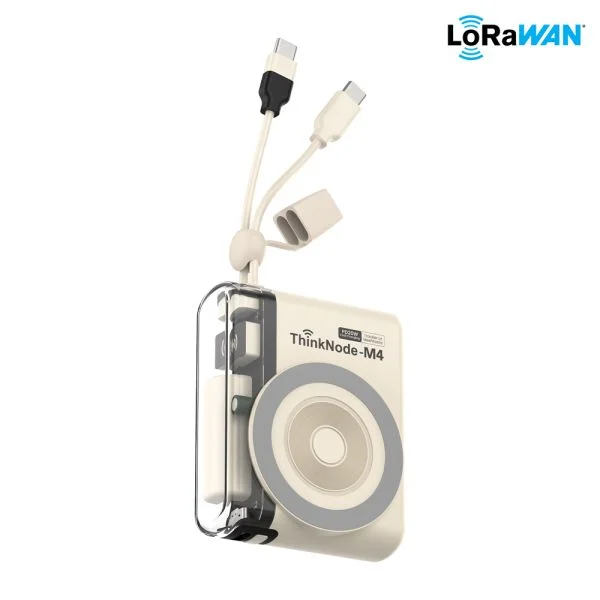
ThinkNode_M4_Power_Bank-LoRa_Device_with_LoRa_Tracker_Function_Powered_By_nRF52840
Model LMM14004D2
Firmware Flash:
Press and hold the function button for 15 seconds to enter flash mode.
Drag the firmware file into the newly created drive letter to complete the firmware update.Firmware location:https://github.com/Elecrow-RD/ThinkNode_M4_Power_Bank_LoRa_Device_with_LoRa_Tracker_Function_Powered_By_nRF52840/tree/master/factory_firmware

Indicator light effects:
| Operation | Light effects | |
|---|---|---|
| Click on the device | 1. Data Information: When the device is woken up in normal mode (active/sleep/standby), you can view its current status and battery level. If the device is connected to the network, it will simultaneously retrieve location and sensor data and upload it. If not connected, it will display the battery level and a “Waiting to Connect” status. 2. Indicator Light Status: (1) Normal Status (<25% Battery): White battery indicator light > LED 1 stays on for 10 seconds > turns off (the one near the temperature and humidity sensor) (2) Normal Status (25%–50% Battery): White battery indicator light > LEDs 1 and 2 stay on for 10 seconds > turn off (3) Normal status (51%–75% battery): White battery indicator lights 1, 2, and 3 remain on for 10 seconds, then turn off (4) Normal status (>75% battery): White battery indicator lights 1, 2, 3, and 4 remain on for 10 seconds, then turn off (5) Powered off/low battery status: None | |
| Double-click the device | 1. Purpose: Double-clicking the device initiates or attempts to join the LoRaWAN network. (Configuration parameters must be pre-programmed into the host computer.) 2. LED Status: (1) Connecting: Blue LED flashes rapidly (1 Hz, alternating) (2) Connection successful: White power LED flashes rapidly (1 Hz, 3 times, 4 LEDs) (3) Connection Failed: Red light flashing rapidly (1 Hz, 3 times) (4) Waiting to Initiate Connection: Blue light breathing (1 Hz, alternating) (5) a. After a failed network join attempt, the device automatically returns to the “Waiting to Initiate Connection” state; b. After a network join is successful, the device enters normal operating mode; | |
| Three Strikes on Equipment | 1. Function: Manually enables/disables the SOS alarm function, retrieves location and sensor data, and uploads the data. 2. Indicator Light Status: The red indicator light flashes in a pattern of three short flashes, three long flashes, and three short flashes (short: 0.1 s; long: 0.3 s). 3. Other: No notification is provided when data is being transmitted. | |
| Press and hold the device for 3 seconds | 1. Power-on Status: The device enters/exits configuration mode. (a. Automatically exits configuration mode and enters normal operating mode after receiving downlink data to complete setup; b. Triggered by long press and hold) 2. Indicator Light Status: Configuration Mode: Blue breathing light (1 Hz, alternating) Configuration Complete: White power indicator light〉Rapid flashing (1 Hz, 3 times, 4 lights) | |
| Press and hold the device for 5 seconds | 1. Power On/Off: The device can only be manually powered on or off while in standby mode. To power on from standby mode, press and hold for 5 seconds; to power on from the off state, press and hold for 5 seconds (triggered by holding down without releasing). 2. Indicator Light Status: Offline Status (<25% battery): White battery light > LED 1 stays on for 10 seconds > turns off, while the blue LED pulses (1 Hz, alternating) Offline status (25%–50% battery): White battery indicator > LEDs 1 and 2 stay on for 10 seconds > turn off, while the blue LED pulses (1 Hz, alternating) Offline status (51%–75% battery): White battery indicator〉1#2#3# steady for 10s〉off, simultaneously blue〉breathing light (1Hz, alternating) Offline state (>75% battery): White battery indicator〉1#2#3#4# steady for 10s〉off, simultaneously blue〉breathing light (1Hz, alternating) Power Off: Red > Rapid flash (2 Hz, 2 times) 3. Other Power can only be manually turned on or off in Standby mode; in Normal mode or Trigger mode, powering off is not permitted. If the device shuts down due to a depleted battery, press and hold the power button for 5 seconds while charging to turn it on and enter the pre-network connection state | |
| Press and hold the device for 15 seconds | Connect the device to the serial port and press and hold the function key for 15 seconds to enter programming mode. |
Flash the firmware
| 1. Enter programming mode by pressing and holding the reset button for 15 seconds. | A drive labeled “ThinkNodeM4” will appear on your computer; drag the firmware you want to flash into it. |
|---|---|
| \ | \ |
Practical Configuration Guide
1.Adding a ThinkNode-M4 Device via the ThinkNode-M4 Web Interface
1.1 Connect the ThinkNode-M4 charging cable: Plug the USB-C end of the cable into the Type-C port on the ThinkNode-M4, and plug the other end into a USB-A port on your computer.

Download the program from the following link: https://github.com/Elecrow-RD/ThinkNode_M4_Power_Bank_LoRa_Device_with_LoRa_Tracker_Function_Powered_By_nRF52840/tree/master/ThinkNode-Tracker-Host%20PC
Double-click the ThinkNode-Tracker executable file, as shown in the figure.


1.4 Click the “Refresh” button to refresh the screen, then click the “Open Serial Port” button to open the serial port. The print window will then display real-time device status information. Select the frequency bands supported in your region based on your actual situation.

1.5 Click the “RTC Time Calibration” button to calibrate the RTC clock. If the message “RTC time calibration successful” appears in the interface's print window, the calibration was successful. Minimize the ThinkNode-M4 serial configuration window.

1.6 Go to https://web.thinknode.cc/ to register an account and log in.

1.7 Select “Tracker Overview,” click the “Add Tracker” button to add a tracker, and then click the “Click Here” button to proceed with the specific steps.
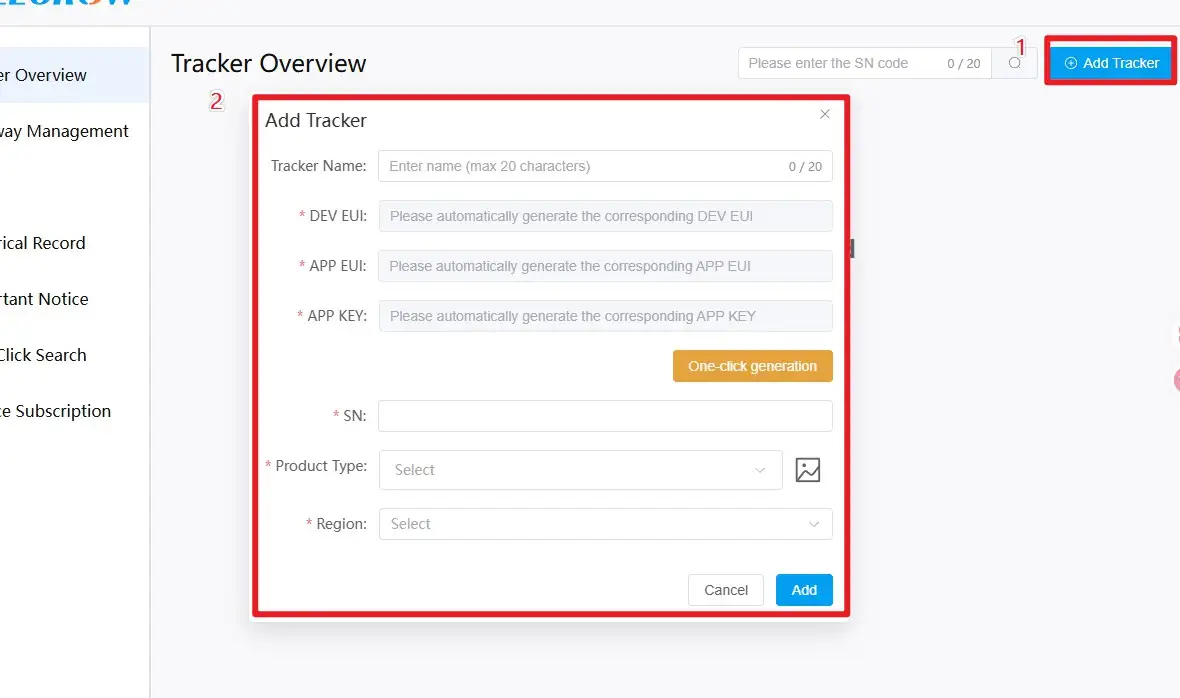
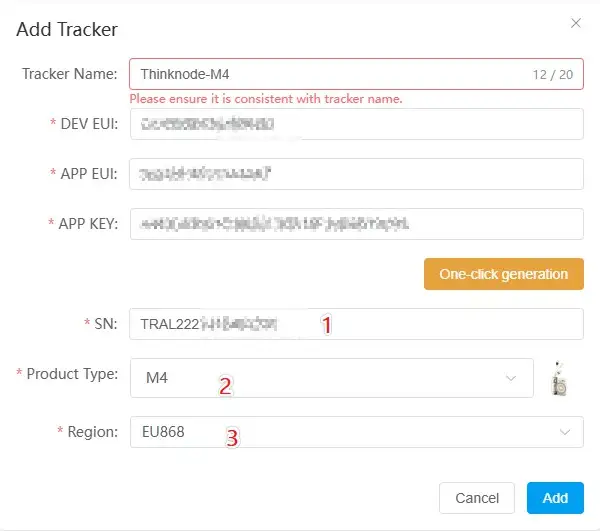
1.8 Click the “One-click generation” button, then click the “Confirm” button to generate the DEV EUI, APP EUI, and APP KEY with a single click.

1.9 Customize the tracker name, enter the SN code(Check the SN code printed on the front of the device) located on the back of the ThinkNode-M4 device, select the region(Set to 868 or 915 depending on actual usage), and click the “Add” button to successfully add the tracker information to the webpage.
1.10 After successful addition, click the “Details” button on the page.

1.11 Copy the automatically generated DEV EUI, APP EUI, and APP KEY into the corresponding fields in the ThinkNode-M4 serial configuration window (make sure there are no spaces when copying), then click the “Settings” button to write the data to the device.
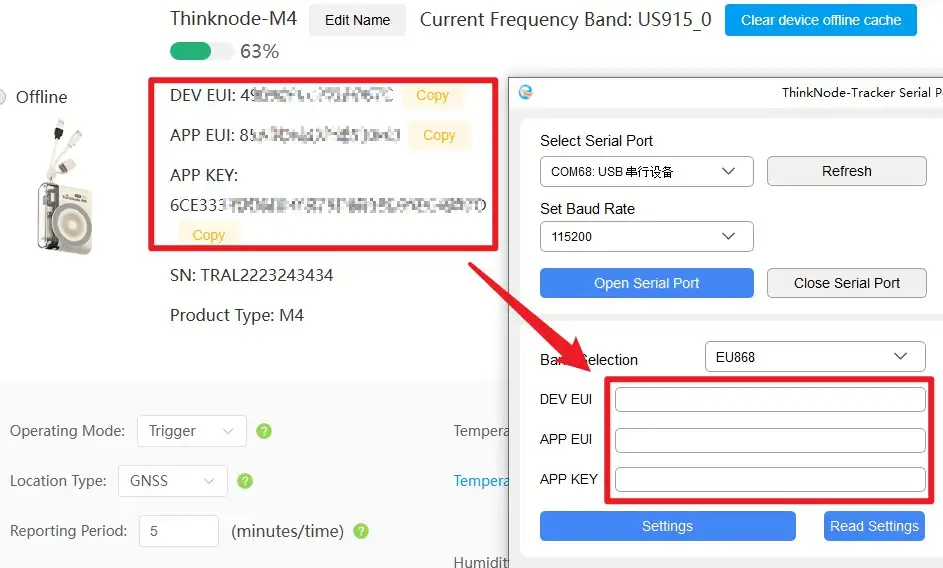
1.12 When the print window displays the information shown in the figure below, the data has been successfully written. Minimize the ThinkNode-M4 serial configuration window.

2.Configure the gateway via the web interface (this demonstration uses the ThinkNode-G1 EU868
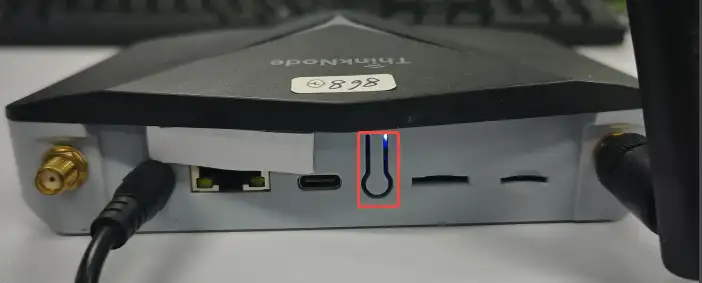
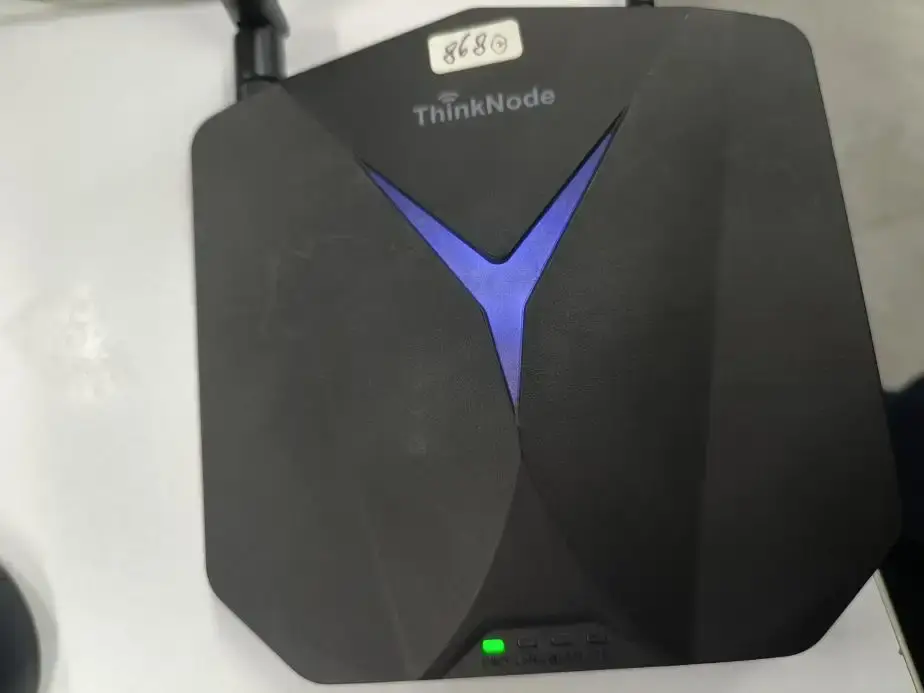
2.1 Charge the gateway. The “Y”-shaped indicator light on top of the gateway will slowly flash green. Wait 90 seconds, then press and hold the button shown in the figure below for 5 seconds. The “Y”-shaped indicator light on top of the gateway will slowly flash blue, indicating that the gateway has entered configuration mode. (Note: The gateway’s frequency band must correspond to the selected region and frequency band.)
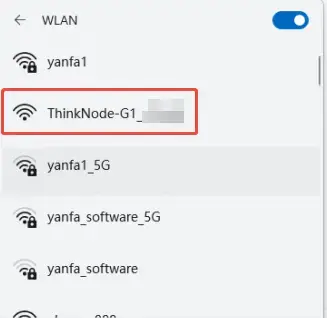
2.2 Connect to the gateway’s Wi-Fi.
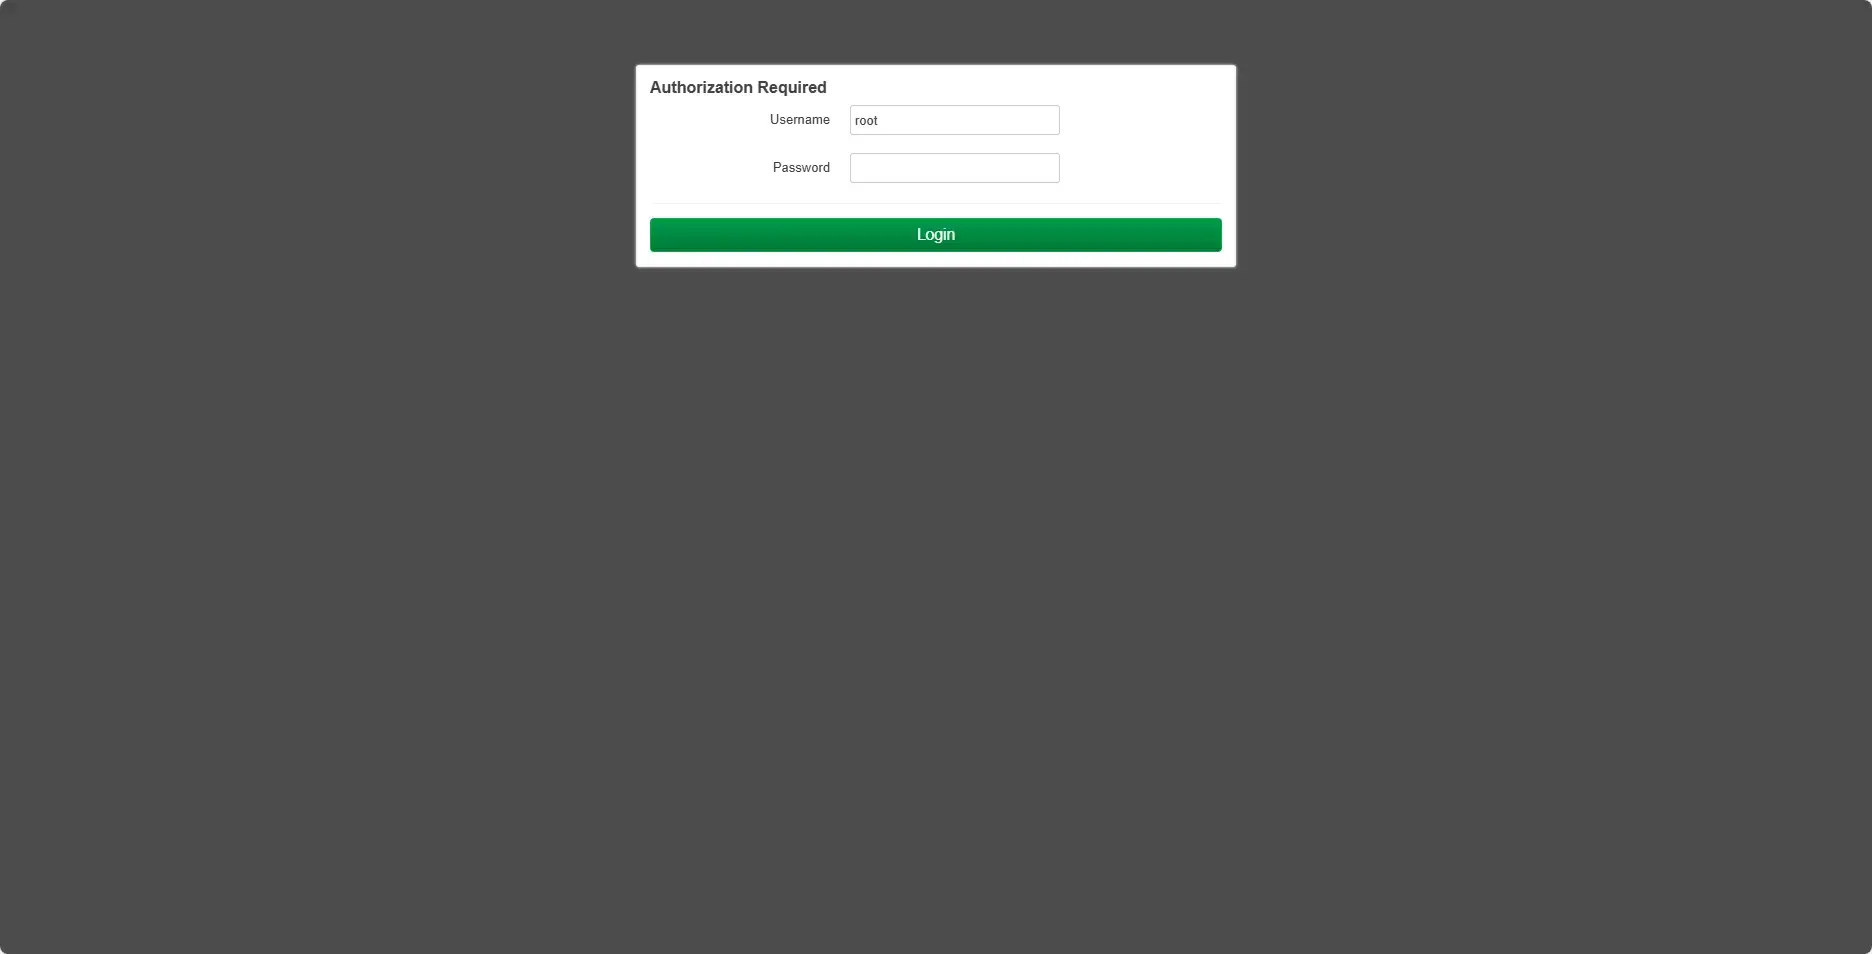
2.3 Enter the URL 192.168.1.1 in your browser (this URL remains fixed), then enter the username and password; by default, both are “root.” (Note: You can only access this URL after successfully connecting to the gateway’s Wi-Fi.)
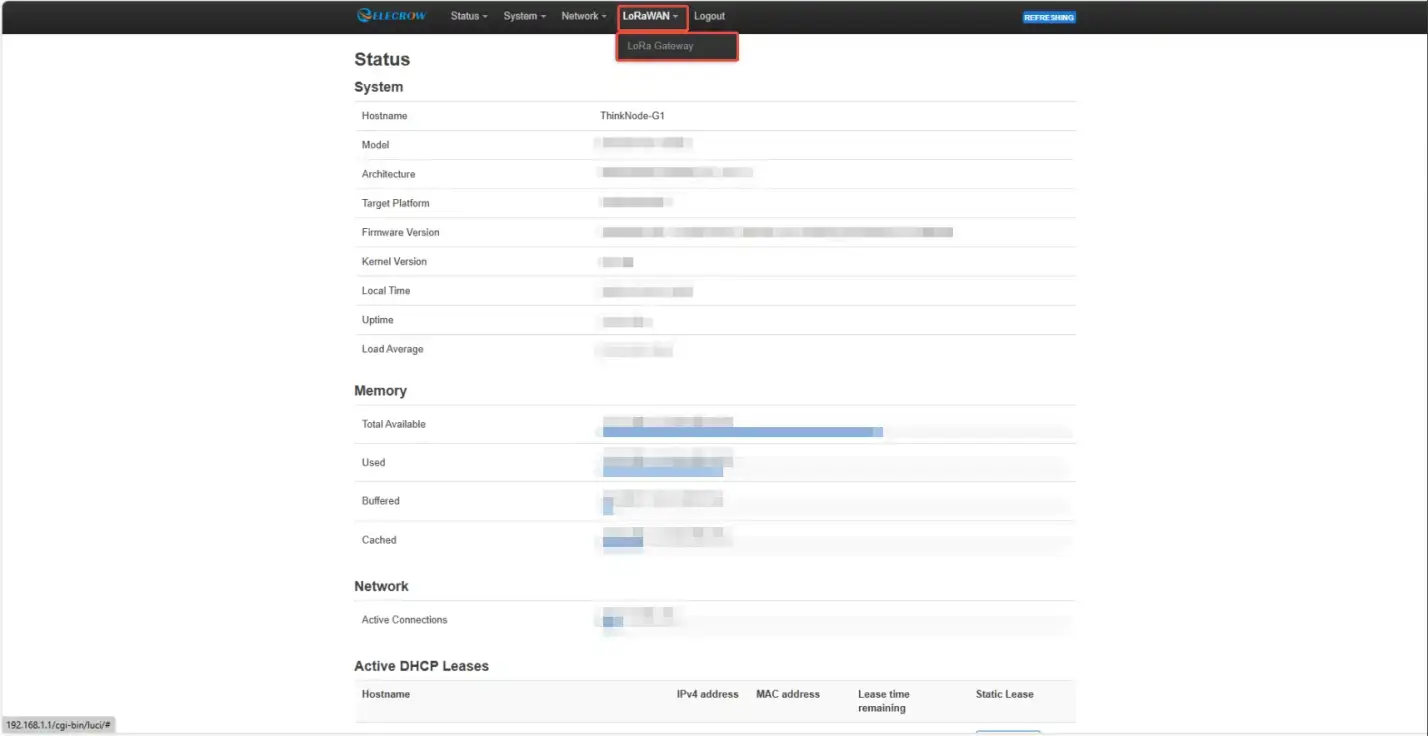
2.4 Select “LoRaWAN” and click the “LoRa Gateway” button.
2.5 Select a connection method (choose one based on your actual situation)
2.5.1 Ethernet connection:
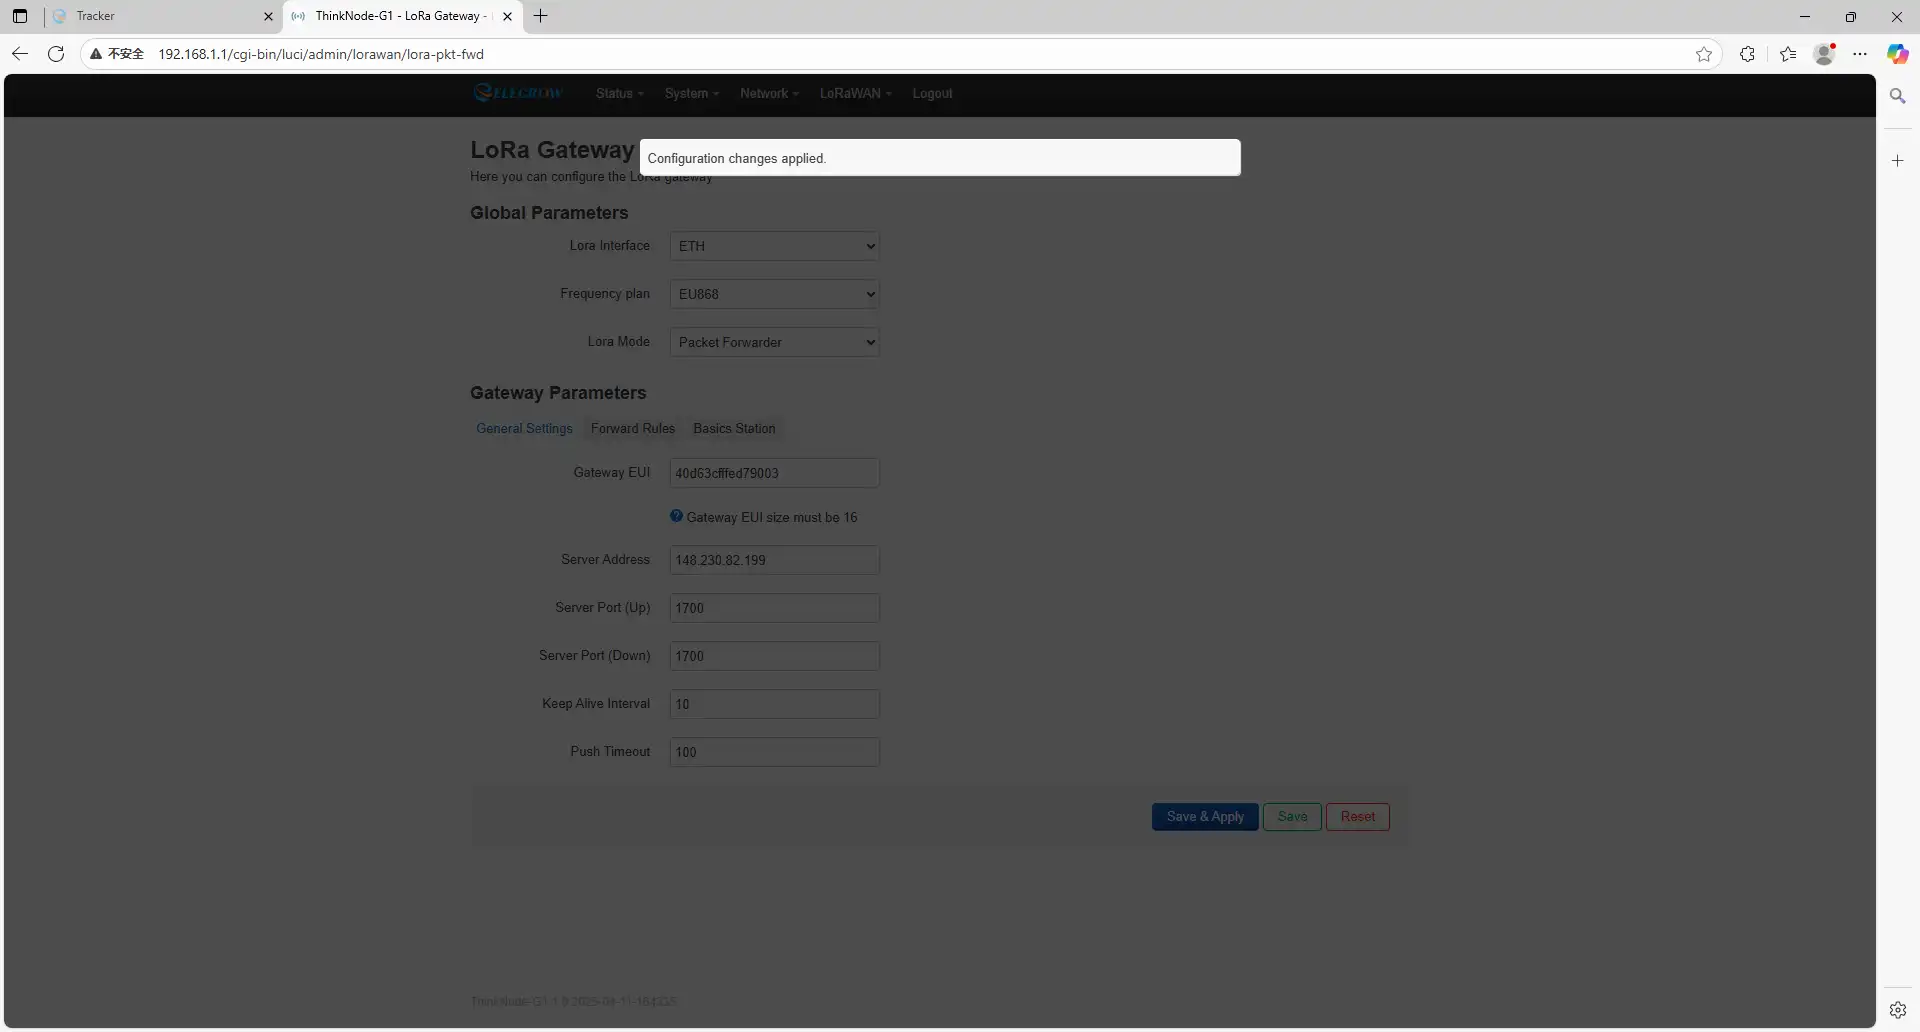
2.5.1.1 If you select the Ethernet connection method, choose “ETH” for “Lora Interface” and “EU868” for “Frequency plan” (select the corresponding band based on your actual situation). The Gateway EUI will be randomly generated (users may also set it manually, but a previously bound string cannot be reused unless the corresponding gateway information is deleted on the ThinkNode-M4 web page; it will become available again the next day). Copy this string for subsequent operations. The Server Address is fixed at 148.230.82.199. If your Server Address differs from this, manually change it to 148.230.82.199. Leave other settings at their defaults, then click the “Save & Apply” button to save and apply the changes.

2.5.1.2 Wait for configuration.
2.5.1.3 Configuration successful. Then connect the Ethernet cable to the gateway. Wait for the gateway’s LoRa indicator light to turn green.

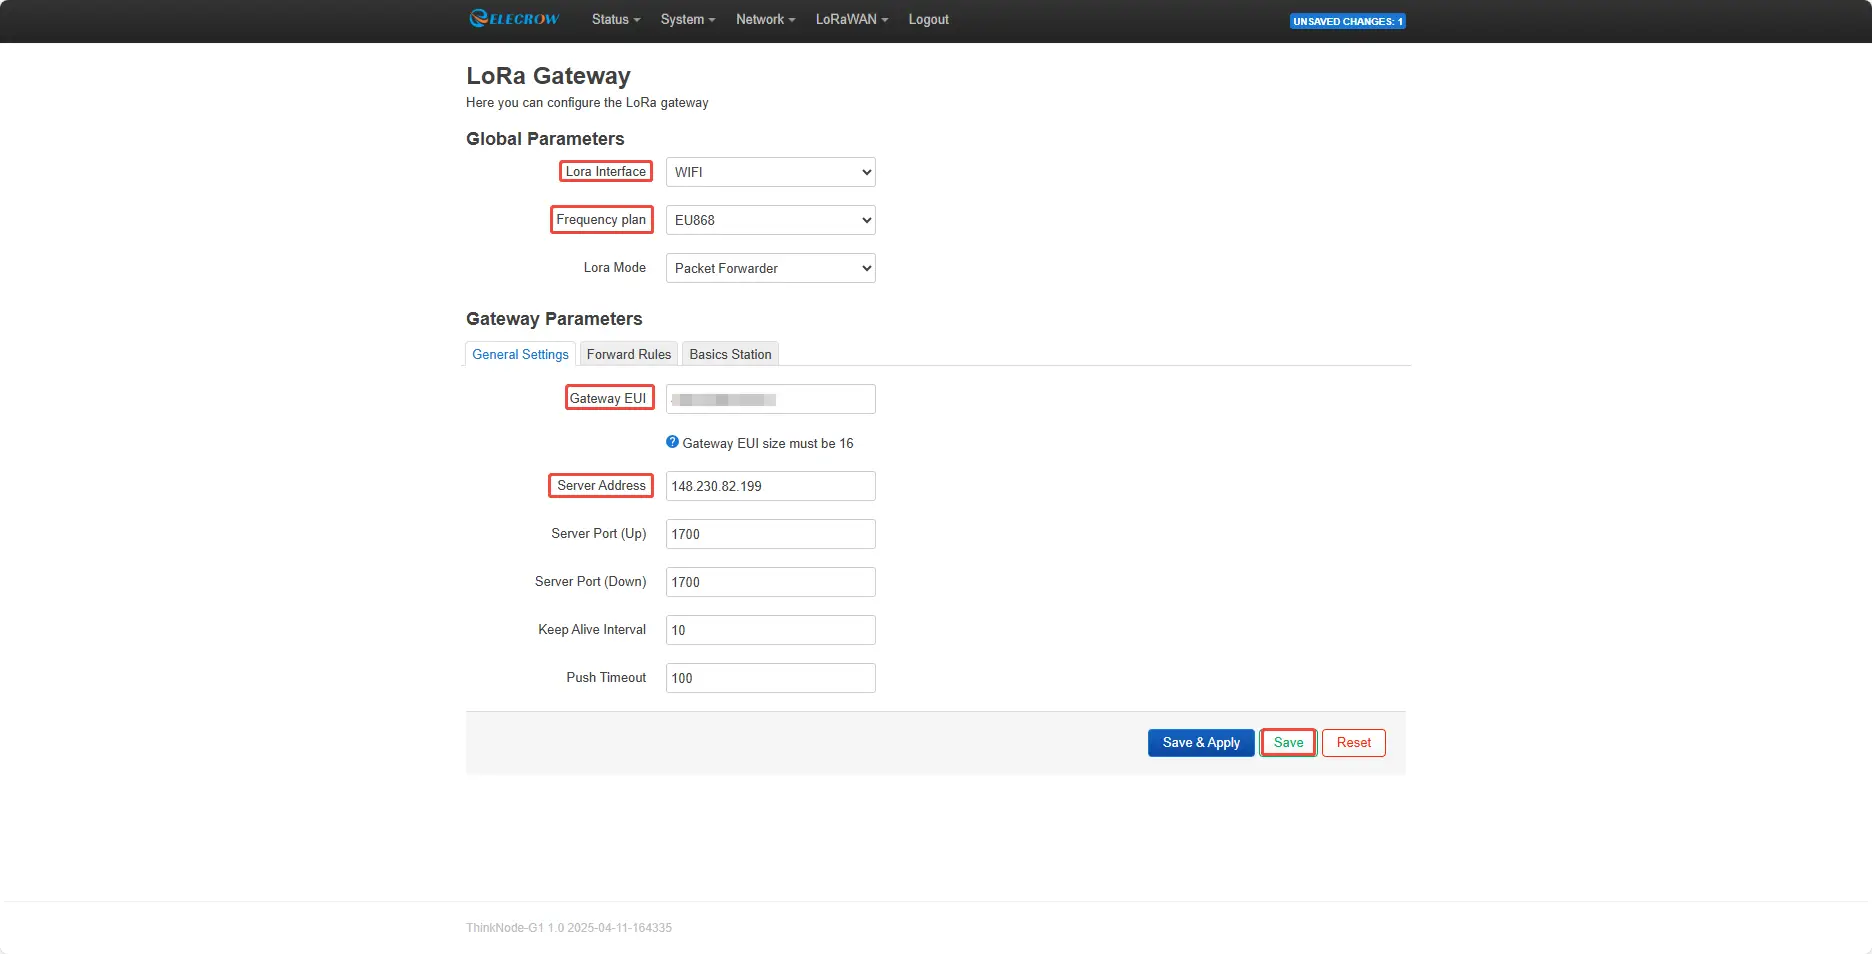
2.5.2 Wi-Fi Connection: 2.5.2.1 If you choose the Wi-Fi connection method, select “WIFI” under “LoRa Interface” and “EU868” under “Frequency Plan” (select the appropriate frequency band based on your actual situation). The Gateway EUI will be randomly generated (users may also set it manually, but once bound, the string cannot be reused unless the corresponding gateway information is deleted on the ThinkNode-M4 web interface, in which case it can be reused). Copy this string for subsequent operations. The Server Address is fixed at 148.230.82.199. If your Server Address differs from this
2.5.2.2 Select “Network” ,then click “Wireless”.

2.5.2.3 Click “Scan” to scan for available networks.

2.5.2.4 Select the network you want to connect to, click the “Join Network” button, enter the password to connect, click “Submit” to submit the information, and click “Save” to save the network details.


2.5.2.5 Click “Save & Apply” to proceed with the gateway configuration.

2.5.2.6 Wait for the configuration to complete.

2.5.2.7 Configuration successful. Wait for the gateway’s LoRa indicator light to turn green.

3.Adding a Gateway via the ThinkNode-M4 Web Interface
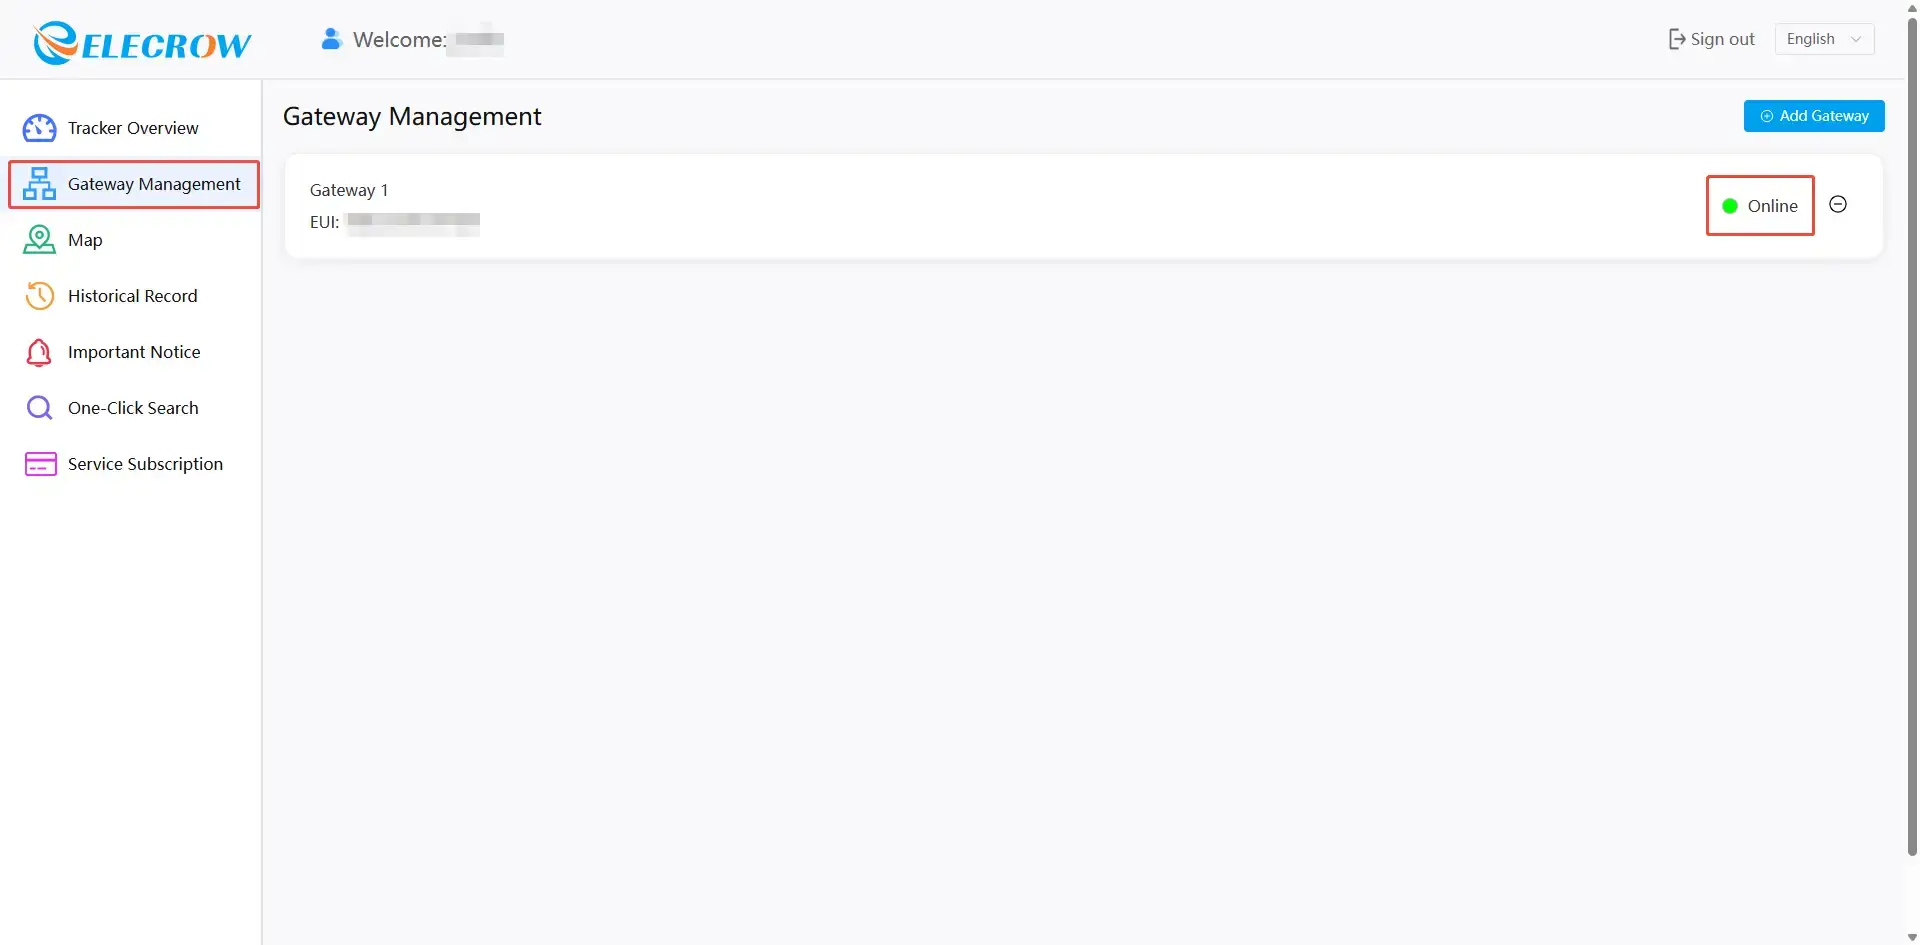
3.1 Switch to a network with internet access (for Ethernet connections, select any available network; for Wi-Fi connections, select the Wi-Fi network saved in the gateway’s web interface), then return to the website: https://web.thinknode.cc/, select “Gateway Management,” click the “Add Gateway” button, enter the previously copied string in the Gateway EUI field, customize the gateway name, select the region, and click the “Add” button to add the gateway information to the web interface.

3.2 Refresh the page; the gateway status should now display “Online,” indicating that the gateway has been successfully configured.
4. ThinkNode-M4 Network Registration
4.1 Press and hold the button on the ThinkNode-M4 device for 5 seconds to turn it on. The green indicator light will then flash in a pattern of “on for 2 seconds, off for 1 second,” indicating that the ThinkNode-M4 device has successfully powered on. Once the device is on, press the button twice to start the network configuration. At this point, the blue light will flash rapidly (1 Hz, back and forth). The blue LED will then turn off, indicating that network registration was successful.
4.2 Select “Tracker Overview.” The tracker status will now display as “Online.” Click the “Details” button, set “Operating Mode” to “Normal”or"Trigger"(Trigger mode, with a reporting interval of 1 minute, is slightly faster than Normal mode.), and wait for the page to refresh. Information such as battery level will then appear.

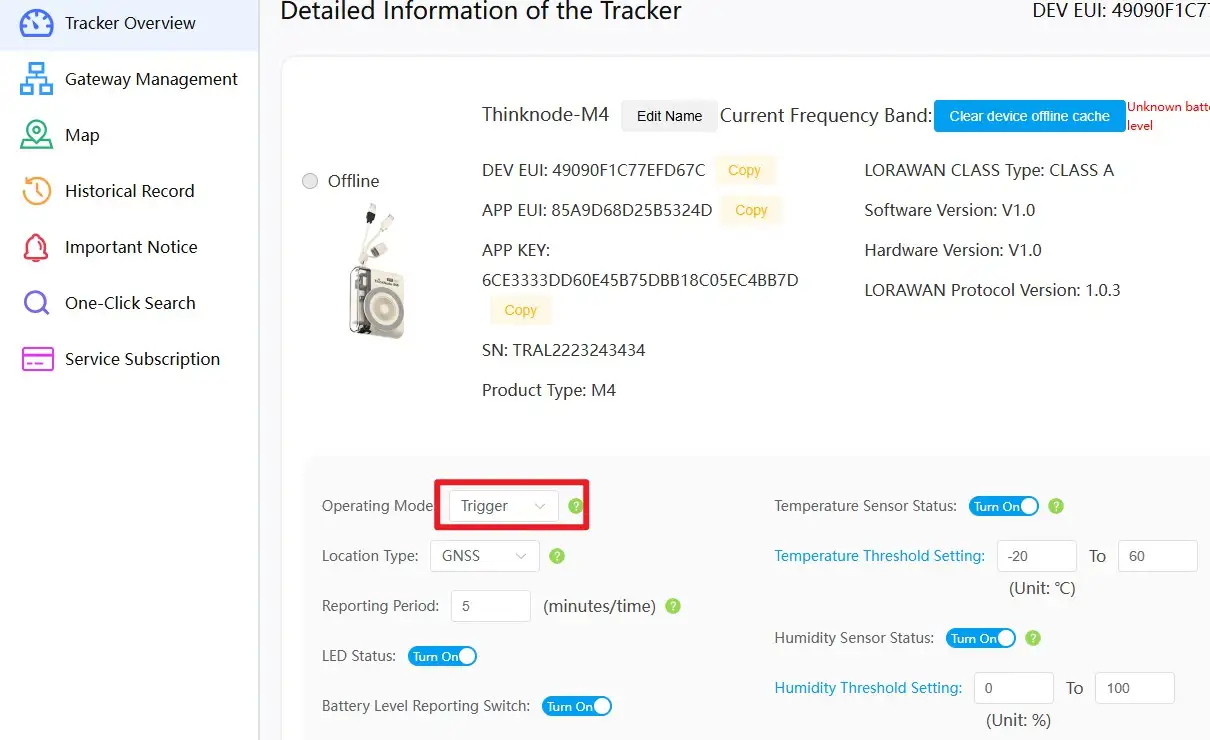
Mode Selection: Three modes—Standby, Normal, and Trigger.
(1) Standby Mode: The default factory setting. No usage parameters have been configured; only power on/off operations are available.
(2) Normal Mode: The standard operating state. Functions include tracking and positioning, viewing trajectories, and viewing sensor data reports.
(3) Trigger Mode: Monitors specific parameters by setting sensor thresholds and triggers sensor data reporting.
Configuration is complete, and you can now use the tracker’s functions normally.
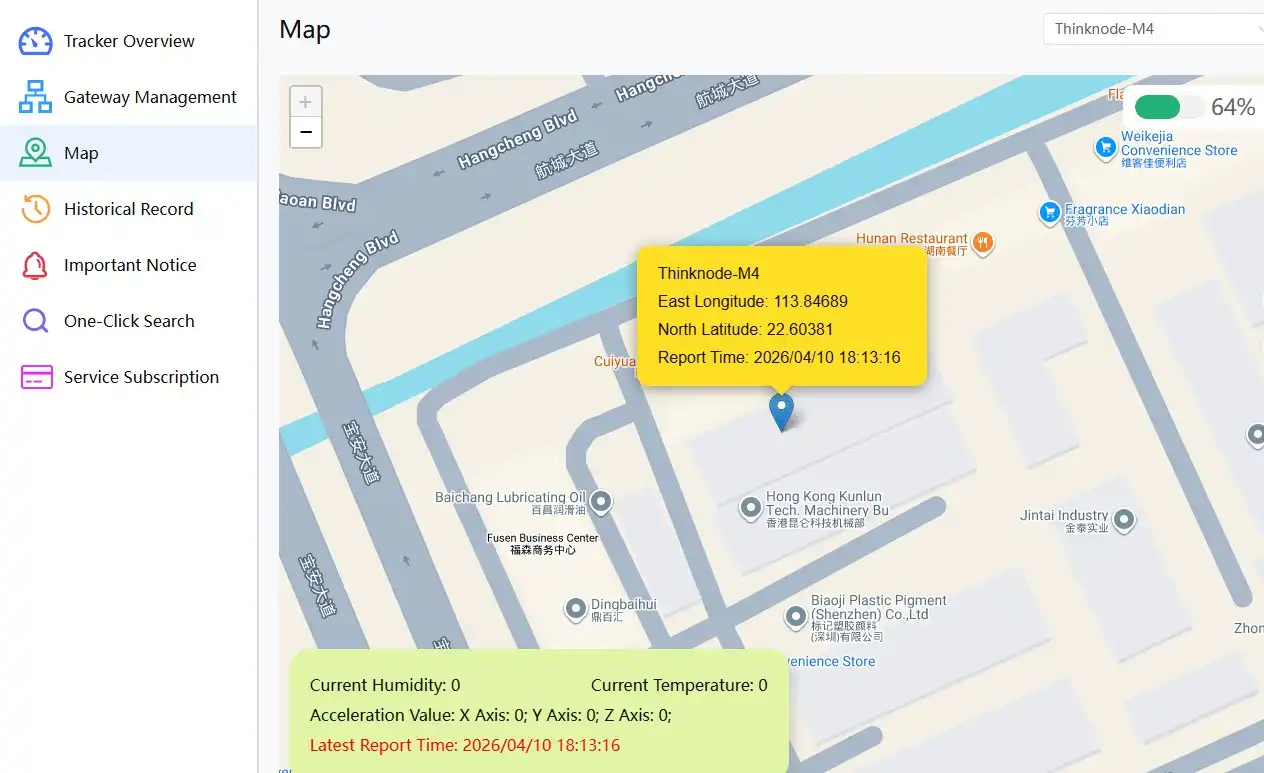
1,The map display shows the device's location, battery level, temperature, humidity, and other information.
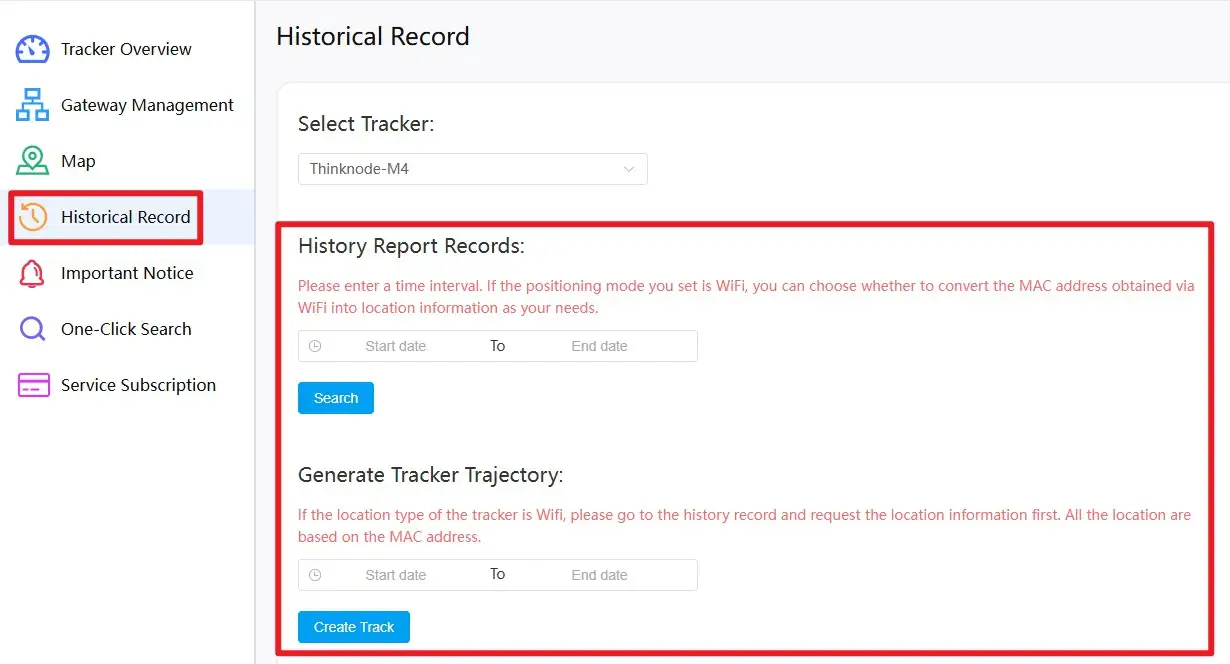
2,The history log can be used to print historical reports and generate tracking records.
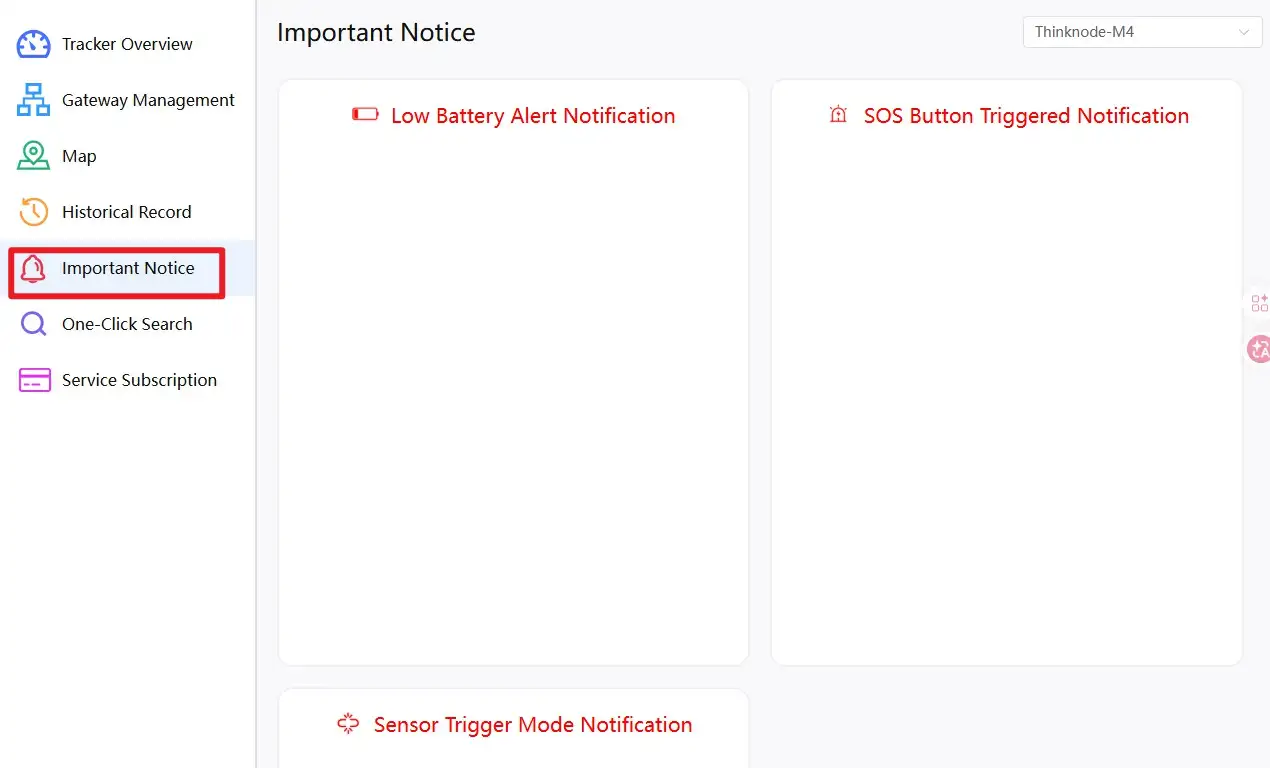
3,The Important Notices page displays various alerts and other information.
How to buy
Please visit this page to purchase ThinkNode M4 lorawan Tracker.
Support
If you have any problem about how to use it, you can connect to us at the bottom-right of bazzer or contact to techsupport@elecrow.com to get technology support.