Infrared Thermometer MLX90614 Breakout Board
Description
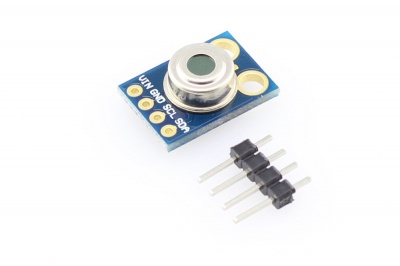
This is a MELEXIS MLX90614ESF-BAA-000-TU-ND non-contact infrared thermometer for use with Arduino, or any microcontroller that can communicate with it through it's I2C interface.
Model:SPM90614S
Features
- Small size, low cost
- Mounted on a breakout board with two types of pins
- 10k Pull up resistors for the I2C interface with optional solder jumpers
- Easy to integrate
- Factory calibrated in wide temperature range:-40…+125°C for sensor temperature and -70…+380°C for object temperature.
- High accuracy of 0.5°C over wide temperaturerange (0…+50°C for both Ta and To) High (medical) accuracy calibration
- Measurement resolution of 0.02°C
- Single and dual zone versions
- SMBus compatible digital interface
- Customizable PWM output for continuousreading
- Simple adaptation for 8-16V applications
- Sleep mode for reduced power consumption
- Different package options for applications andmeasurements versatility
Application Ideas
- High precision non-contact temperature measurements
- Thermal Comfort sensor for Mobile AirConditioning control system
- Temperature sensing element for residential,commercial and industrial building airconditioning
- Windshield defogging
- Automotive blind angle detection
- Industrial temperature control of moving parts
- Temperature control in printers and copiers
- Home appliances with temperature control
- Healthcare
- Livestock monitoring
- Movement detection
- Multiple zone temperature control – up to 127sensors can be read via common 2 wires
- Thermal relay / alert
- Body temperature measurement
Usage
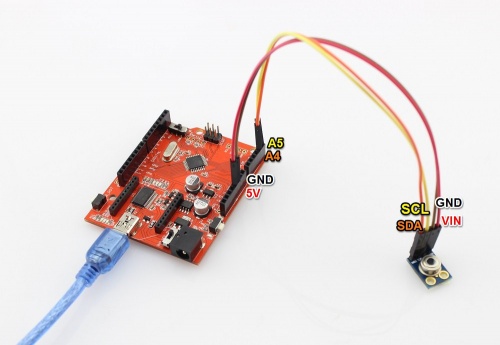
1. Hardware Installation
2.Download the library File:MLX90614 Library
3.Unzip it into the libraries file of Arduino IDE by the path: ..\arduino-1.0\libraries.
4.Open the code directly by the path:File -> Example ->MLS90614.
#include <i2cmaster.h>
void setup(){
    Serial.begin(9600);
    Serial.println("Setup...");

    i2c_init(); //Initialise the i2c bus
    PORTC = (1 << PORTC4) | (1 << PORTC5);//enable pullups
}

void loop(){
    int dev = 0x5A<<1;
    int data_low = 0;
    int data_high = 0;
    int pec = 0;

    i2c_start_wait(dev+I2C_WRITE);
    i2c_write(0x07);

    // read
    i2c_rep_start(dev+I2C_READ);
    data_low = i2c_readAck(); //Read 1 byte and then send ack
    data_high = i2c_readAck(); //Read 1 byte and then send ack
    pec = i2c_readNak();
    i2c_stop();

    //This converts high and low bytes together and processes temperature, MSB is a error bit and is ignored for temps
    double tempFactor = 0.02; // 0.02 degrees per LSB (measurement resolution of the MLX90614)
    double tempData = 0x0000; // zero out the data
    int frac; // data past the decimal point

    // This masks off the error bit of the high byte, then moves it left 8 bits and adds the low byte.
    tempData = (double)(((data_high & 0x007F) << 8) + data_low);
    tempData = (tempData * tempFactor)-0.01;

    float celcius = tempData - 273.15;
    float fahrenheit = (celcius*1.8) + 32;

    Serial.print("Celcius: ");
    Serial.println(celcius);

    Serial.print("Fahrenheit: ");
    Serial.println(fahrenheit);

    delay(1000); // wait a second before printing again
}
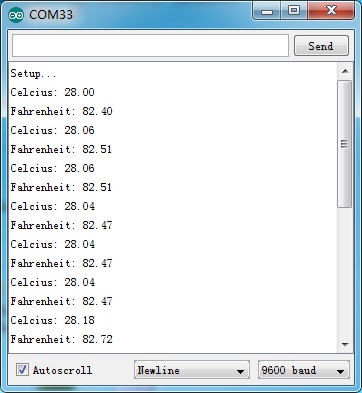
5.Upload the code,then open the serial monitor to see the result.


