Capacitive Touch Shield
Introduction
The MPR121 is a capacitive touch sensor controller that makes it very easy to integrate capacitive touch sensing into your project. It communicates via I2C, and works by measuring the capacitance of twelve electrode points. When an object comes close to the electrode connector, the measured capacitance changes. This signals the MPR121 that something has touched a 'button'.
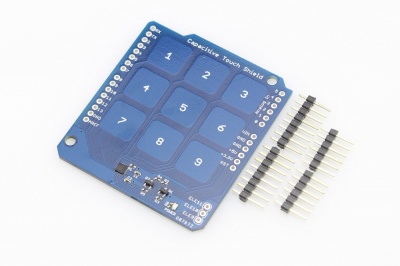
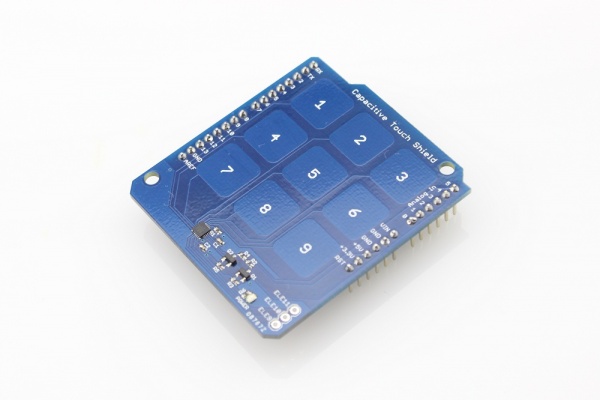
This Capacitive Touch Shield has 9 build-on capacitive touch pads, and the other 3 electrode for further usage. With this shield you can have a total of 12 touch sensitive buttons. . Compares to other touch shield that using digital pins, this shield uses less pins, which allows more pins left for other usage.
Model: AS00121CTH
Features
- 12 Channels totally
- Build-On 9 keypad, 3 reserved pins for external usage
- Power status indicator
- I2C Communication, use less Arduino pins
- Dimensions(mm):60.0(L)x53.5(W)x2.8(H)
Basic Knowledge
- please skit over this prograph if you do not interested on this, it do not your usage on this capacitive Touch Shield
How to Sense the "Touch"
The MPR121 measures the capacitance changes that between the pins and "ground" to detect the human touch. The complete capacitance measurement system is composed by sensing electrode pads connected to MPR121 sensing inputs, and the MPR121 communicating with the host processor via I2C bus and interrupt output .
The capacitance measured on each sensing channel is the total capacitance to ground which can be the combination of background parasitic capacitance to ground(Cb) and finger touch induced capacitance to ground(Cx). The MPR121 uses a constant DC charge current scheme for capacitance measurement. Each channel is charged and then discharged completely to ground periodically to measure the capacitance. All the channels are measured sequentially, when one channel is in the charge/discharge and measurement period the other channels are shorted to ground.
The amount of charge(Q)applied is programmable by setting the charge current(I), And the charge time(T). Once the electrode is charged, the peak voltage(V)at the end of chage is measured by internal 10 bit ADC. This voltage V is reverse proportional to the capatance(C)on the sensing channel.
That is, If charge the outside cap with a some value of current(I) and time(T), and get the voltage(V), We can get the value of captance, using this way.
How the mpr121 measures the capacitance and calibrate
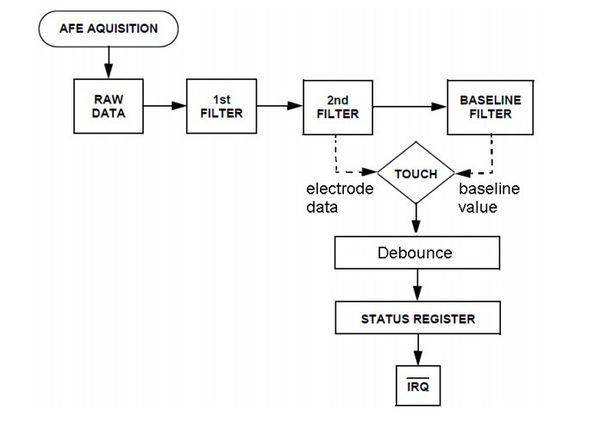
The ADC raw data outputs run through 3 levels of digital filtering to filter out the high frequency and low frequency noise encountered. The first level filter is a simple running average filter, the second level filter result is 10bit and stored in the output data registers as the immediate capacitance of each sensing input, the third level filter result is an even lower frequency content of signal change using the second level filter output, mainly used as the baseline value representing the capacitance variation over the long term and slow environment change such as atmospheric moisture and dirt for touch detection.
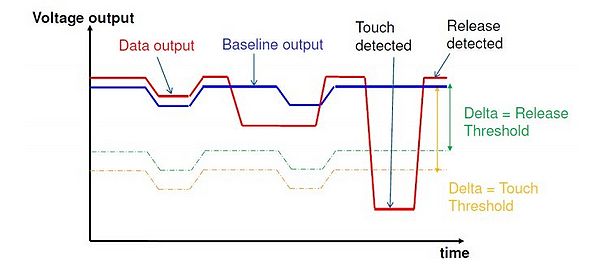
Touch and release is determined by comparing the immediate capacitance deviation that is the electrode second level filtered output data deviation to the baseline value. If the deviation passed the setting threshold, then a touch or release status is detected and reported in the status register. The touch and release threshold are independent and individually programmable for each electrode, providing hysteresis and electrode independence. Debounce setting can be used for further noise filtering to provide glitch free touch and release detection.
Usage
1.Hardware connection
All the header pins are not soldered, so you can solder them by yourself to use it as Arduino “Shield”, or just solder the necessary pins(Power/GND/I2C/IRQ) to make this board more easy to implement anywhere. There are 9 pads on the touch shield, the pad name connect with the MPR121 with :
<i><b>Pad Name<---> MPR121 Pin</b></i>
    1<--->ELE8
    2<--->ELE5
    3<--->ELE2
    4<--->ELE7
    5<--->ELE4
    6<--->ELE1
    7<--->ELE6
    8<--->ELE3
    9<--->ELE0
And the ELE9~11 can be use for external usage. you can use any mental material you’ve chosen to use as your electrode.
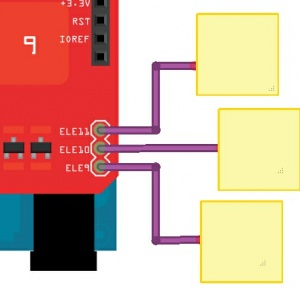
The Touch Shield uses I2C to communicate with controller. An IRQ(D2) was used to report the controller there is a "Touch" happened.
2.Download the Touch Shield demo code
3.Unzip it into the libraries file of Arduino IDE by the path: ..\arduino-1.0\libraries.
4.Open the code directly by the path:File -> Example ->Touch_Shield_Example.
#include "mpr121.h"
#include "i2c.h"

// 11 max digits used
#define DIGITS 11

// Match key inputs with electrode numbers
#define ONE 8
#define TWO 5
#define THREE 2
#define FOUR 7
#define FIVE 4
#define SIX 1
#define SEVEN 6
#define EIGHT 3
#define NINE 0

//extras (not used)
#define ELE9 9
#define ELE10 10
#define ELE11 11

//interupt pin
int irqpin = 2;  // D2

void setup()
{
  //make sure the interrupt pin is an input and pulled high
  pinMode(irqpin, INPUT);
  digitalWrite(irqpin, HIGH);

  //configure serial out
  Serial.begin(9600);

  //output on ADC4 (PC4, SDA)
  DDRC |= 0b00010011;
  // Pull-ups on I2C Bus
  PORTC = 0b00110000;
  // initalize I2C bus. Wiring lib not used.
  i2cInit();

  delay(100);
  // initialize mpr121
  mpr121QuickConfig();

  // Create and interrupt to trigger when a button
  // is hit, the IRQ pin goes low, and the function getNumber is run.
  attachInterrupt(0,getNumber,LOW);

  // prints 'Ready...' when you can start hitting numbers
  Serial.println("Ready...");
}

void loop()
{
  //You can put additional code here. The interrupt will run in the backgound.
}

void getNumber()
{
  int i = 0;
  int touchNumber = 0;
  uint16_t touchstatus;
  char digits[DIGITS];

  touchstatus = mpr121Read(0x01) << 8;
  touchstatus |= mpr121Read(0x00);

  for (int j=0; j<12; j++)  // Check how many electrodes were pressed
  {
    if ((touchstatus & (1<<j)))
      touchNumber++;
  }

  if (touchNumber == 1)
  {
    if (touchstatus & (1<<SEVEN))
      digits[i] = '7';
    else if (touchstatus & (1<<FOUR))
      digits[i] = '4';
    else if (touchstatus & (1<<ONE))
      digits[i] = '1';
    else if (touchstatus & (1<<EIGHT))
      digits[i] = '8';
    else if (touchstatus & (1<<FIVE))
      digits[i] = '5';
    else if (touchstatus & (1<<TWO))
      digits[i] = '2';
    else if (touchstatus & (1<<NINE))
      digits[i] = '9';
    else if (touchstatus & (1<<SIX))
      digits[i] = '6';
    else if (touchstatus & (1<<THREE))
      digits[i] = '3';

    Serial.print(digits[i]);
    i++;
  }
  //do nothing if more than one button is pressed
  else if (touchNumber == 0)
    ;
  else
    ;
}
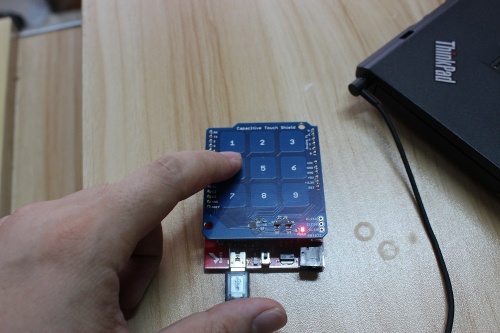
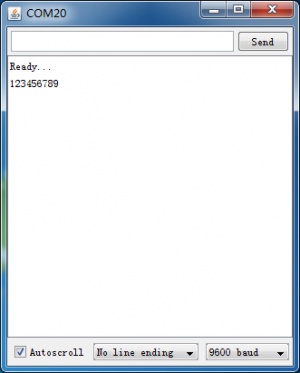
5.Uplaod the code, then touch the pad on the shield, you will see outputs as below:
6.If you want to use the extern 3 pins, add the follows codes in the if (touchNumber == 1) function in the loop()
   else if (touchstatus & (1 << ELE9))
{
  digits = 'A';
}
else if (touchstatus & (1 << ELE10))
{
 digits = 'B';
}
else if (touchstatus & (1 << ELE11))
{
 digits = 'C';
}
If your IRQ was used for other modules and you do not want to use the IRQ, you can also inquery the toush status with about 100ms interval, you can take a reference of Touch Shield with no IRQ.zip
