Joystick Shield
Introduction
The Joystick Shield enable your Arduino with a joystick! The shield sits on top of your Arduino and turns it into a simple controller. Five momentary push buttons (4+ joystick select button) and a two-axis thumb joystick gives your Arduino functionality on the level of old Nintendo controllers.
This shield is a great piece of uer interface board, it is perfect for gaming and navigating through menu quickly. It has headers for LCDs and RF modules , to communicating and displays easily.
Model: ACS77312JS

Features
Dimensions(mm):86.5(L)x53.0(W)x40.0(H)
Application Ideas
- Joystick Game
- Greedy Freak
Pin definition and Rating
KEY Button Define
| Pin | # | KEY |
|---|---|---|
| D0(RX) | 0 | NULL |
| D1(TX) | 1 | NULL |
| D2 | 2 | KEY A |
| D3 | 3 | KEY B |
| D4 | 4 | KEY C |
| D5 | 5 | KEY D |
| D6 | 6 | KEY E |
| D7 | 7 | KEY F |
| D8 | 8 | KEY Down |
Nokoia 5110 LCD
| Pin | # | KEY |
|---|---|---|
| D9 | 9 | SCLK |
| D10 | 10 | CSN |
| D11 | 11 | D/C |
| D12 | 12 | RST |
| D13 | 13 | SCE |
nRF24L01
| Pin | # | KEY |
|---|---|---|
| D9 | 9 | SCE |
| D10 | 10 | CSN |
| D11 | 11 | SCK |
| D12 | 12 | MOSI |
| D13 | 13 | MISO |
Usage
Hardware Installation
Plug JoyStick shield onto the Arduino/Crowduino. Connect the board to PC using USB cable. 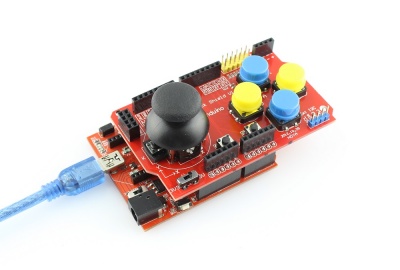
Programming
1.Copy the demo code to your sketch, then upload to Arduino or Crowduino board.
int FirstShotX , FirstShotY;
void setup()
{
    for(int i=2; i<9; i++)
   {
    pinMode(i, INPUT);
    digitalWrite(i, 1);
    }
    Serial.begin(9600);
    FirstShotX = 0;
    FirstShotY = 0;
}
void loop()
{
    int i, someInt, flag = 0;
    for(i=2; i<9; i++)
    {
        someInt = digitalRead(i);
        if(someInt == 0)
        {
             flag =1;
             break;
         }
     }
     if(flag == 1)
     {
          switch(i)
          {
              case 2: Serial.println("--------> Button A"); break;
              case 3: Serial.println("--------> Button B"); break;
              case 4: Serial.println("--------> Button C"); break;
              case 5: Serial.println("--------> Button D"); break;
              case 6: Serial.println("--------> Button E"); break;
              case 7: Serial.println("--------> Button F"); break;
              case 8: Serial.println("--------> Button KEY"); break;
              default: break;
           }
           flag=0;
        }
       int sensorValue = analogRead(A0);
       if(FirstShotX == 0)
       {
            FirstShotX = sensorValue;
            Serial.print("FirstShotX = ");
            Serial.println(FirstShotX);
       }
       Serial.print("X = ");
       Serial.println(sensorValue - FirstShotX);
       sensorValue = analogRead(A1);
       if(FirstShotY == 0)
       {
             FirstShotY = sensorValue;
             Serial.print("FirstShotY = ");
             Serial.println(FirstShotY);
        }
         Serial.print("Y = ");
         Serial.println(sensorValue - FirstShotY);
         delay(200);
}
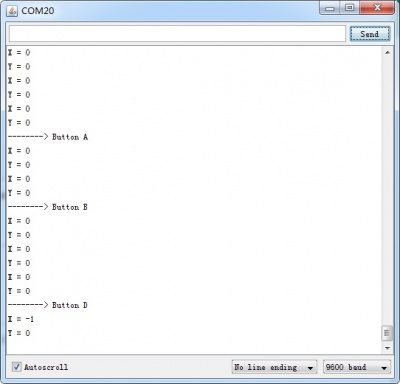
2.Open the serial monitor. Control the JoyStich Shield,you should see some data from you control.