5inch HD Touch Display-D 1024*600 IPS Screen Compatible with Raspberry Pi/BB Black, etc
Description
5inch IPS HD Raspberry Pi Display
This 5-inch HD display features an IPS panel with a native resolution of 1024×600 and supports 1080P signal input via intelligent scaling, delivering a rich and realistic visual experience. The screen utilizes a 5-point capacitive touch solution, enabling driverless touch control via USB, providing a smooth and responsive operating experience on Windows and various development platforms. The device also supports USB dimming and has an FPC flexible cable expansion interface, facilitating diverse installation and application scenarios.
This 5-inch screen is equipped with an OSD menu, allowing easy adjustment of parameters such as brightness and contrast. Its excellent compatibility fully supports Raspberry Pi series development boards (compatible with Raspbian/Ubuntu/Win10 IoT systems, supporting multi-touch, driverless), perfectly matching the entire Windows 7 to 11 operating system series (achieving five-point touch, driverless), and can also connect to mainstream gaming devices such as PS4 and Xbox. It comes with an acrylic stand, and mounting holes on the back of the screen allow direct connection of the Raspberry Pi board to the display. The 5-inch screen has passed multiple international certifications, including CE and RoHS, ensuring stable and reliable performance in applications such as development and debugging, industrial control, and multimedia entertainment.
OEM customization requests can be discussed for projects.
Model DLH05050B

Feature
- Superior Display: Utilizes a 5-inch IPS full-view panel with a physical resolution of 1024×600, supporting up to 1080P signal input for a crisp and lifelike picture.
- Precise Touch: Integrates a 5-point capacitive touchscreen with USB communication, offering plug-and-play functionality without drivers, ensuring smooth and responsive operation.
- Professional Functions: Features a built-in OSD menu for adjusting brightness and contrast; supports USB dimming and FPC flexible cable expansion for easy integration.
- Wide compatibility: Compatible with mainstream mini PCs such as Raspberry Pi (¾/5), BB Black, and Banana Pi; supports systems such as Raspbian, Ubuntu, and WIN10 IoT; supports Windows ⅞/8.1/10/11 systems and game consoles such as PS4 and Xbox.
- Reliable Certifications: The product is CE and RoHS certified, ensuring quality and environmental safety.
- Integrated Mounting Design: Rear mounting holes allow for direct attachment of Raspberry Pi boards to the display, making it perfect for compact, all-in-one embedded projects. The included acrylic stand can also be placed on a desktop.
Specification
| Display size | 5.0inch |
|---|---|
| Display type | IPS |
| Field of view | 178° |
| Touch | Capacitive 5-point Touch |
| Resolution | 1024×600 |
| Backlight Brightness | 410cd/m2 |
| Refresh Rate | 60Hz |
| Response Time | 5 ms |
| Power Voltage | 5V (USB Type-C) |
| Power Consumption | 2.3W |
| Video Input Interface | HD/FPC Display Port |
| Touch Interface | USB/4P-1.25mm Port |
| Dimensions | 121.11×77.93x13.94 mm |
| Net Weight | 112g |
Hardware Description
| Name | Description |
|---|---|
| Menu | Displays the OSD settings menu / selection key |
| Left/Up | Direction key <- (Backlight quick adjustment key) |
| Right/Down | Direction key -> (Backlight quick adjustment key) |
| Return | When setting the display menu, return to the previous level |
| Power | Turn on or off the LCD display to reduce power consumption |
| Display interface | Used to connect the motherboard and the LCD display for HDMI transmission |
| HD Interface | Connect to the signal source device using an HDMI cable |
| Touch & Power | Connect to the signal source device using a TypeC-USB cable. This interface is used for touch and power supply |
| PWM external interface | This interface can be used for external PWM debugging and needs to be soldered by yourself |
| Raspberry Pi hole | 2.5mm copper post, which can be used to connect and fix the Raspberry Pi |
Pin Definition of the 20Pin-0.5mm-FPC Expansion Interface
| Number | Name | Description | Number | Name | Description |
|---|---|---|---|---|---|
| 1 | NC | Floating | 11 | RXC_P | Clock transmission pin, used to transmit the differential clock signal |
| 2 | RX0_N | Data transmission pin, used to transmit the differential data signal of channel 0 | 12 | GND | Ground |
| 3 | GND | Ground | 13 | RXC_N | Clock transmission pin, used to transmit the differential clock signal |
| 4 | RX0_P | Data transmission pin, used to transmit the differential data signal of channel 0 | 14 | NC | Floating |
| 5 | RX1_N | Data transmission pin, used to transmit the differential data signal of channel 1 | 15 | NC | Floating |
| 6 | GND | Ground | 16 | HDMI SCL | IIC clock line, which provides a clock signal for data transmission |
| 7 | RX1_P | Data transmission pin, used to transmit the differential data signal of channel 1 | 17 | HDMI SDA | IIC data line, used for actual data transmission |
| 8 | RX2_N | Data transmission pin, used to transmit the differential data signal of channel 2 | 18 | GND | Ground |
| 9 | GND | Ground | 19 | HDMI 5V | Power pin, providing 5V power supply |
| 10 | RX2_P | Data transmission pin, used to transmit the differential data signal of channel 2 | 20 | HDMI HPD0 | It is the hot-plug detection signal pin in the HDMI interface |
4Pin-1.25mm Touch Expansion Interface Definition
| Pin | Identifier | Function Description |
|---|---|---|
| 1 | 5V | Power pin, providing 5V power supply |
| 2 | D+ | Data transmission pin, used to transmit differential data signals |
| 3 | D- | Data transmission pin, used to transmit differential data signals |
| 4 | GND | Ground pin |
Usage Instructions
Windows System - USB Dimming Software Guide
Step1. Download and Extract USB Dimming Software (Windows)
LCD-USB-BRIGHTNESS-Windows-V1.0
Step2. Run LCD-USB-BRIGHTNESS-Windows-V1.0.exe
-
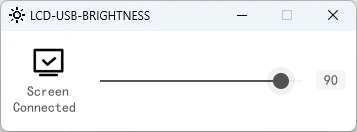
Displays "Screen Disconnected" when not connected

Step3. Connect Display USB to PC
-
Shows "Screen Connected" with real-time brightness adjustment • Saves last brightness setting.
Using in Raspberry Pi Raspbian/Ubuntu Mate/Win10 IoT Core Systems
-
Step 1, Install the Official Image
- Download the latest image from the official website
- Install the system according to the official tutorial steps
-
Step 2, Modify the config.txt Configuration File
hdmi_force_edid_audio=1
max_usb_current=1
hdmi_force_hotplug=1
config_hdmi_boost=7
hdmi_group=2
hdmi_mode=87
hdmi_drive=1
hdmi_cvt 1024 600 60 6 0 0 0
Note: For the official Raspberry Pi system on 2021-10-30, you also need to comment out dtoverlay=vc4-kms-v3d (modify it to #dtoverlay=vc4-kms-v3d)
-
Step 3,
Insert the Micro SD card into the Raspberry Pi, connect the HDMI cable between the Raspberry Pi and the LCD, connect the USB cable to any one of the 4 USB ports of the Raspberry Pi, and connect the other end of the USB cable to the USB port of the LCD. Then power on the Raspberry Pi. If the display and touch are both normal, the driver installation is successful (please use a power supply of at least 2A).
How to Use as a Computer Display
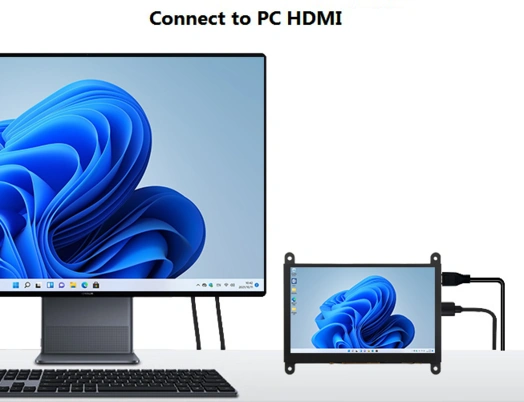
- Use an HDMI cable to connect the computer's HDMI output signal to the HDMI interface of the LCD;
- Connect one end of the MicroUSB cable to the USB Touch interface of the LCD (either of the two MicroUSB ports can be used), and the other end to the USB port of the computer.
- If there are multiple displays, please first unplug the interfaces of other displays and test this LCD as the only display.
How to rotate the display direction
This method only applies to the Raspberry Pi series of display screens, other display screens do not apply.
-
Method 1,If the driver is not installed, execute the following command (Raspberry Pi needs to connected to the Internet):
sudo rm -rf LCD-show
git clone https://github.com/goodtft/LCD-show.git
chmod -R 755 LCD-show
cd LCD-show/
sudo ./XXX-show 90
After execution, the driver will be installed. The system will automatically restart, and the display screen will rotate 90 degrees to display and touch normally.
( ' XXX-show ' can be changed to the corresponding driver, and ' 90 ' can be changed to 0, 90, 180 and 270, respectively representing rotation angles of 0 degrees, 90 degrees, 180 degrees, 270 degrees) -
Method 2,If the driver is already installed, execute the following command:
After execution, the system will automatically restart, and the display screen will rotate 90 degrees to display and touch normally.
( ' 90 ' can be changed to 0, 90, 180 and 270, respectively representing rotation angles of 0 degrees, 90 degrees, 180 degrees, 270 degrees)
If the rotate.sh prompt cannot be found, use Method 1 to install the latest drivers
Resources
How to buy
Please visit this page to purchase 5inch HD Touch Display-D.
Support
If you have any problem about how to use it, you can connect to us at the bottom-right of bazzer or contact to techsupport@elecrow.com to get technology support.