Luminosity Sensor- TSL2561 Breakout
Description
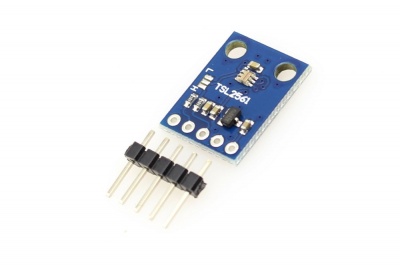
The TSL2561 Luminosity Sensor Breakout is a sophisticated light sensor which has a flat response across most of the visible spectrum. Unlike simpler sensors, the TSL2561 measures both infrared and visible light to better approximate the response of the human eye. And because the TSL2561 is an integrating sensor (it soaks up light for a predetermined amount of time), it is capable of measuring both small and large amounts of light by changing the integration time.
The TSL2561 is capable of direct I2C communication and is able to conduct specific light ranges from 0.1 - 40k+ Lux easily. Additionally, the TSL12561 contains two integrating analog-to-digital converters (ADC) that integrate currents from two photodiodes, simultaneously.
Model:SM2561TSL
Features
- I2C interfaces
- Power supply:3.3v ~ 5v
- A low supply current max of 0.6mA
Usage
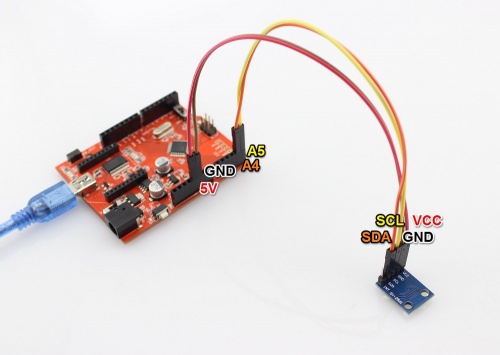
1.Hardware Installation
2.Download the library File:TSL2561 Library 3.Unzip it into the libraries file of Arduino IDE by the path: ..\arduino-1.0\libraries. 4.Open the code directly by the path:File -> Examples ->SFE_TSL2561->SFE_TSL2561_example.
#include <SFE_TSL2561.h>
#include <Wire.h>

// Create an SFE_TSL2561 object, here called "light":

SFE_TSL2561 light;

// Global variables:

boolean gain;     // Gain setting, 0 = X1, 1 = X16;
unsigned int ms;  // Integration ("shutter") time in milliseconds

void setup()
{
  // Initialize the Serial port:

  Serial.begin(9600);
  Serial.println("TSL2561 example sketch");

  // Initialize the SFE_TSL2561 library

  // You can pass nothing to light.begin() for the default I2C address (0x39),
  // or use one of the following presets if you have changed
  // the ADDR jumper on the board:

  // TSL2561_ADDR_0 address with '0' shorted on board (0x29)
  // TSL2561_ADDR   default address (0x39)
  // TSL2561_ADDR_1 address with '1' shorted on board (0x49)

   light.begin();

  // Get factory ID from sensor:
  // (Just for fun, you don't need to do this to operate the sensor)

  unsigned char ID;

  if (light.getID(ID))
  {
    Serial.print("Got factory ID: 0X");
    Serial.print(ID,HEX);
    Serial.println(", should be 0X5X");
  }
  // Most library commands will return true if communications was successful,
  // and false if there was a problem. You can ignore this returned value,
  // or check whether a command worked correctly and retrieve an error code:
  else
  {
    byte error = light.getError();
    printError(error);
  }
  gain = 0;

  // If time = 0, integration will be 13.7ms
  // If time = 1, integration will be 101ms
  // If time = 2, integration will be 402ms
  // If time = 3, use manual start / stop to perform your own integration

  unsigned char time = 2;

  // setTiming() will set the third parameter (ms) to the
  // requested integration time in ms (this will be useful later):

  Serial.println("Set timing...");
  light.setTiming(gain,time,ms);

  // To start taking measurements, power up the sensor:

  Serial.println("Powerup...");
  light.setPowerUp();

  // The sensor will now gather light during the integration time.
  // After the specified time, you can retrieve the result from the sensor.
  // Once a measurement occurs, another integration period will start.
}

void loop()
{
  delay(ms);
  unsigned int data0, data1;

  if (light.getData(data0,data1))
  {
    // getData() returned true, communication was successful

    Serial.print("data0: ");
    Serial.print(data0);
    Serial.print(" data1: ");
    Serial.print(data1);
    double lux;    // Resulting lux value
    boolean good;  // True if neither sensor is saturated

    // Perform lux calculation:

    good = light.getLux(gain,ms,data0,data1,lux);

    // Print out the results:

    Serial.print(" lux: ");
    Serial.print(lux);
    if (good) Serial.println(" (good)"); else Serial.println(" (BAD)");
  }
  else
  {
    // getData() returned false because of an I2C error, inform the user.

    byte error = light.getError();
    printError(error);
  }
}

void printError(byte error)
  // If there's an I2C error, this function will
  // print out an explanation.
{
  Serial.print("I2C error: ");
  Serial.print(error,DEC);
  Serial.print(", ");

  switch(error)
  {
    case 0:
      Serial.println("success");
      break;
    case 1:
      Serial.println("data too long for transmit buffer");
      break;
    case 2:
      Serial.println("received NACK on address (disconnected?)");
      break;
    case 3:
      Serial.println("received NACK on data");
      break;
    case 4:
      Serial.println("other error");
      break;
    default:
      Serial.println("unknown error");
  }
}
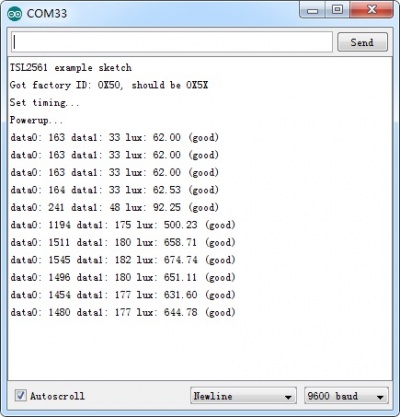
5.Upload the code,then open the serial monitor to see the test result.


