CrowPi-3
Description
CrowPi 3 is constructed around the newly released Raspberry Pi 5 development board by the Raspberry Pi Foundation. It serves as a powerful tool that integrates learning, design, and programming, offering a new learning platform for coding enthusiasts and developers. CrowPi 3 is compatible with various development boards including Pi 5, Arduino Nano, micro:bit, and Pico series. It integrates a variety of sensors and is equipped with a display, camera, and microphone, facilitating the construction of an AI smart hardware platform. Additionally, it offers abundant course resources, making CrowPi 3 an ideal choice for learning programming.
Model: SER14003P 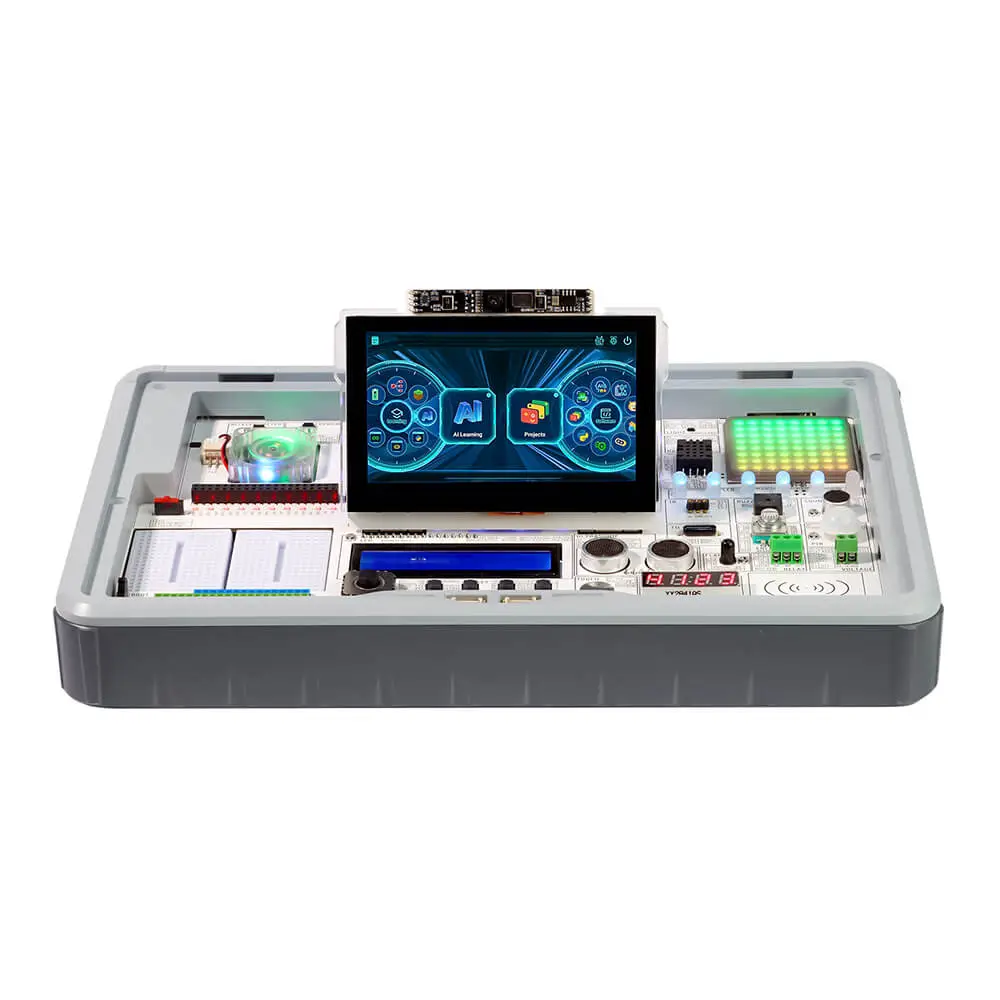

Feature
- Compatible with multiple development boards
- Supports 4 mainstream open source development boards including Raspberry Pi 5, Arduino Nano, micro:bit, Pico, etc., covering a wide range of user groups from beginners to professional engineers, meeting the learning and development needs at different stages.
- Integrated with multiple sensors and modules
- Built-in 30+ commonly used sensors and electronic modules, with clear layout and clear identification, ready to use after power-on, no complicated wiring required, and easy implementation of various sensor project practices and AI visual development.
- Rich hardware interfaces
- Equipped with Ethernet, HDMI, audio interface, DEBUG interface, power input and output, USB 3.0, I2C/UART interface and Raspberry Pi native 40-Pin GPIO interface, it meets the needs of most application scenarios and has strong scalability.
- Intelligent interactive experience
- Equipped with a 4.3-inch capacitive touch display, a 2-megapixel camera and a high-sensitivity microphone, it supports AI visual recognition, voice recognition and interaction, providing an intuitive and smooth user experience.
- Diverse programming support
- Provides a graphical programming interface, fun examples, mini-game challenges and 100+ course resources, covering program codes, experimental wiring diagrams, etc., suitable for zero-based entry and advanced learning, improving programming learning efficiency.
- AI development capabilities
- Combined with the Raspberry Pi 5 processor, it can support AI applications such as OpenCV image processing, object recognition and tracking, face recognition, QR code recognition, pedestrian and car detection, and can explore the LLM large language model and deep learning development framework to help users easily play with artificial intelligence.
- Dynamic programming lighting effects
- Built-in a variety of dynamic programming lighting effects to enhance learning fun and visual experience and stimulate user creativity.
- Portable and easy-to-use design
- Integrated portable design, ready to use, no complex configuration required, suitable for classroom teaching, personal learning, project development and on-site demonstration and other usage scenarios.
- Comprehensive learning resource support
- Equipped with rich learning resources and software tools, it helps users get started quickly and easily achieve programming learning and project development from basic to advanced.
CrowPi 3 integrates learning, design, programming, and AI exploration, and is a portable programming laboratory for the future. Whether you are a student, educator, or professional developer, you can easily step into the world of artificial intelligence and creative development with it.
Specifications
| SBC-Raspberry Pi 5 | |
|---|---|
| CPU/SoC | Broadcom BCM2712, ARM Cortex-A76, up to 2.4GHz, quad-core, 64-bit |
| GPU | VideoCore VII GPU @800MHz, supports OpenGL ES 3.1, Vulkan 1.2(dual micro HDMI ports, supports dual 4K@60fps video output) |
| RAM | 4GB/8GB LPDDR4X-4267 SDRAM |
| Development | Python, C/C++, Java, Node.js, etc. |
| Development environments (IDE) | Thonny, Visual Studio Code, etc. (supports Node-RED) |
| Support frameworks/libraries | TensorFlow, OpenCV, Docker, etc. |
| Operating systems | Official: Raspberry Pi OSOther compatible: Ubuntu Desktop, Manjaro ARM, Kali Linux, LibreELEC (Media Center), OSMC, etc. |
| Screen | |
| Size | 4.3 inch |
| Resolution | 800RGB(H)x480(V) |
| Active area | 95.04(W)×53.858(H) mm |
| Display panel | IPS wide viewing angle |
| Brightness | 300 cd/m² (Typ.) |
| Color depth | 16.7M |
| Contrast ratio | 1200:1 |
| Backlight | 10-LED |
| Touch type | Full capacitive touch, single point |
| Wireless Connection | |
| Wi-Fi | Wi-Fi 6 (802.11ax), supports 2.4GHz and 5GHz bands |
| Bluetooth | Bluetooth 5.2, Bluetooth BLE, supports low-power device connection |
| Interface (Peripheral) | |
| Type-C (IN/OUT) | For data transmission and DC power supply. The input rated voltage is 5V/5A, the output is 5V/2A, and it supports PD function. |
| Type-C (OUT) | A USB Type-C interface with output function, used to transmit data to the outside or to power/charge other devices, with an output rated voltage of 5V/2A. |
| HDMI | This interface is the HDMI interface that comes with Pi 5 |
| Headphone jack | Used to connect headphones or external speakers, output audio signals, 3.5mm. |
| Ethernet Gigabit | Ethernet interface 10/100/1000 Mbps. |
| USB 3.0 | USB 3.0 port, supports simultaneous 5Gbps operation |
| USB 2.0 | USB 2.0 specification port |
| DEBUG | DEBUG interface is used for debugging of microcontroller modules, allows users to connect devices such as debuggers or logic analyzers. |
| Button | |
|---|---|
| Power button/(Power) | Press and hold the power button for 1 second to turn the device on, and press and hold the power button for 3 seconds to turn the device off. |
| Volume/Brightness button | Used to adjust the volume and screen brightness of the device. |
| LED Indicator Light | |
|---|---|
| PWR | Power indicator light, lights up red after the device is turned on. |
| CHG | Lithium battery status indicator, flashes red when low voltage, lights up red when charging, lights up green when fully charged. |
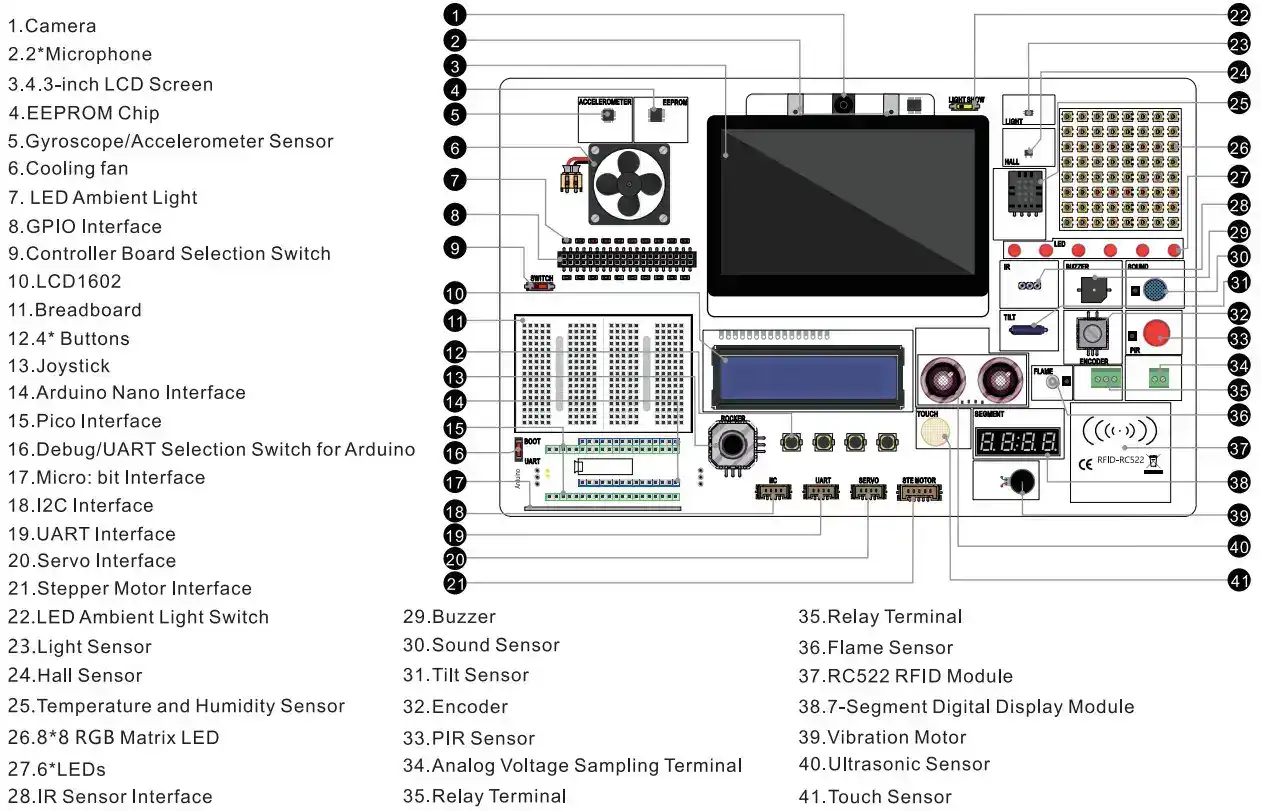
| Sensor(Input) | |||
|---|---|---|---|
| EEPROM | Gyroscope/Acceleration | Five-way joystick | Button*4 |
| Touch Sensing | RFID sensing | ultrasound | Flame sensor |
| Relay | Voltage detection | Angle tilt | Encoder |
| PIR sensor | Sound detection | Infrared receiver | Temperature and humidity |
| Hall sensor | Light intensity | Camera | Microphone |
| Sensor(Output) | |||||
|---|---|---|---|---|---|
| Vibration motor | Digital tube | Buzzer | LED*6 running lights | 8*8 RGB matrix | LCD 1602 |
| Other Interface |
|---|
| 1*40-Pin pin,1*Ambient Lighting, 2* Breadboard, 1* I2C interface,1* UART interface, 1* Servo interface, 1* Stepper motor interface |
| Mechanical | |
|---|---|
| Size | 285*185*38mm |
| Shell | ABS+PC |
| Installation method | Desktop, portable |
| Operating temperature | -10~60 ℃ |
| Relative humidity | 10%-95%, @ 40°C (non-condensing) |
| Power Input | 5V/5A, with PD protocol |
| Power Output | 5V/2A |
SAFETY WARNING
- This appliance can be used by children aged from 8 years and above and persons with reduced physical, sensory or mental capabilities or lack of experience and knowledge if they have been given supervision or instruction concerning use of the appliance in a safe way and understand the hazards involved.
- Children shall not play with the appliance.
- Cleaning and user maintenance shall not be made by children without supervision.
WARNING: Use the detachable supply unit provided with this appliance only.
Structure
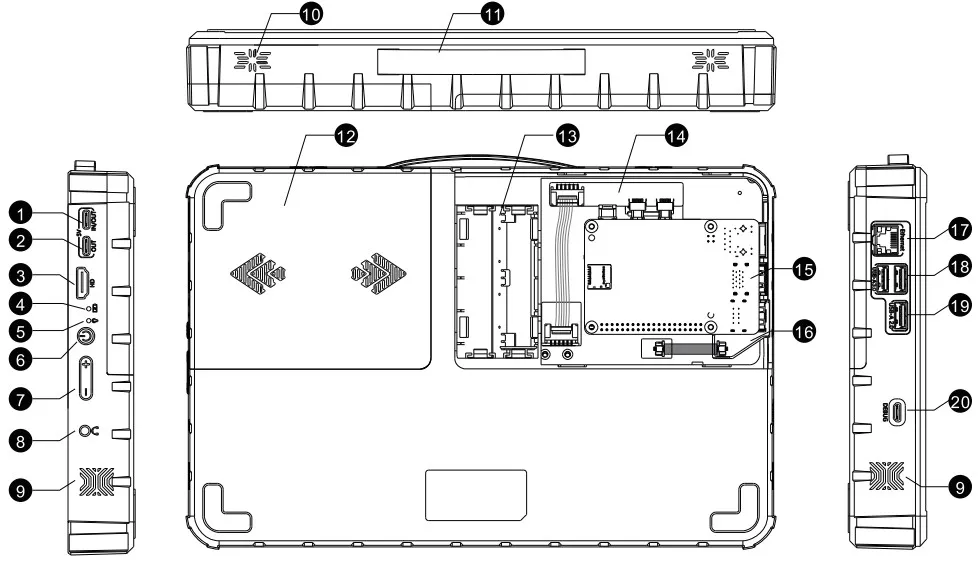
| 1.Type-C port: PD5V/5A Input/5V/2A Output | 2.Type-C port: 5V/2A Output | 3.HDMI port | 4.Battery Status LED |
| 5.Power-On Status LED | 6.Power Button | 7.Volume and brightness ± | 8.3.5mm headphone jack |
| 9.Speakers | 10.Cooling hole | 11.Handle | 12.Storage groove |
| 13.18650 battery holder | 14.Function adapter board | 15.Raspberry Pi fixed position | 16.Camera signal adapter board |
| 17.Raspberry Pi network port | 18.Raspberry Pi USB3.0 port | 19.Raspberry Pi USB2.0 port | 20.Debug port |
Battery Status LED: Red flashing at low voltage, solid red while charging, solid green after fully charged.
Power-On Status LED: The device remains red after powering on
Power Button: Short press to power on, long press to power off (release upon completion)
Debug port Used for debugging microcontroller modules such as Arduino Nano and Pico series.
Install Raspberry Pi
Step 1. Insert the SD card (with built-in system) into the Raspberry Pi's SD card slot.
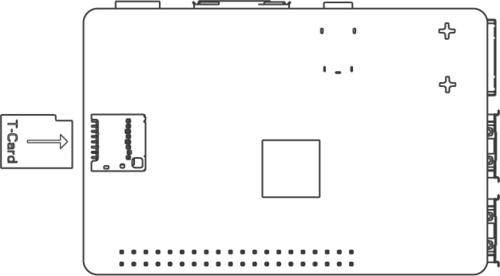
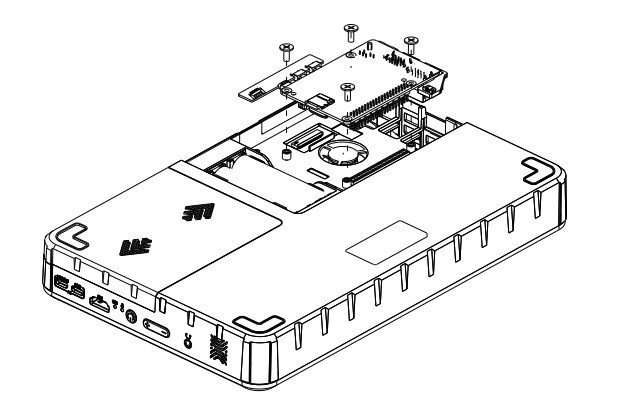
Step 2.Slide to the right to open the back cover of the CrowPi 3 Raspberry Pi enclosure.

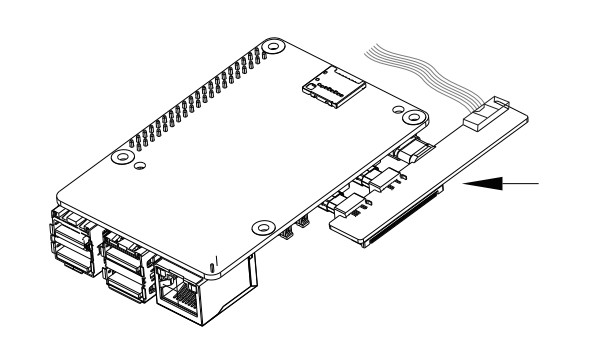
Step 3.Peel off the masking tape on the function adapter board and the camera signal adapter board.
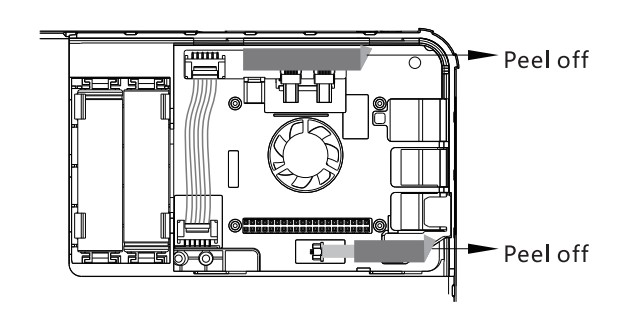
Step 4.Insert the function adapter board into the Raspberry Pi's Micro HDMl port and Type-C port.
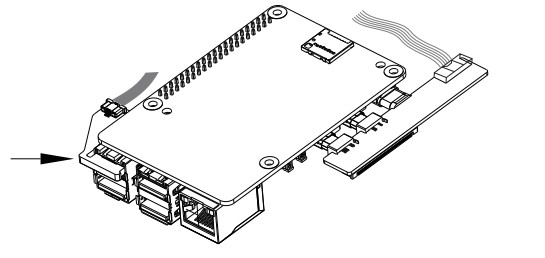
Step 5.Insert the camera signal adapter board into the outermost USB 2.0 port of the Raspberry Pi 5.
Step 6.Verticallyinstall the Raspberry Pi 5 with the inserted TF card into the Raspberry Pienclosure.
Step 7. Pace two 18650 batteries in the correct positive and negative direction.
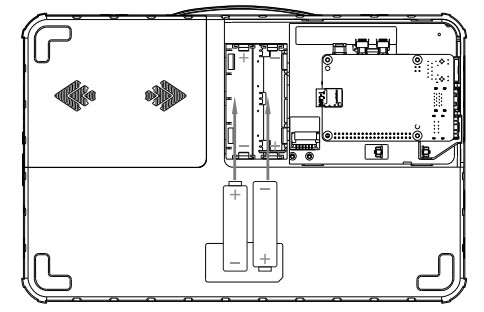
Note:
1.The battery is not included in the Basic Kit. lf you need it,please purchaseit separately or opt for the Advanced Kit. 2.Users who do not need built-in batteries can skip this step.
Step 8. Close the cover. 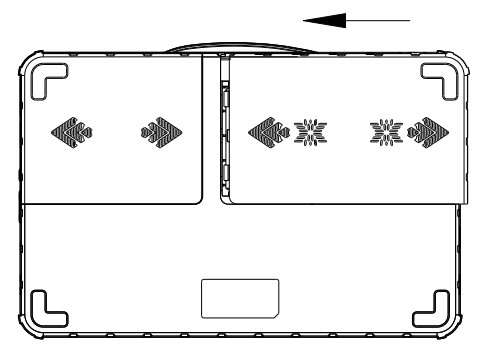
FAQ:
- Unable to boot Make sure you are using the correct charger and that the SD card is inserted into the Raspberry Pi.
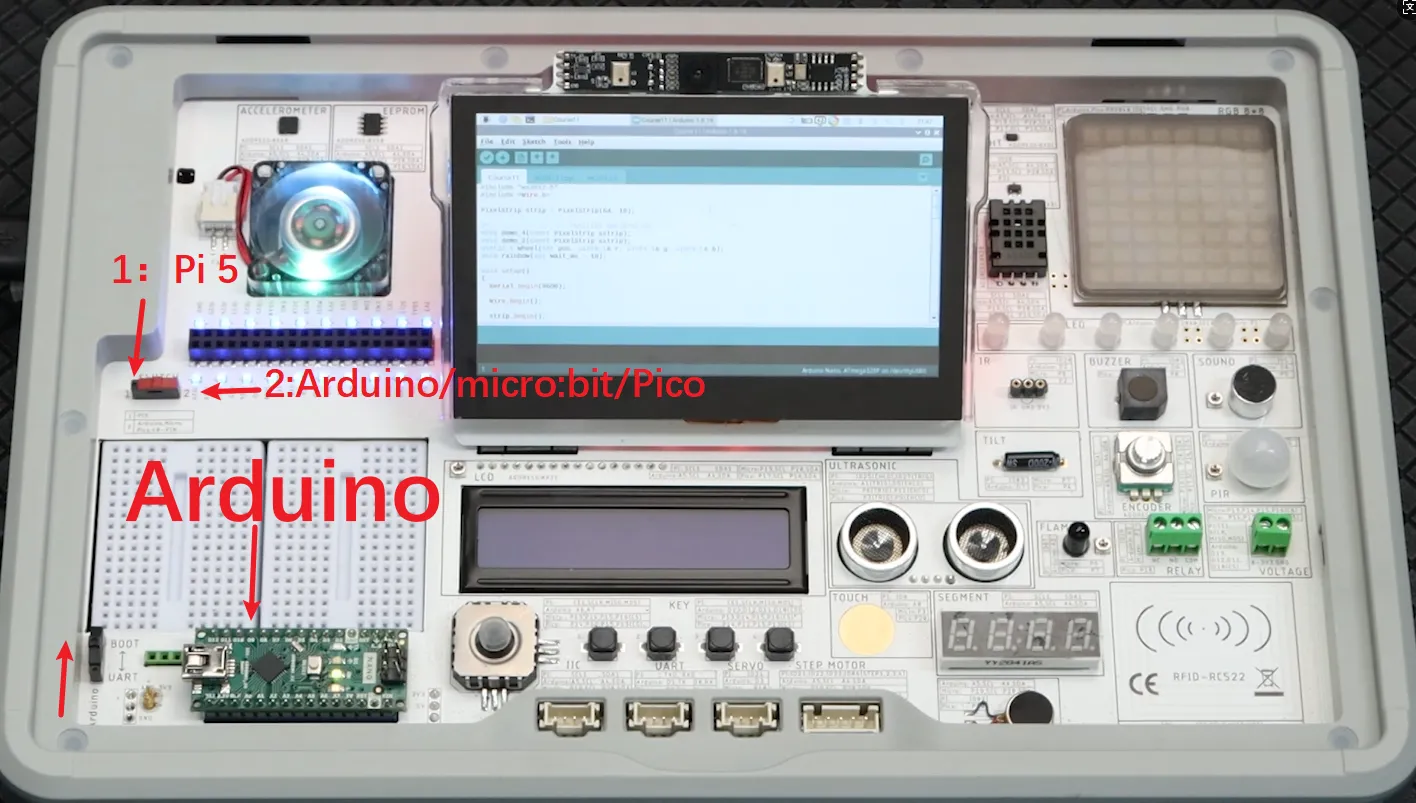
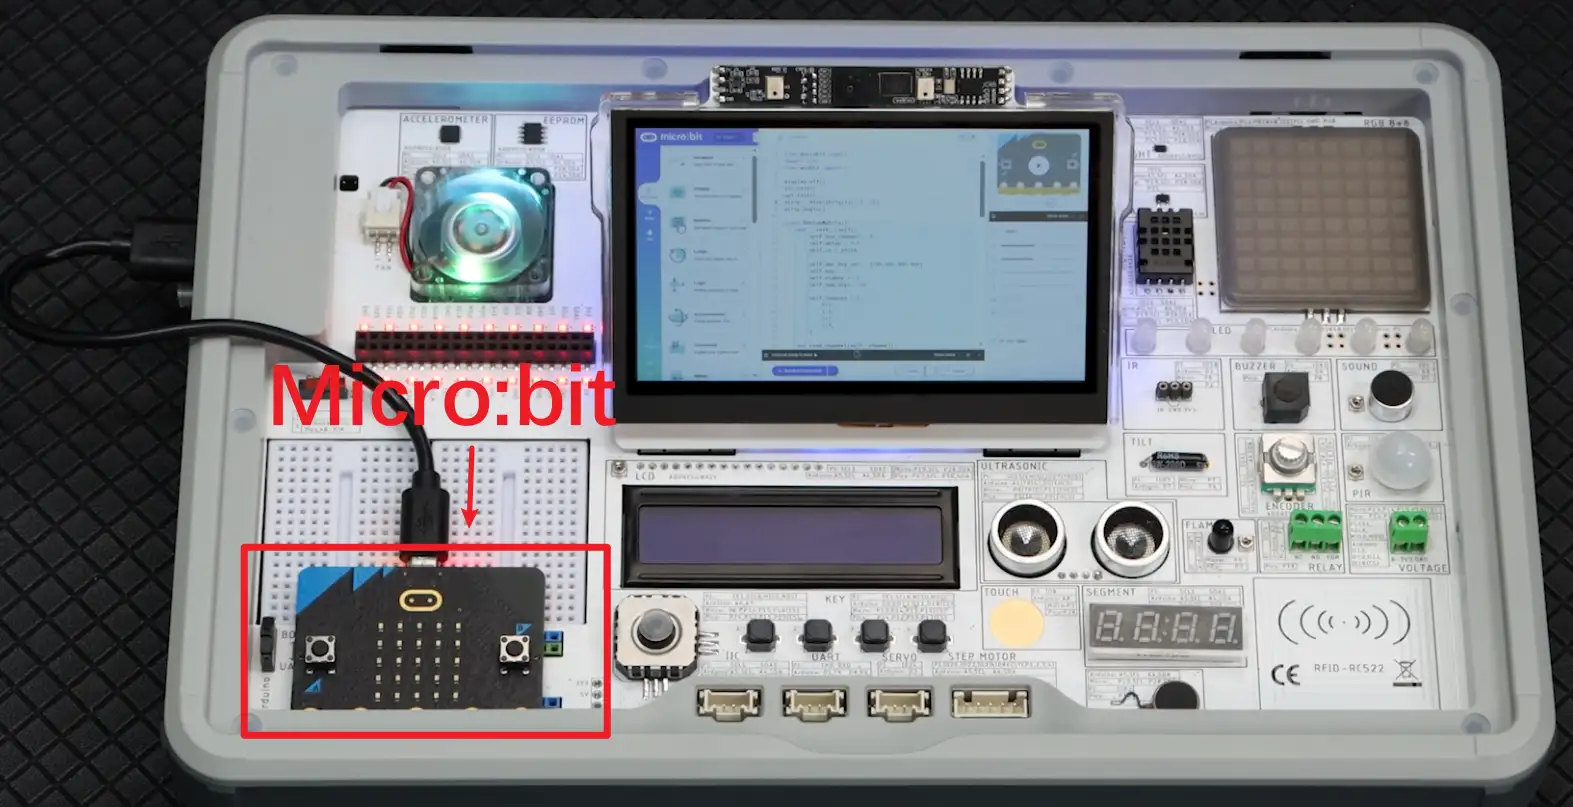
- The module or sensor on the PCBA board cannot be used Please set the controller board selection switch to the correct position. If connecting to Raspberry Pi 5, set it to position 1. If connecting to Arduino Nano and Pico, set it to position 2.
- After setting up the circuit on the breadboard and not getting the expected output Please confirm whether the controller board selection switch has been switched to position 2.
- The screen goes black and crashes Please check whether a high-current peripheral is mounted, causing an insufficient power supply.
- Camera and microphone do not work Please confirm if the camera signal adapter board is fully connected.
- Unable to connect to the network Please turn on the wireless network or connect to the Raspberry Pi Ethernet network port.
Parameters
How to use
Hardware:
The gpio call form of the sensor module
Raspberry(3.3v):
| Function | connector | quantities | reference voltage | Function name for IO |
|---|---|---|---|---|
| Accelerometer&Gyro | I2C | 1 | 3.3V | SCL1,SDA1 |
| 1602 LCD | I2C | 1 | 5V | SCL1,SDA1 |
| Digital display | I2C | 1 | 5V | SCL1,SDA1 |
| LIGHT SENSOR | I2C | 1 | 3.3V | SCL1,SDA1 |
| EEPROM | I2C | 1 | 5V | SCL1,SDA1 |
| Temperature & Humidity | I2C | 1 | 3.3V | SCL1,SDA1 |
| IIC | I2C | 1 | 5V | SCL1,SDA1 |
| Encoder | I2C | 2 | 5V | SCL1,SDA1 |
| HALL SENSOR | I2C/GPIO | 1 | 5V | IO26 |
| STEP MOTOR | I2C/GPIO | 4 | 5V | IO21,IO22,IO23,IO06(STEP1,2,3,4) |
| Vibration sensor | I2C/GPIO | 1 | 5V | IO02 |
| LED*6 | IIC-PR2040,IO10 | 6 | 5V | SCL1,SDA1 |
| 8*8 RGB_LED | IIC-PR2040,IO6 | 1 | 5V | SCL1,SDA1 |
| ROCKER | SPI-ADC | 2 | 3.3V | CE1,SCLK,MISO,MOSI |
| custom_key*4 | SPI-ADC | 1 | 3.3V | CE1,SCLK,MISO,MOSI |
| Voltage Sensor | SPI-ADC | 1 | 3.3V | CE1,SCLK,MISO,MOSI |
| RFID | SPI | 1 | 3.3V | CE0,SCLK,MISO,MOSI |
| SERVO | GPIO | 1 | 5V | IO24 |
| Touch Sensor | GPIO | 1 | 3.3V | IO0 |
| Ultrasonic Sensor | GPIO | 2 | 3.3V | IO25(EHCO),IO27(TRIG) |
| Flame | GPIO | 1 | 3.3V | IO07 |
| Relay | GPIO | 1 | 5V | IO29 |
| Tilt sensor | GPIO | 1 | 3.3V | IO03 |
| Motion sensor(PIR) | GPIO | 1 | 3.3V | IO04 |
| SOUND_SENSOR | GPIO | 1 | 3.3V | IO05 |
| BUZZER | GPIO | 1 | 5V | IO01 |
| IR Remote Sensor | GPIO | 1 | 3.3V | IO28 |
| uart | uart | 1 | 3.3V | TXD, RXD |
| burn-in port | USB-UART | 1 | 5V | TXD, RXD |
Arduino Nano(5v):
Note:Before using the 40-pin header, ensure the DIP switch is set to the corresponding host controller: Position 1 is for Raspberry Pi, Position 2 is for Arduino, Microbit, and Pico.
| Function | connector | quantities | reference voltage | Function name for IO |
|---|---|---|---|---|
| Accelerometer&Gyro | I2C | 1 | 3.3V | A5,SCL;A4,SDA |
| 1602 LCD | I2C | 1 | 5V | A5,SCL;A4,SDA |
| Digital display | I2C | 1 | 5V | A5,SCL;A4,SDA |
| LIGHT SENSOR | I2C | 1 | 3.3V | A5,SCL;A4,SDA |
| EEPROM | I2C | 1 | 5V | A5,SCL;A4,SDA |
| Temperature & Humidity | I2C | 1 | 3.3V | A5,SCL;A4,SDA |
| IIC | I2C | 1 | 5V | A5,SCL;A4,SDA |
| Encoder | I2C | 2 | 5V | A5,SCL;A4,SDA |
| HALL SENSOR | I2C/GPIO | 1 | 5V | A5,SCL;A4,SDA |
| STEP MOTOR | I2C/GPIO | 4 | 5V | A5,SCL;A4,SDA |
| Vibration sensor | I2C/GPIO | 1 | 5V | A5,SCL;A4,SDA |
| LED*6 | IIC-PR2040,IO10 | 6 | 5V | A5,SCL;A4,SDA |
| 8*8 RGB_LED | IIC-PR2040,IO6 | 1 | 5V | A5,SCL;A4,SDA |
| ROCKER | SPI-ADC | 2 | 3.3V | A6,A7 |
| custom_key*4 | SPI-ADC | 1 | 3.3V | D13,D12,D11,D10(CS) |
| Voltage Sensor | SPI-ADC | 1 | 3.3V | D13,D12,D11,D10(CS) |
| RFID | SPI | 1 | 3.3V | D13,D12,D11,D9(CS) |
| SERVO | GPIO | 1 | 5V | D3 |
| Touch Sensor | GPIO | 1 | 3.3V | A0 |
| Ultrasonic Sensor | GPIO | 2 | 3.3V | A1(TRIG),D5(EHCO) |
| Flame | GPIO | 1 | 3.3V | A2 |
| Relay | GPIO | 1 | 5V | A3 |
| Tilt sensor | GPIO | 1 | 3.3V | D7 |
| Motion sensor(PIR) | GPIO | 1 | 3.3V | D4 |
| SOUND_SENSOR | GPIO | 1 | 3.3V | D8 |
| BUZZER | GPIO | 1 | 5V | D6 |
| IR Remote Sensor | GPIO | 1 | 3.3V | D2 |
| uart | uart | 1 | 3.3V | TXD, RXD |
| burn-in port | USB-UART | 1 | 5V | TXD, RXD |
Micro:bit(3.3V):
| Function | connector | quantities | reference voltage | Function name for IO |
|---|---|---|---|---|
| Accelerometer&Gyro | I2C | 1 | 3.3V | P19,SCL;P20,SDA |
| 1602 LCD | I2C | 1 | 5V | P19,SCL;P20,SDA |
| Digital display | I2C | 1 | 5V | P19,SCL;P20,SDA |
| LIGHT SENSOR | I2C | 1 | 3.3V | P19,SCL;P20,SDA |
| EEPROM | I2C | 1 | 5V | P19,SCL;P20,SDA |
| Temperature & Humidity | I2C | 1 | 3.3V | P19,SCL;P20,SDA |
| IIC | I2C | 1 | 5V | P19,SCL;P20,SDA |
| Encoder | I2C | 2 | 5V | P19,SCL;P20,SDA |
| HALL SENSOR | I2C/GPIO | 1 | 5V | P19,SCL;P20,SDA |
| STEP MOTOR | I2C/GPIO | 4 | 5V | P19,SCL;P20,SDA |
| Vibration sensor | I2C/GPIO | 1 | 5V | P19,SCL;P20,SDA |
| LED*6 | IIC-PR2040,IO10 | 6 | 5V | P1 |
| 8*8 RGB_LED | IIC-PR2040,IO6 | 1 | 5V | P12 |
| ROCKER | SPI-ADC | 2 | 3.3V | P13,P14,P15,P16(CS) |
| custom_key*4 | SPI-ADC | 1 | 3.3V | P13,P14,P15,P16(CS) |
| Voltage Sensor | SPI-ADC | 1 | 3.3V | P13,P14,P15,P16(CS) |
| RFID | SPI | 1 | 3.3V | P13,P14,P15,P4(CS) |
| SERVO | GPIO | 1 | 5V | P10 |
| Touch Sensor | GPIO | 1 | 3.3V | P3 |
| Ultrasonic Sensor | GPIO | 2 | 3.3V | P6(TRIG),P11(EHCO) |
| Flame | GPIO | 1 | 3.3V | P9 |
| Relay | GPIO | 1 | 5V | P2 |
| Tilt sensor | GPIO | 1 | 3.3V | P7 |
| Motion sensor(PIR) | GPIO | 1 | 3.3V | P5 |
| SOUND_SENSOR | GPIO | 1 | 3.3V | NC |
| BUZZER | GPIO | 1 | 5V | P0 |
| IR Remote Sensor | GPIO | 1 | 3.3V | P8 |
| uart | uart | 1 | 3.3V | NC |
| burn-in port | USB-UART | 1 | 5V | NC |
PICO(3.3V):
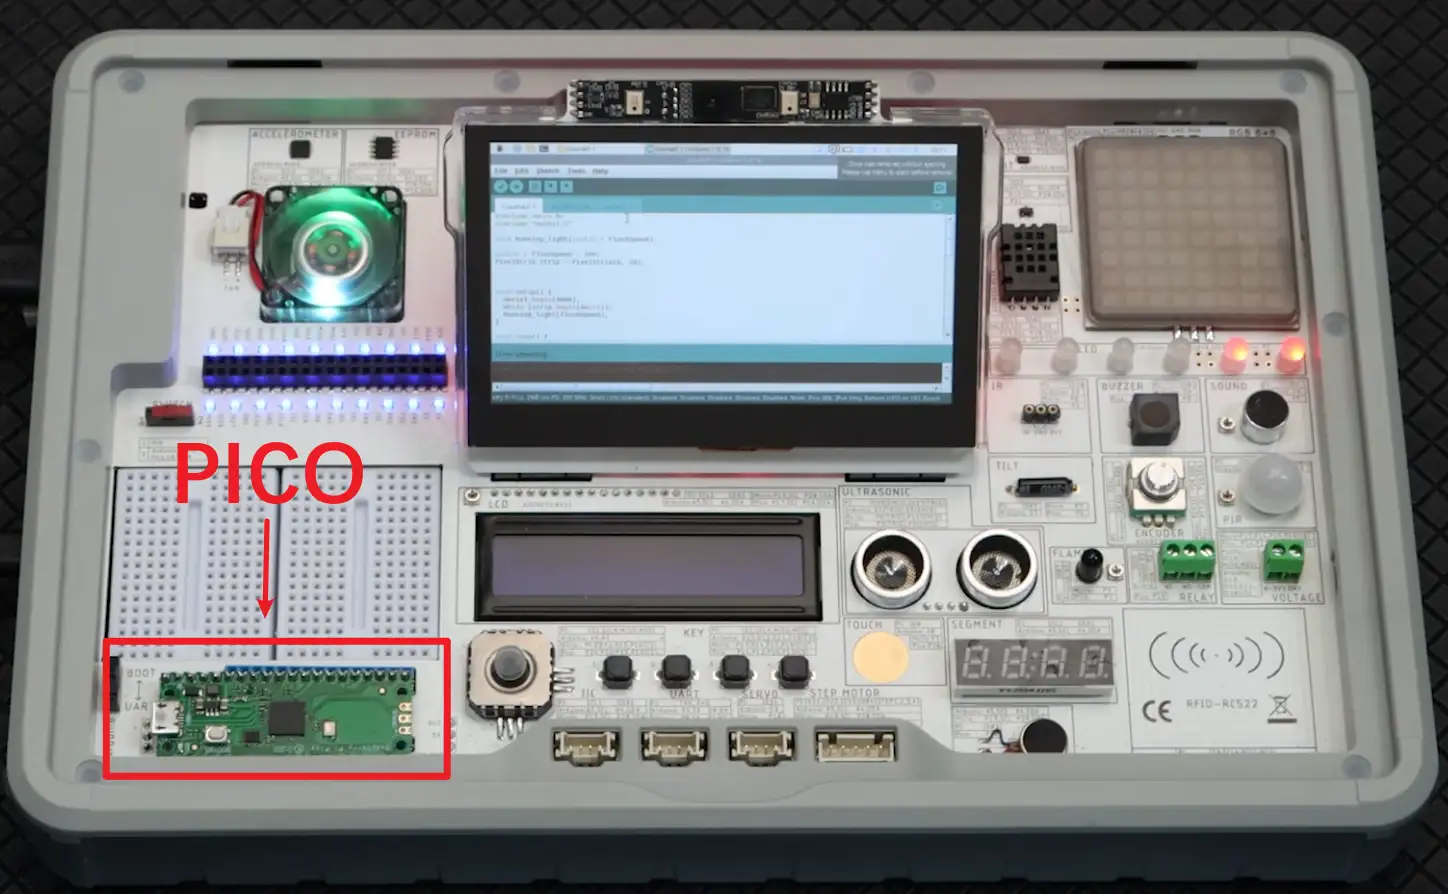
| Function | connector | quantities | reference voltage | Function name for IO |
|---|---|---|---|---|
| Accelerometer&Gyro | I2C | 1 | 3.3V | P17,SCL;P16,SDA |
| 1602 LCD | I2C | 1 | 5V | P17,SCL;P16,SDA |
| Digital display | I2C | 1 | 5V | P17,SCL;P16,SDA |
| LIGHT SENSOR | I2C | 1 | 3.3V | P17,SCL;P16,SDA |
| EEPROM | I2C | 1 | 5V | P17,SCL;P16,SDA |
| Temperature & Humidity | I2C | 1 | 3.3V | P17,SCL;P16,SDA |
| IIC | I2C | 1 | 5V | P17,SCL;P16,SDA |
| Encoder | I2C | 2 | 5V | P17,SCL;P16,SDA |
| HALL SENSOR | I2C/GPIO | 1 | 5V | P21 |
| STEP MOTOR | I2C/GPIO | 4 | 5V | P22,P26,P27,P28(STEP1,2,3,4) |
| Vibration sensor | I2C/GPIO | 1 | 5V | P10 |
| LED*6 | IIC-PR2040,IO10 | 6 | 5V | P17,SCL;P16,SDA |
| 8*8 RGB_LED | IIC-PR2040,IO6 | 1 | 5V | P17,SCL;P16,SDA |
| ROCKER | SPI-ADC | 2 | 3.3V | P14,P12,P15,P13(CS) |
| custom_key*4 | SPI-ADC | 1 | 3.3V | P14,P12,P15,P13(CS) |
| Voltage Sensor | SPI-ADC | 1 | 3.3V | P14,P12,P15,P13(CS) |
| RFID | SPI | 1 | 3.3V | P14,P12,P15,P11(CS) |
| SERVO | GPIO | 1 | 5V | P8 |
| Touch Sensor | GPIO | 1 | 3.3V | P20 |
| Ultrasonic Sensor | GPIO | 2 | 3.3V | P3(TRIG),P9(EHCO) |
| Flame | GPIO | 1 | 3.3V | P7 |
| Relay | GPIO | 1 | 5V | P18 |
| Tilt sensor | GPIO | 1 | 3.3V | P4 |
| Motion sensor(PIR) | GPIO | 1 | 3.3V | P6 |
| SOUND_SENSOR | GPIO | 1 | 3.3V | p5 |
| BUZZER | GPIO | 1 | 5V | P19 |
| IR Remote Sensor | GPIO | 1 | 3.3V | P2 |
| uart | uart | 1 | 3.3V | P0,TX;P1;RX |
| burn-in port | USB-UART | 1 | 5V | NC |
Software:
This is software specifically designed for CrowPi 3 users, featuring over 150 meticulously planned learning courses that offer a convenient, ready-to-use experience. The provided electronic components, circuits, and courses cover a wide range of knowledge points, ensuring that users can quickly grasp the basic principles of electronics and programming through practical operations. For the most popular artificial intelligence applications, such as facial and speech recognition, as well as AI interaction, we have also provided some AI courses and built-in model libraries.
Parts
| Parts name | Function |
|---|---|
| Learing | Python lessons:Let users quickly master the knowledge of python programming and software and hardware interaction Scratch lessons:Let users quickly master the knowledge of scratch programming and software and hardware interaction |
| Projects | 20 small applications designed for quick familiarity with CrowPi 2 hardware features |
| Minecraft | Use game Minecraft to open the door to python programming world for children, teaching in fun |
| AI | Get the most popular knowledge of AI- face recognition and speech recognition |
| Python | Built-in python programming client |
| Game | Experience the fun of simple Mini Game written by python and develop your child's brain |
| Micro:bit | Makecode entry which is designed for Micro:bit programming |
| Scratch | Built-in Scratch Visual Programming Client |
| Arduino | Built-in Arduino programming IDE |
Main page and User Settings
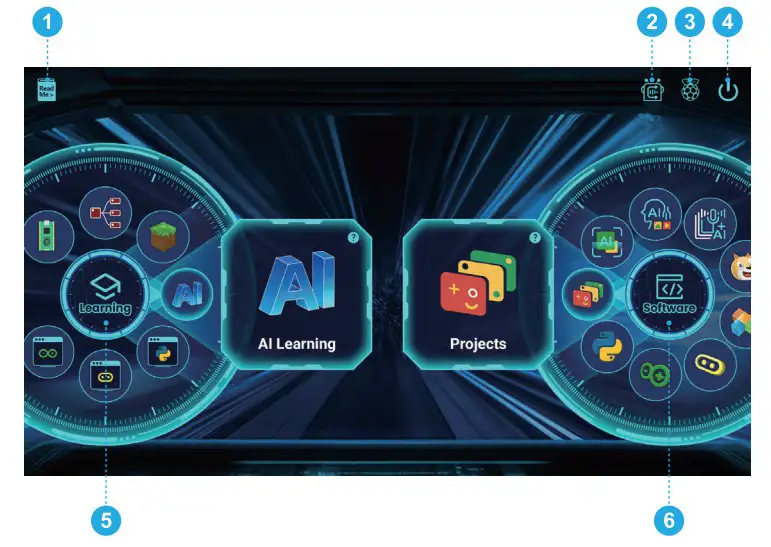
1.README Manual:
A brief overview of the main interface and the functions of each section.
2.Ai Chat:
Al Voice Agent, lt can help you access a wide range of information, control various hardware devices, and even chat with you for companionship. lts name is "Crow," and you can wake it up by saying "Hello Crow."
3.Return to the Raspberry Pi desktop.
4.Shutdown Button:
Choose to either shut down or restart the Raspberry Pi.
5.Learning courses:
All the courses on the CrowPi3 include Al, Python, Node-RED, Micro:bit, Pico, Arduino, and Minecraft.
6.Applications:
All the applications on the CrowPi 3 include Projects, Al Computer Vision, Al Generated Content, Al Voice Cloning,Python IDE, Arduino IDE, Micro:bit, Game and Scratch.
Software operations (coming soon)
Resources
Github link:
Image link:
FAQ:
Device Binding to AI Server Operation Video
- If you find that your Crowpi3 does not display a 6-digit verification code after booting up,

Unable to bind the “elecrow Ai” server. Or, you have already bound the “elecrow Ai” server using a verification code, but after use, your points remain unchanged, or you are unable to use the service and receive an insufficient points message. Please follow the troubleshooting steps below:
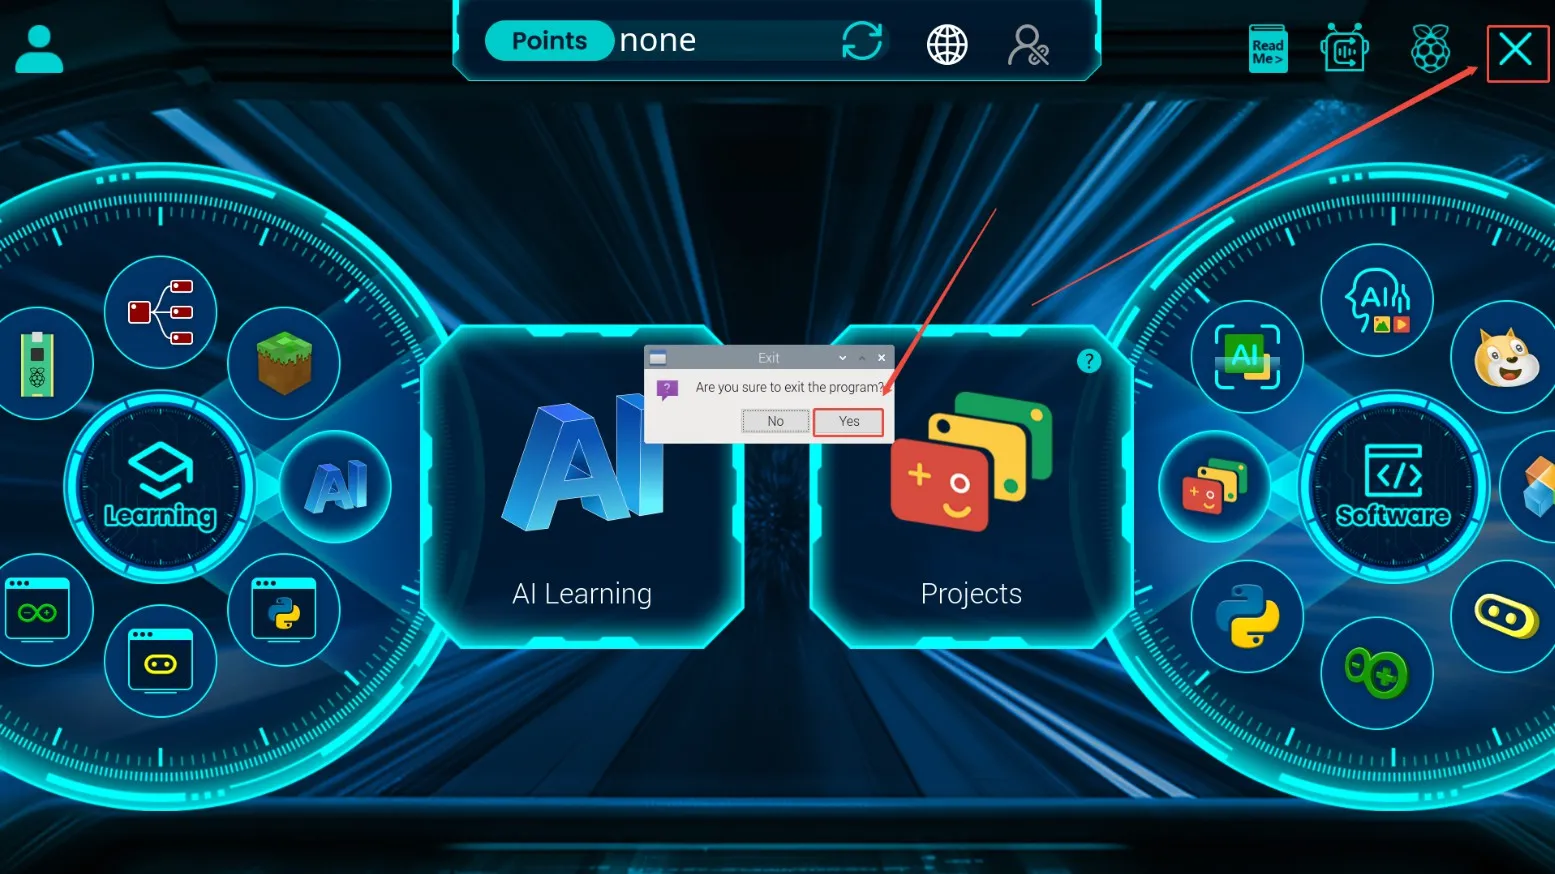
① Exit the learning system: Click the “X” in the upper-right corner, then click “Yes.”
② Click the file system icon in the upper-left corner.
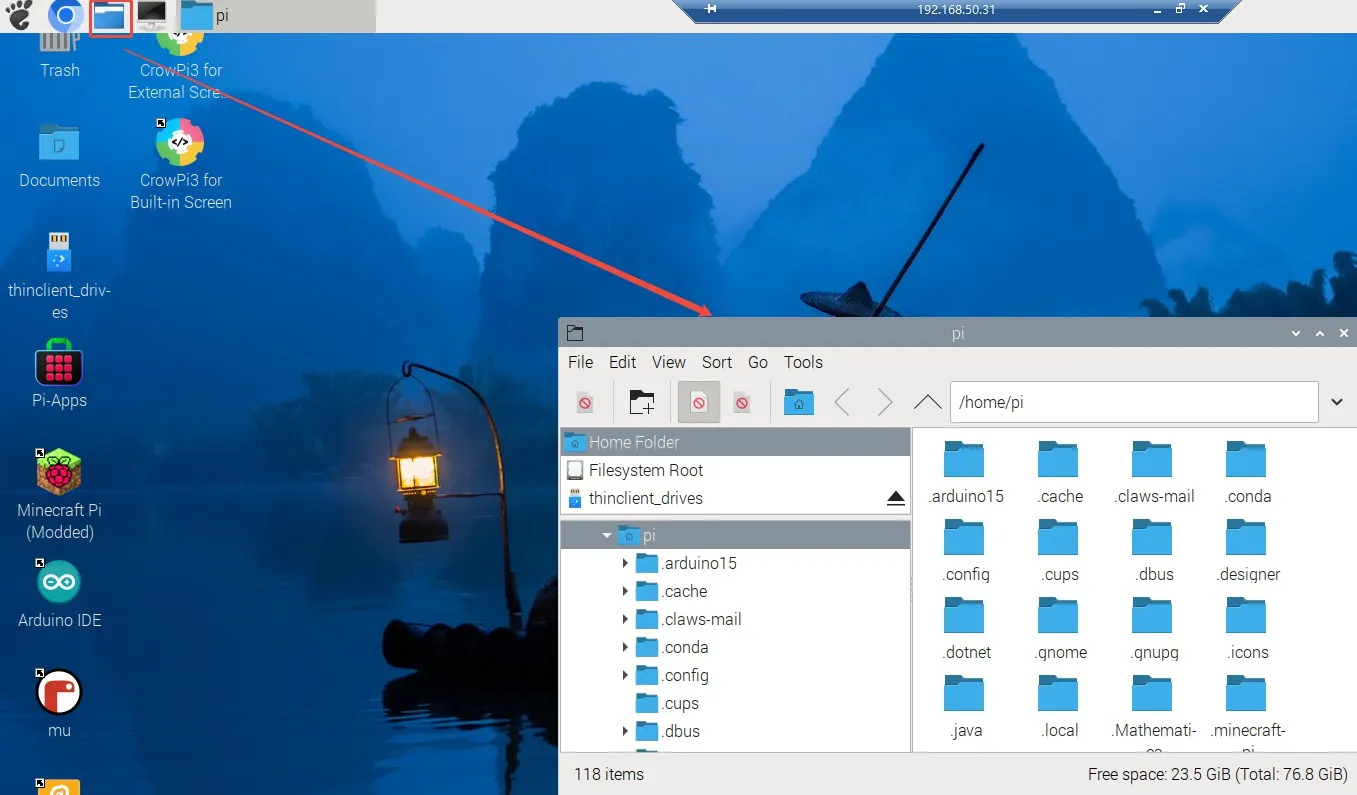
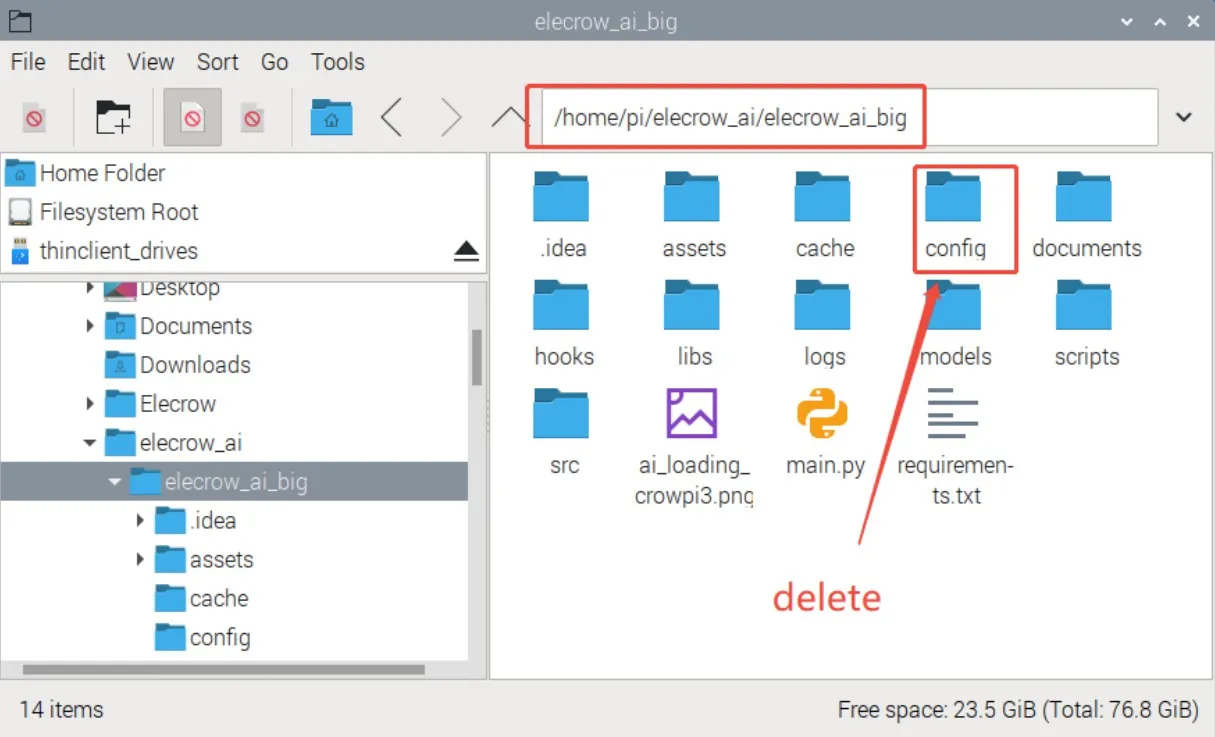
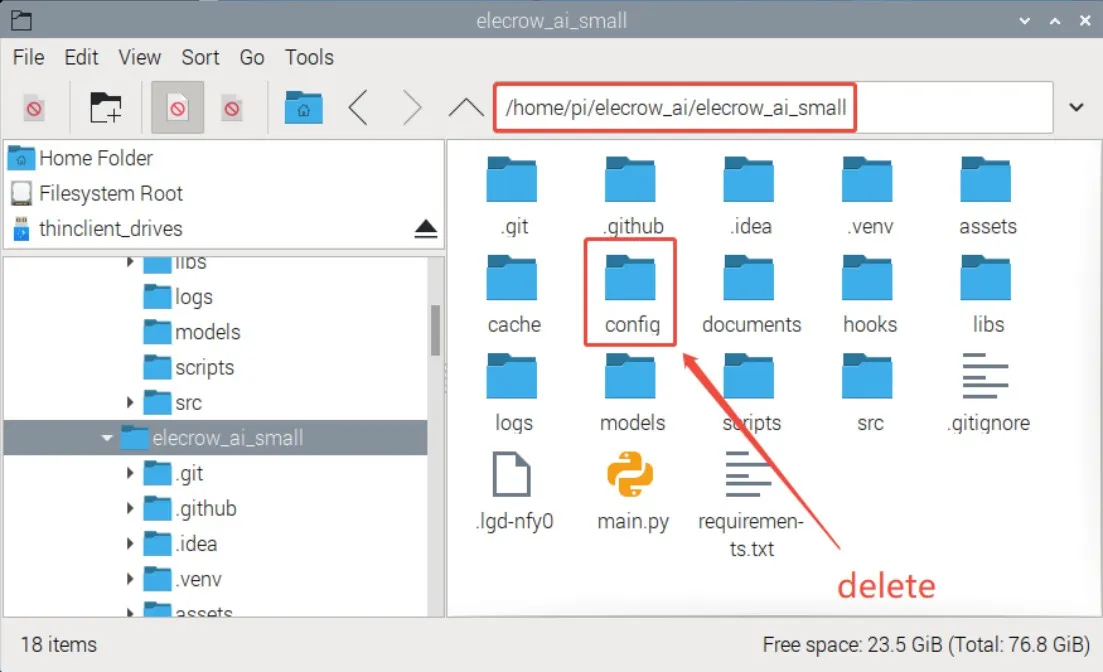
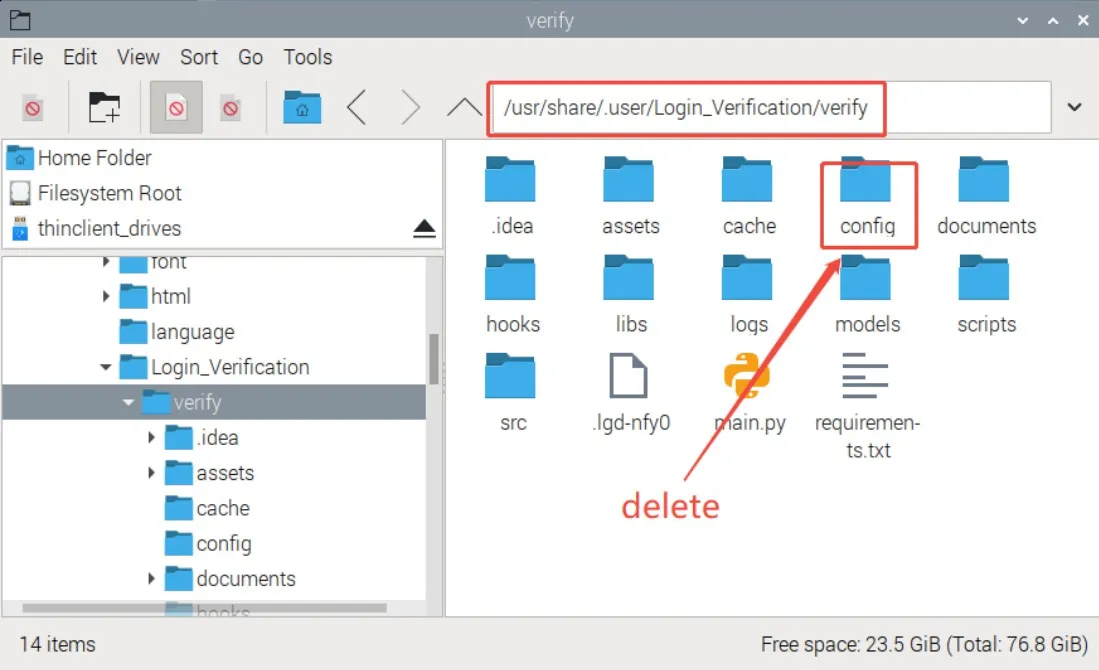
③ Enter the following sections respectively:
/home/pi/elecrow_ai/elecrow_ai_big
/home/pi/elecrow_ai/elecrow_ai_samll
/usr/share/.user/Login_Verification/verify
Delete the corresponding “config” files in these three paths to ensure that the “config” files in all three paths are removed.
④ Restart Crowpi
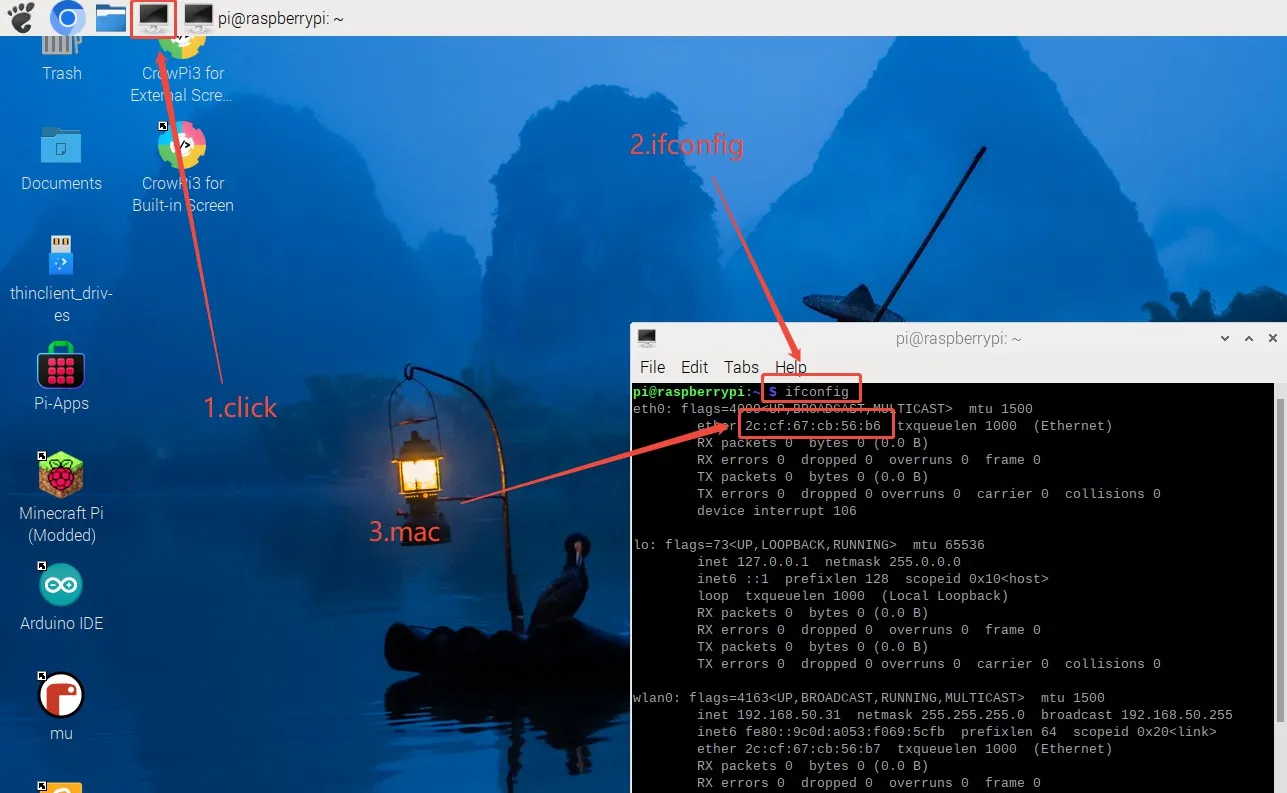
If all three “config” files have been confirmed deleted and the issue persists after restarting Crowpi, open Terminal, enter the “ifconfig” command, capture your device's MAC address, and contact technical support.
How to buy
Please visit this page to purchase crowpi 3.
Support
If you have any problem about how to use it, you can connect to us at the bottom-right of bazzer or contact to techsupport@elecrow.com to get technology support.