Lesson12 Make Your ESP32 Display the Lantern Control terminal
Project description:
This project uses Squareline Studio to create an RGB light control terminal based on ESP32. Users can control the color of the RGB light by clicking on different buttons on the screen.
Introduction to Knowledge Points:
The following is a basic introduction to the widgets used in the project:
Squareline Studio's terminal control uses an image widget, which is a user interface element used to display images or graphics. The image widget is usually a rectangular area that can display various types of images, such as bitmaps, vector graphics, or animations.
The image widget can be used for various purposes, such as:
-
Displaying icons or logos: The image widget can be used to display brand logos, application icons, or other icon-style elements.
-
Displaying image content: The image widget can be used to display images, photos, or other visual elements, such as product images or user avatars.
-
Visualizing data: The image widget can be used to display graphics, charts, or other data visualization elements, such as maps or statistical charts.
The image widget usually has the ability to resize and scale to fit different screen sizes and resolutions. In addition, the image widget can usually be used in conjunction with other user interface elements, such as text labels or buttons.
In Squareline Studio's terminal control, the image widget may be used to display the output of command-line tools, file or directory lists, code examples, or other visual elements. The image widget may also be used to implement some graphical interactive elements, such as drag-and-drop files for operations.
Project Steps:
Note: Add the provided image material files first!

1 Create a new project in Squareline Studio in the same way as before. First, select the Arduino module, and then perform simple settings for the project, such as project name and display size, etc. Since this UI is vertical, the size needs to be changed to 480*320. Click Create to complete.
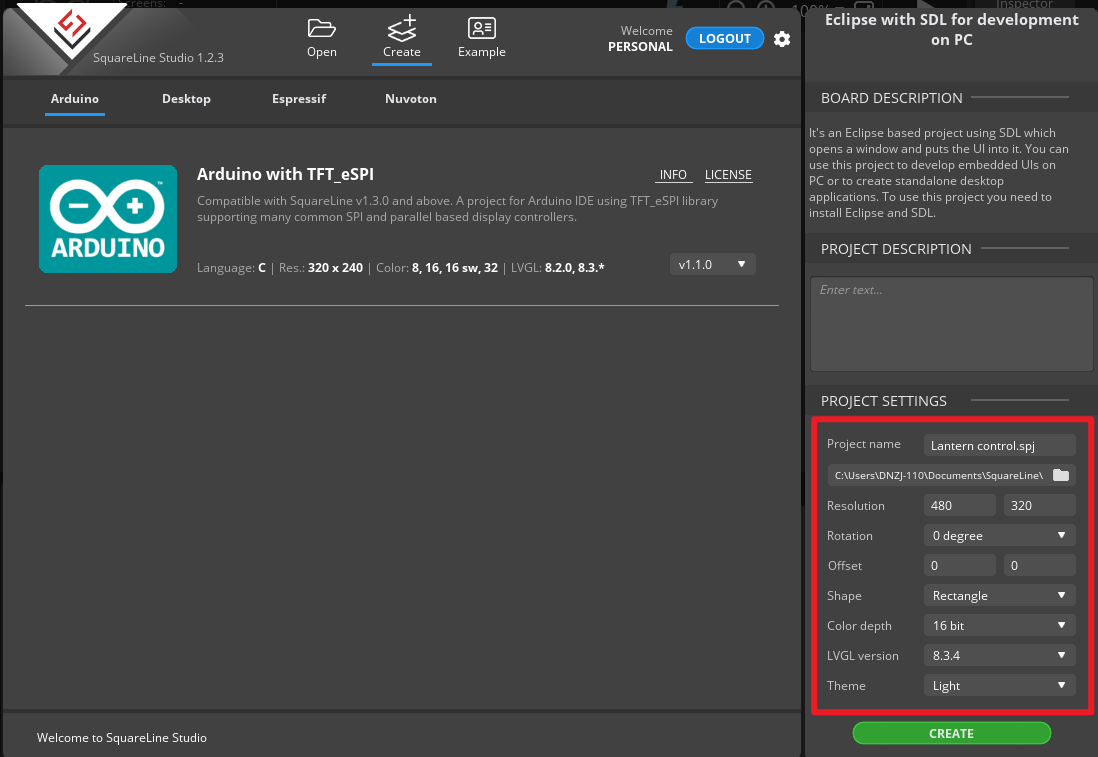
2 Add a panel, add labels and 5 image widgets, adjust and set their positions according to the diagram.

3 Arrange each widget in the position shown in the diagram and add image materials to the image widgets.

4 Check the Clickable option for each image widget's flags.

5 Add an event to each image widget. After generating the UI file, the relevant functions will be generated, which will be set in the program file later.

6 In the generated UI file, open the ui.c and ui.h files.

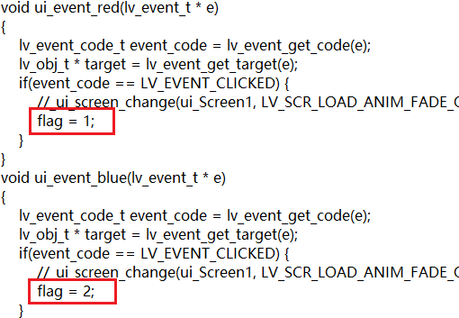
7 In the ui.c file, add a variable, and add a program to set the variable value in each image widget's event function.

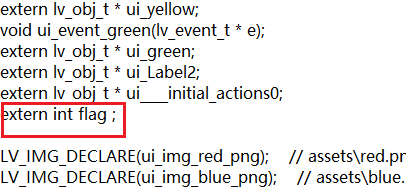
8 Declare the variable set above in ui.h.
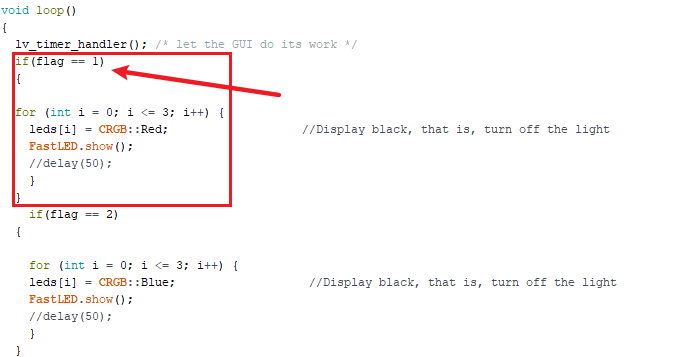
9 In the main program, set the program to control the light. Depending on the value of the variable, display different colors. Note: This main program adds the RGB light library function on the original basis, which can be viewed by yourself.
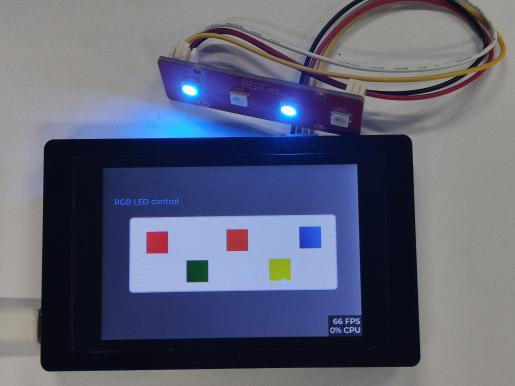
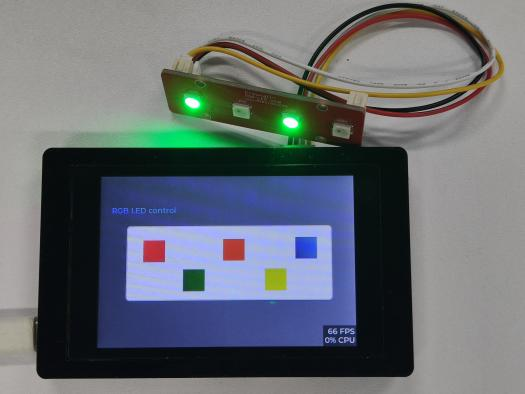
Running effect: After successfully downloading the program, check the effect on the screen.
Summary:
This project helps beginners quickly understand the combination of UI interface and external sensors, how to modify using generated functions, and achieve the function of controlling sensors through the interface. In actual applications, it can be modified and extended according to needs, and more settings and functions can be added.
HMI Display Tutorial Contents
- Lesson01 Introducing the ESP32 Display series and environment configuration
- Lesson02 Start the ESP32 DISPLAY GUI drawing via LovyanGFX Graphics Library
- Lesson03 How to Display Pictures on ESP32 Boards
- Lesson04 LVGL Basics: How to install LVGL for ESP32 Displays
- Lesson05 Introduction to the 5 categories of LVGL GUI library Widgets
- Lesson06 Use Squareline Studio to start your 1st human machine interface project
- Lesson07 How to implement text information input with Squareline Studio
- Lesson08 How to make the menu and a progress bar with Squareline Studio
- Lesson09 How to make an analysis report on ESP32 Display
- Lesson10 Create a 3D Printer UI Project on ESP32 Display
- Lesson11 How to Make a Mixer Interface on ESP32 Display
- Lesson12 Make Your ESP32 Display the Lantern Control terminal
- Lesson13 DIY Electronic Control Terminal on ESP32 Display with Squareline Studio
- Lesson14 Create Car Control Screen on ESP32 Display: A Step-by-Step Guide
- Lesson15 Smart Agriculture Monitoring: IoT-Based Real-Time ESP32 Display Project
- Lesson16 ESP32 Display for Smart Home Central Control: A Home Automation Solution