CrowPanel ESP32 E-Paper 4.2-inch Arduino Tutorial
Overall
This tutorial will demonstrate how to use ESP32 E-Paper Display as a price tags and update price images through WiFi and Bluetooth. And how to obtain weather information and display it on ESP32 E-paper display. In addition, there are simple examples to illustrate how to use the various interfaces on the board.
Get Started with Arduino IDE
Please click the card below to learn how to install Arduino IDE, and install ESP32 board in the Arduino IDE.
Demo 1 Update Pictures Wireless
This demo will introduce how to wireless update a single price tag through WiFi and Bluetooth.
Update via WiFi
Convert the image format
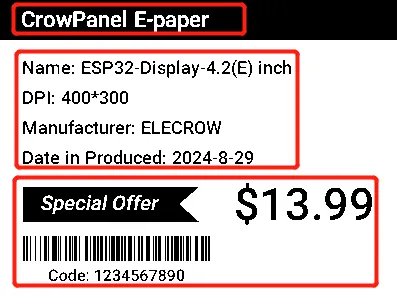
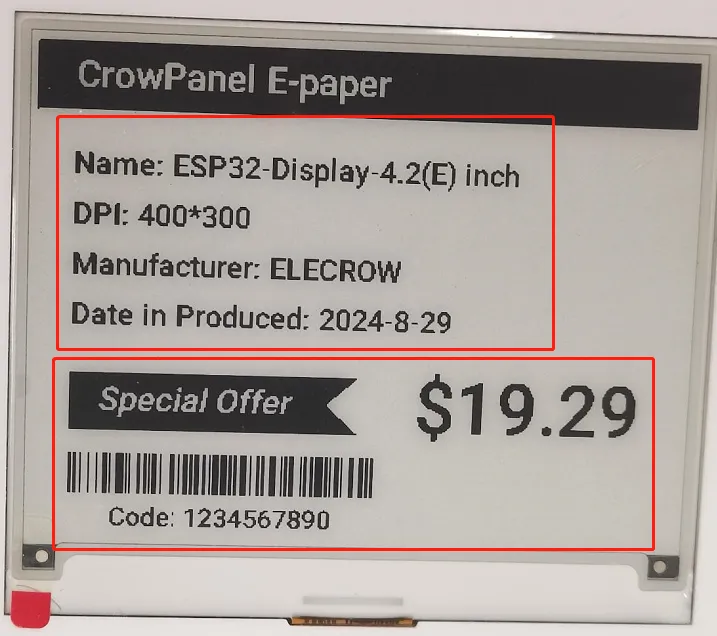
First, let's take a look at the price tag we design in this example, which is divided into three parts(all are images). The top bar is a fixed. The description and the price is variable. The parts we need to update are the description and price.
For the fixed top bar, we can convert it to C array and put them in the code.
For the variable description and price, we need to convert them to bin file and upload them to the board through WiFi.
-
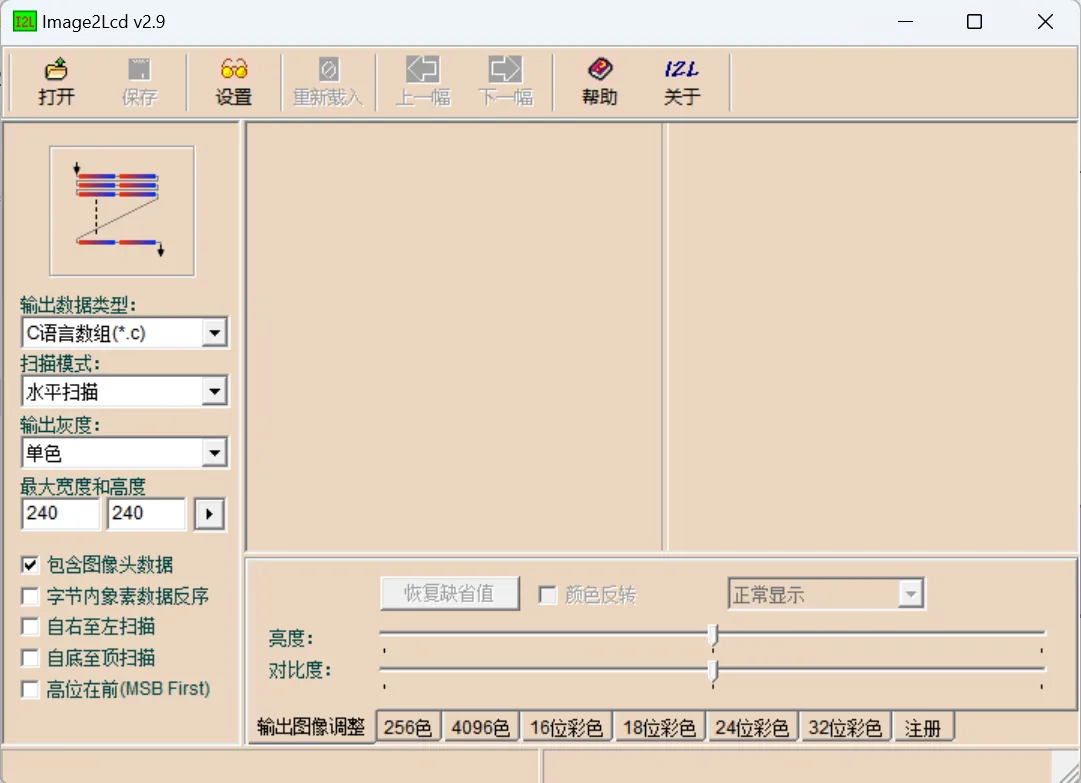
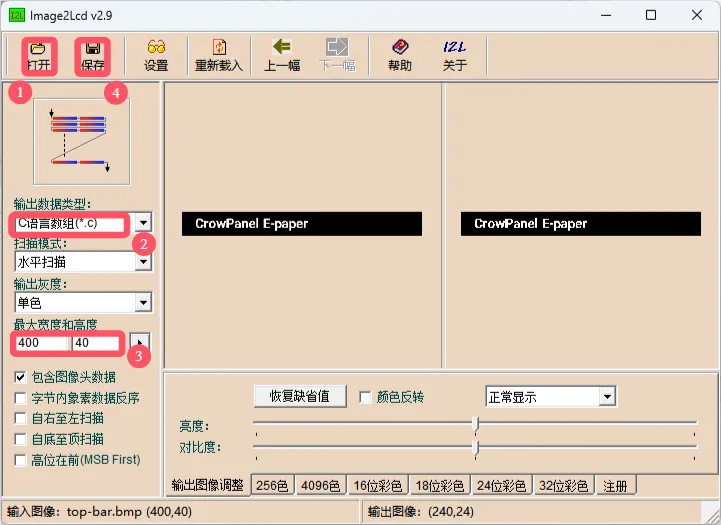
Click open and select top-bar.bmp, convert it to array format.
- Open file
- Output date type: C language array by default
- The biggest width and height: Consistent with the width and height of the image. Note that it must be a multiple of 8, otherwise it cannot be displayed properly
- Save and output
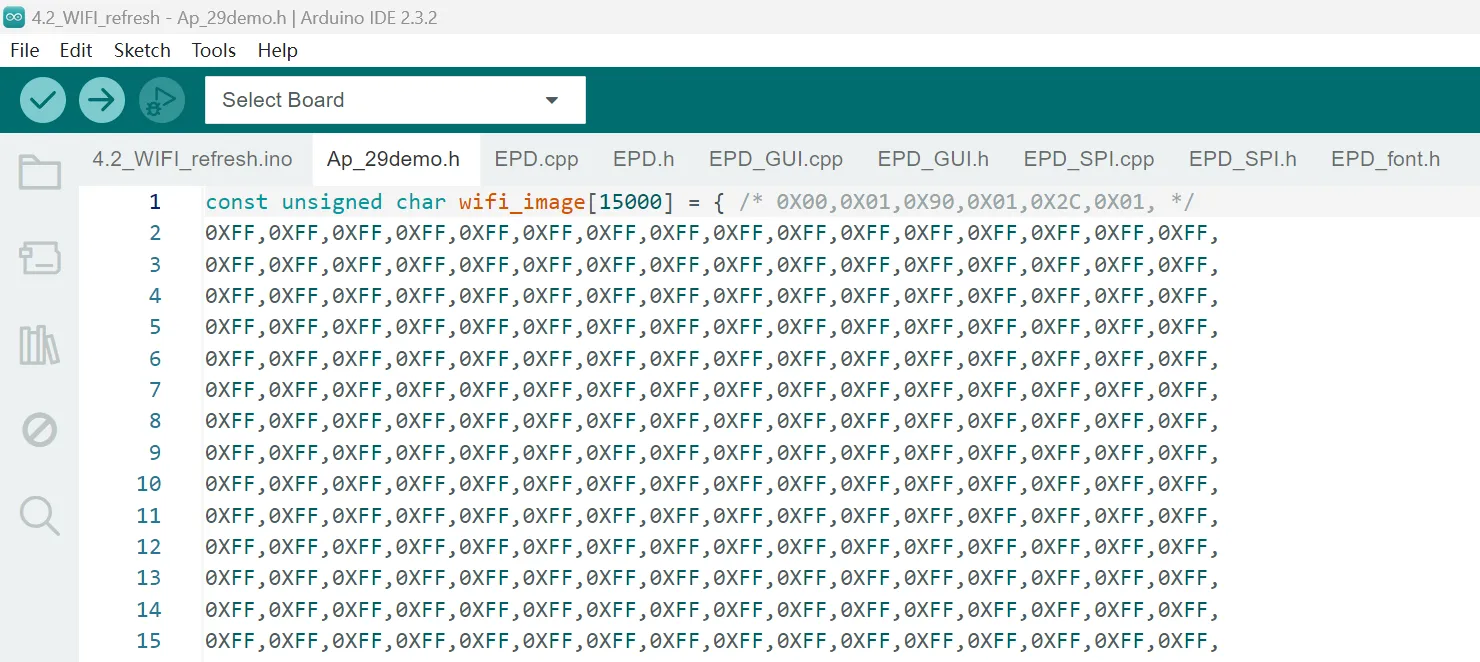
You can put this array in a suitable header file, and I have placed it in Ap_29demo. h here.
-
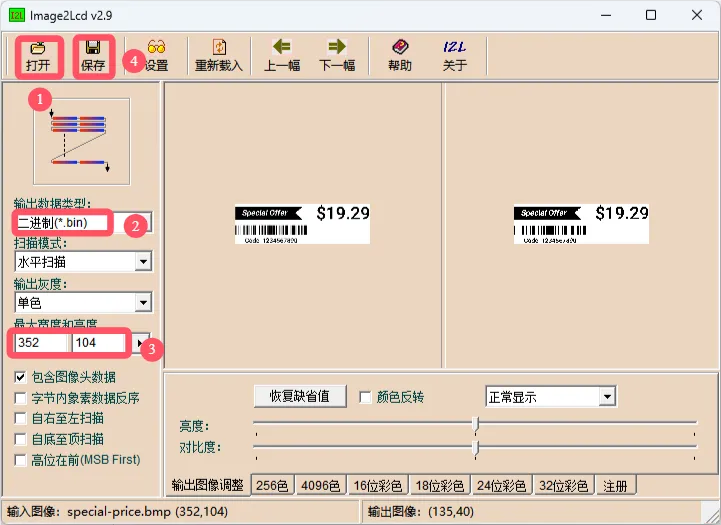
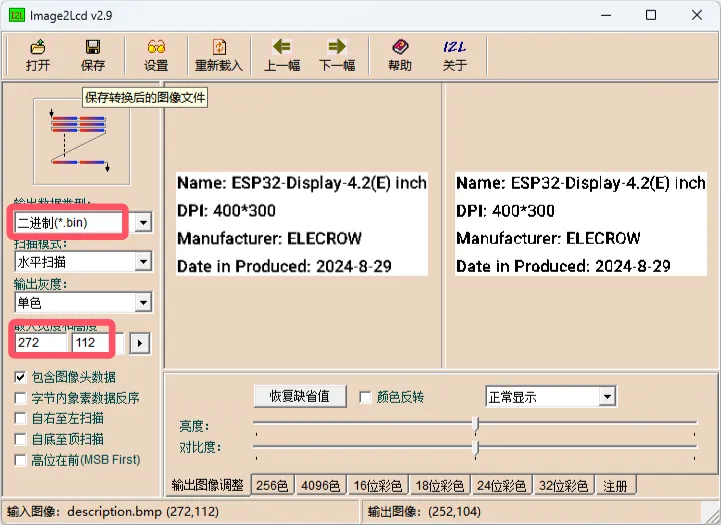
Convert the description pictures and price tag pictures to bin files. These bin files will be used to update prices over WiFi.
- Open the file
- The output type select .bin file
- The width and height should consistent with the width and height of the image. Note that it must be a multiple of 8, otherwise it cannot be displayed properly
- Save the file
Code Explanation
Please click  to download the code file WIFI_refresh.zip for this demo.
Add necessary libraries
#include <Arduino.h>           // Include the Arduino core library
#include "EPD.h"               // Include the EPD library for controlling the electronic ink screen (E-Paper Display)
#include "EPD_GUI.h"           // Include the EPD_GUI library for graphical user interface (GUI) operations
#include "Ap_29demo.h"         // Include the Ap_29demo library, which may be a custom application library
#include <WiFi.h>              // Include the WiFi library for Wi-Fi functionality
#include <Ticker.h>            // Include the Ticker library for timer tasks
#include <WebServer.h>         // Include the WebServer library for creating a web server
#include "FS.h"                // Include the file system library for file operations
#include "SPIFFS.h"            // Include the SPIFFS library for the SPIFFS file system
Define the file variable fsUploadFile Used for accessing files, txt_size and pre_size correspond to the size of the BIN file(Exported in the above steps) for the text label and price label to be transmitted. The image resolution requirement is smaller than the screen resolution and both width and height are multiples of 8.
Note: The size here can be defined based on the size of the images to be transmitted later, otherwise it will cause image transfer failure
UI_price() Function
Check if the file system has saved UI images, and if so, display them.
// UI_price function: Update the price display interface
void UI_price() {
  clear_all();  // Clear all display content
  //
  EPD_ShowPicture(0, 0, EPD_W, 40, background_top, WHITE); // Display the top background image on the screen, with the background color as white

  if (SPIFFS.exists("/txt.bin")) {
    // If the file exists, read the file content
    File file = SPIFFS.open("/txt.bin", FILE_READ);
    if (!file) {
      Serial.println("Failed to open file for reading");
      return;
    }
    // Read data from the file into the array
    size_t bytesRead = file.read(txt_formerly, txt_size);

    Serial.println("File content:");
    while (file.available()) {
      Serial.write(file.read()); // Print the file content
    }
    file.close();

    EPD_ShowPicture(20, 60, 272, 112, txt_formerly, WHITE); // Display the read image on the screen, with the background color as white
    flag_txt = 1; // Set the flag
  }

  if (SPIFFS.exists("/pre.bin")) {
    // If the file exists, read the file content
    File file = SPIFFS.open("/pre.bin", FILE_READ);
    if (!file) {
      Serial.println("Failed to open file for reading");
      return;
    }
    // Read data from the file into the array
    size_t bytesRead = file.read(price_formerly, pre_size);

    Serial.println("File content:");
    while (file.available()) {
      Serial.write(file.read()); // Print the file content
    }
    file.close();

    EPD_ShowPicture(20, 190, 352, 104, price_formerly, WHITE); // Display the read image on the screen, with the background color as white
    flag_pre = 1; // Set the flag
  }

  // Display the image stored in the Image_BW array
  EPD_Display_Part(0, 0, EPD_W, EPD_H, ImageBW);

  EPD_Sleep(); // Enter sleep mode to conserve energy
}
okPage() Function
Receive the bin file sent and determine if it matches the pre-set file size. If it matches, store it in the file system and update the display icon.
// Function to handle file upload requests
void okPage()
{
  server.send(200, "text/html", HTML_OK); // Return the page indicating successful upload
  HTTPUpload &upload = server.upload(); // Get the uploaded file

  // Note: The default size of upload.buf may not be sufficient to handle large files
  // Please refer to the definition of HTTP_UPLOAD_BUFLEN in WebServer.h, adjust the initial size to support large file transfers
  if (upload.status == UPLOAD_FILE_END) // If file upload is complete
  {
    Serial.println("draw file"); // Print debug information: file upload complete
    Serial.println(upload.filename); // Print the uploaded filename
    Serial.println(upload.totalSize); // Print the size of the uploaded file
    if (upload.totalSize == txt_size) // Check if the uploaded file size matches the predefined txt_size
      filename = "txt.bin"; // Set the filename to txt.bin
    else
      filename = "pre.bin"; // Otherwise, set the filename to pre.bin
    if (!filename.startsWith("/")) filename = "/" + filename; // If the filename does not start with '/', add '/' prefix
    fsUploadFile = SPIFFS.open(filename, FILE_WRITE); // Open the file for writing
    fsUploadFile.write(upload.buf, upload.totalSize); // Write the uploaded file data to the file
    fsUploadFile.close(); // Close the file
    Serial.println("Saved successfully"); // Print the message that the save was successful
    Serial.printf("Saved: "); // Print the saved filename
    Serial.println(filename);

    // Copy the uploaded file data to the corresponding buffer array
    if (upload.totalSize == txt_size)
    {
      for (int i = 0; i < txt_size; i++) {
        txt_formerly[i] = upload.buf[i]; // Copy data to txt_formerly
      }
      Serial.println("txt_formerly OK"); // Print the message that txt_formerly has been successfully updated
      flag_txt = 1; // Set the flag_txt to 1
    } else
    {
      for (int i = 0; i < pre_size; i++) {
        price_formerly[i] = upload.buf[i]; // Copy data to price_formerly
      }
      Serial.println(" price_formerly OK"); // Print the message that price_formerly has been successfully updated
      flag_pre = 1; // Set the flag_pre to 1
    }

    clear_all();  // Clear all content on the display

    // Display the background image
    EPD_ShowPicture(0, 0, EPD_W, 40, background_top, WHITE); // Display the background image on the screen, with the background color as white

    if (upload.totalSize != txt_size) // If the uploaded file size does not match txt_size
    {
      if (flag_txt == 1) // If flag_txt is 1
      {
        // Display images from txt_formerly and price_formerly
        EPD_ShowPicture(20, 60, 272, 112, txt_formerly, WHITE); // Display the txt_formerly image
        EPD_ShowPicture(20, 190, 352, 104, price_formerly, WHITE); // Display the price_formerly image
      } else
      {
        // Display only the price_formerly image
        EPD_ShowPicture(20, 190, 352, 104, price_formerly, WHITE); // Display the price_formerly image
      }
    } else
    {
      // When the uploaded file size equals txt_size, process different display content
      if (flag_pre == 1) // If flag_pre is 1
      {
        // Display images from price_formerly and txt_formerly
        EPD_ShowPicture(20, 190, 352, 104, price_formerly, WHITE); // Display the price_formerly image
        EPD_ShowPicture(20, 60, 272, 112, txt_formerly, WHITE); // Display the txt_formerly image
      } else
      {
        // Display only the txt_formerly image
        EPD_ShowPicture(20, 60, 272, 112, txt_formerly, WHITE); // Display the txt_formerly image
      }
    }

    // Quickly display the image stored in the Image_BW array
    EPD_Display_Part(0, 0, EPD_W, EPD_H, ImageBW);

    EPD_Sleep(); // Enter sleep mode
  }
}
Image Refresh Process
-
Initialization
EPD_GPIOInit(); // Initialize the screen GPIO EPD_Clear(); // Clear the screen Paint_NewImage(ImageBW, EPD_W, EPD_H, 0, WHITE); // Create a new canvas, set the canvas to white EPD_Full(WHITE); // Clear the canvas, fill with white EPD_Display_Part(0, 0, EPD_W, EPD_H, ImageBW); // Display the blank canvas EPD_Init_Fast(Fast_Seconds_1_5s); // Initialize the screen, set update speed to 1.5 seconds -
Clear screen
-
Select the data to refresh
-
Update the image to the screen
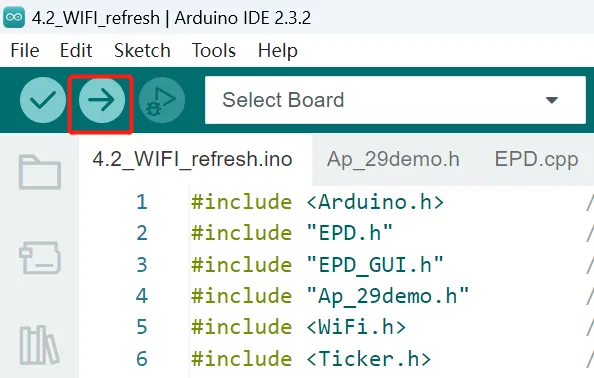
Upload the Code
-
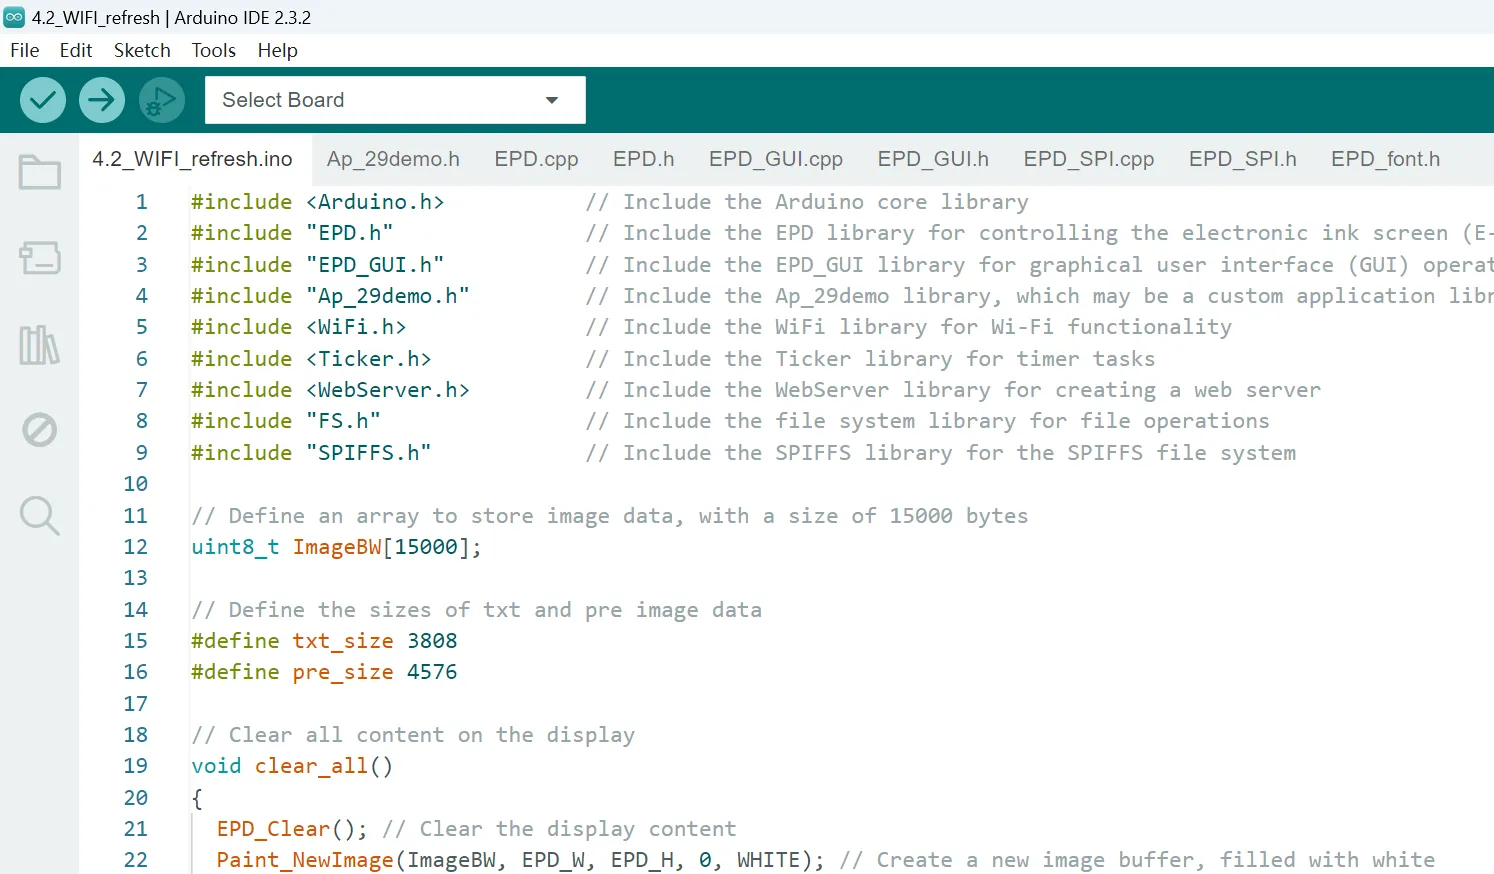
Open the WIFI_refresh.ino
-
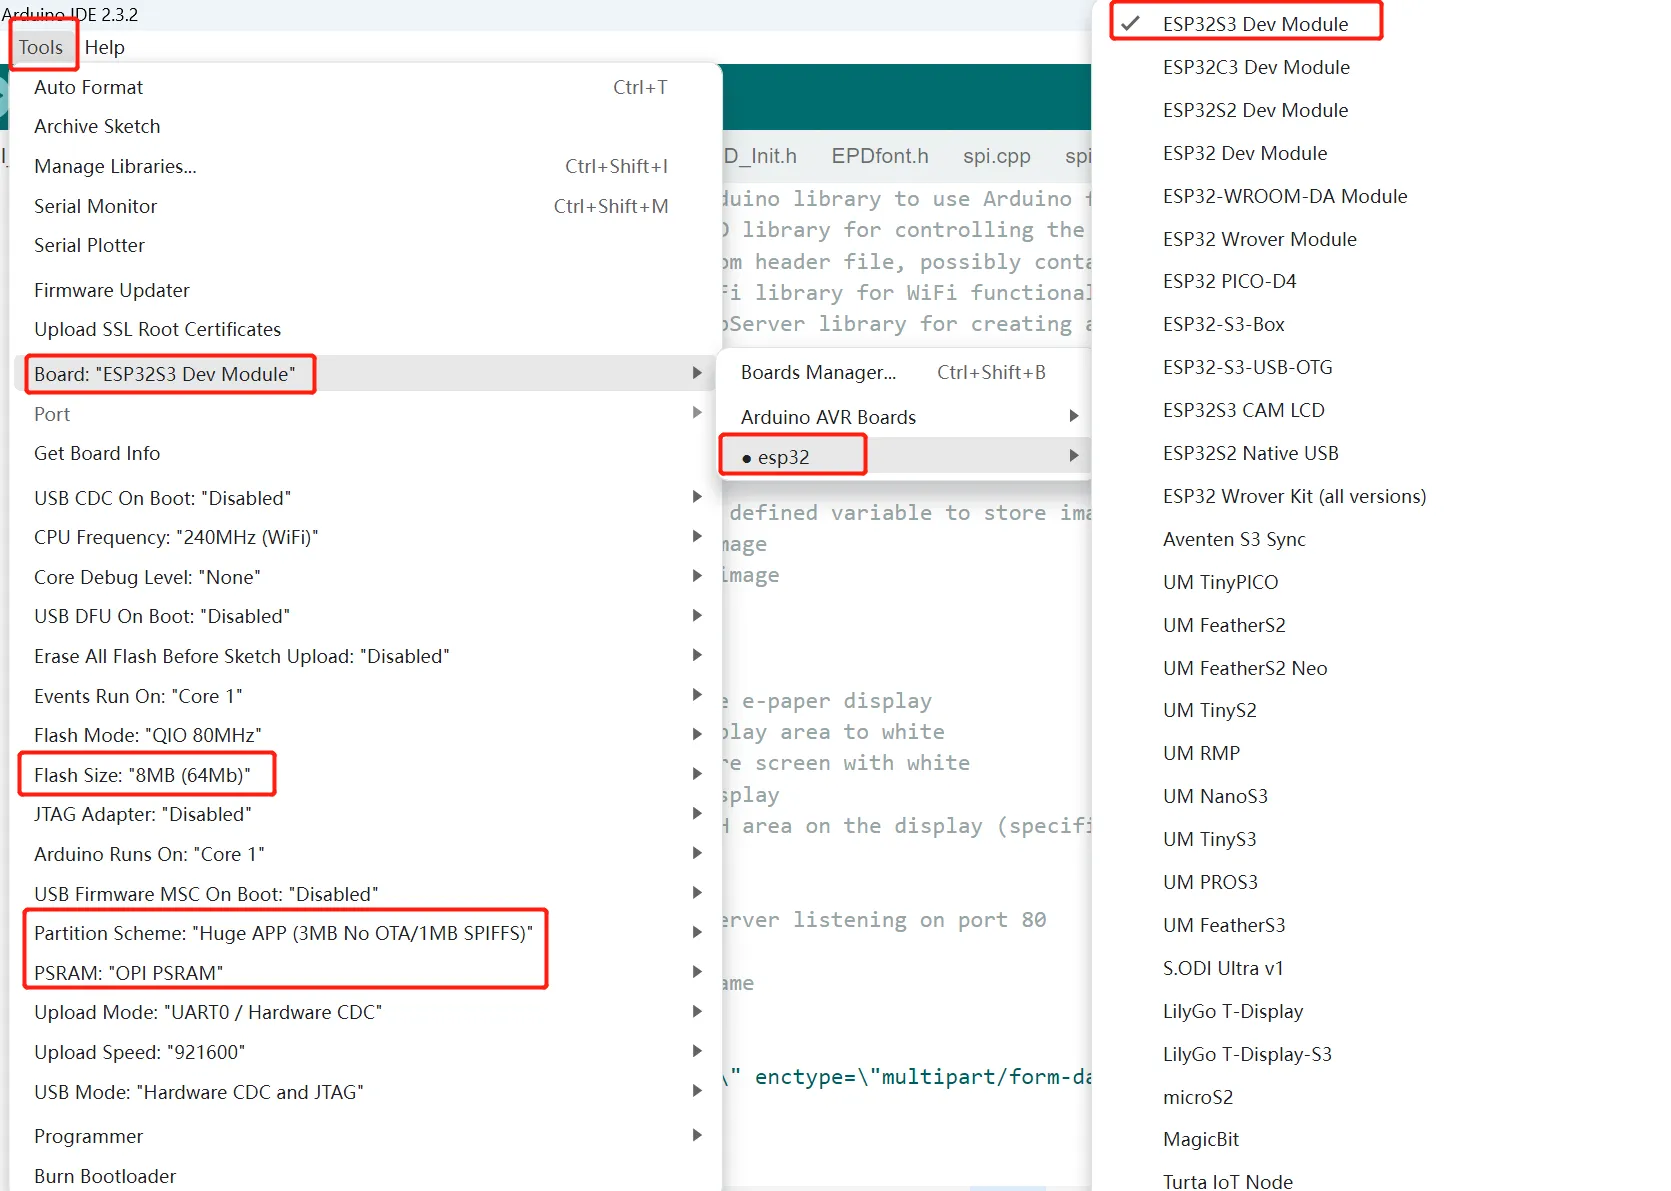
Click "Tools"->"Board"->"esp32"->"ESP32S3 Dev Module", and the "Partition Scheme" select "Huge APP (3MB No OTA/1MB SPIFFS)", "PSRAM" select "OPI PSRAM".
-
Connect CorwPanel to the computer, click on "Tool" and select the corresponding "port".
-
Click "Upload" to upload the code to the board. There will be an image show on the screen.
Update the price tag with WiFi
-
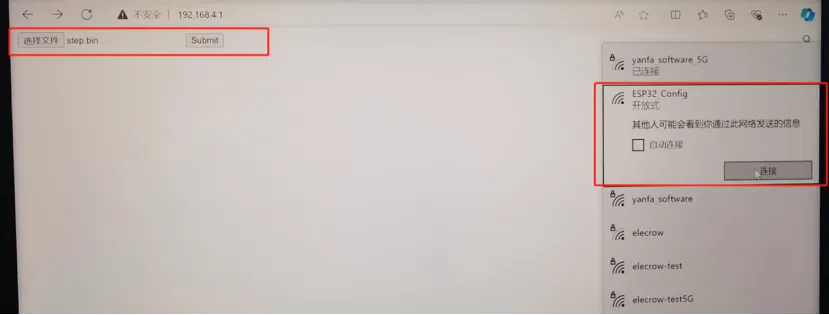
Connect a laptop to the hotspot of the ESP32 E-PAPER display.
-
Enter the IP address 192.168.4.1 in the browser.
-
Select the bin file of the picture you need to show, then click submit.
Note: The size of the images you transfer must be consistent with the size defined in the code, otherwise it will cause image transfer failure
-
After successful transmission, the price and text will be replaced, and the data will be saved in flash.
Update via Bluetooth
Convert the image format
The same as the method in the "Update via WiFi".
Code Explanation
Please click  to download the code file ble_refresh.zip for this demo.
Add necessary libraries
#include <BLEDevice.h>
#include <BLEServer.h>
#include <BLEUtils.h>
#include <BLE2902.h>
#include <Arduino.h>
#include "EPD.h"
#include "EPD_GUI.h"
#include "Ap_29demo.h"
#include "FS.h"           // File system library
#include "SPIFFS.h"       // SPIFFS file system library, for file read/write
Define the file variable fsUploadFile Used for accessing files, txt_size and pre_size correspond to the size of the BIN file(Exported in the above steps) for the text label and price label to be transmitted. The image resolution requirement is smaller than the screen resolution and both width and height are multiples of 8
Note: The size here can be defined based on the size of the images to be transmitted later, otherwise it will cause image transfer failure
ble_pic function
Process the bin file sent and determine if it matches the pre-set file size. If it does, store it in the file system and update the display icon.
// Function: Handle Bluetooth data
void ble_pic()
{
  // Check if data has been received
  if (dataReceived) {
    // If the data buffer is not empty
    if (!dataBuffer.empty()) {
      // Get the size of the data buffer
      size_t bufferSize = dataBuffer.size();
      Serial.println(bufferSize);

      // Determine the filename based on the size of the data buffer
      if (dataBuffer.size() == txt_size) // If the data size equals txt_size
        filename = "txt.bin"; // Filename is txt.bin
      else
        filename = "pre.bin"; // Otherwise, filename is pre.bin

      // Ensure the filename starts with "/"
      if (!filename.startsWith("/")) filename = "/" + filename;

      // Open the file for writing
      fsUploadFile = SPIFFS.open(filename, FILE_WRITE);
      fsUploadFile.write(dataBuffer.data(), dataBuffer.size()); // Write the data
      fsUploadFile.close(); // Close the file

      Serial.println("Saved successfully");
      Serial.printf("Saved: ");
      Serial.println(filename);

      // Update flag_txt or flag_pre based on the size of the data buffer
      if (bufferSize == txt_size) {
        for (int i = 0; i < txt_size; i++) {
          txt_formerly[i] = dataBuffer[i]; // Copy the data to txt_formerly
        }
        Serial.println("txt_formerly OK");
        flag_txt = 1; // Set the flag_txt flag
      } else {
        for (int i = 0; i < pre_size; i++) {
          price_formerly[i] = dataBuffer[i]; // Copy the data to price_formerly
        }
        Serial.println("price_formerly OK");
        flag_pre = 1; // Set the flag_pre flag
      }

      // Clear all display content
      clear_all();

      // Display the background image on the screen
      EPD_ShowPicture(0, 0, EPD_W, 40, wifi_background_top, WHITE);

      // Determine the display content based on the size of the data buffer and the flags
      if (bufferSize != txt_size) {
        if (flag_txt == 1) {
          EPD_ShowPicture(20, 60, 272, 112, txt_formerly, WHITE); // Display txt_formerly
          EPD_ShowPicture(20, 190, 352, 104, price_formerly, WHITE); // Display price_formerly
        } else {
          EPD_ShowPicture(20, 190, 352, 104, price_formerly, WHITE); // Display price_formerly
        }
      } else {
        // If the data size equals txt_size, determine the display content based on flag_pre
        if (flag_pre == 1) {
          EPD_ShowPicture(20, 190, 352, 104, price_formerly, WHITE); // Display price_formerly
          EPD_ShowPicture(20, 60, 272, 112, txt_formerly, WHITE); // Display txt_formerly
        } else {
          EPD_ShowPicture(0, 80, 152, 160, txt_formerly, WHITE); // Display txt_formerly
        }
      }

      // Quickly display the image stored in the Image_BW array
      EPD_Display_Part(0, 0, EPD_W, EPD_H, ImageBW);

      // Enter sleep mode
      EPD_Sleep();

      // Clear the data buffer after writing the data
      dataBuffer.clear();
      // Reset the total number of bytes received
      totalReceivedBytes = 0;

      // Reset the data received flag after processing the data
      dataReceived = false;
    }
  }
}
class MyCallbacks : public BLECharacteristicCallbacks
Receive the data sent and integrate it together. Receiving the "OK" character indicates that the transmission is complete.
// BLE characteristic callback class
class MyCallbacks : public BLECharacteristicCallbacks {
    void onWrite(BLECharacteristic *pCharacteristic) {
        std::string value = pCharacteristic->getValue(); // Get the characteristic value

        if (value.length() > 0) {
            Serial.printf("."); // Output a dot for each data block received

            // Check if the complete data has been received
            if (value == "OK") {
                dataReceived = true; // Set the data received flag
                return;
            }
            // Append the received data to the buffer
            size_t len = value.length(); // Get the data length
            if (len > 0) {
                dataBuffer.insert(dataBuffer.end(), value.begin(), value.end()); // Add data to the buffer
                totalReceivedBytes += len; // Update the total number of bytes received
            }
        }
    }
};
UI_price
Check if the file system has saved UI images, and if so, display them.
// Function: Update the price interface
void UI_price()
{
  // Clear all display content
  clear_all();
  // Display the top background image
  EPD_ShowPicture(0, 0, EPD_W, 40, background_top, WHITE);

  // If the txt.bin file exists, read its content
  if (SPIFFS.exists("/txt.bin")) {
    File file = SPIFFS.open("/txt.bin", FILE_READ);
    if (!file) {
      Serial.println("Failed to open file for reading");
      return;
    }
    // Read data from the file into the array
    size_t bytesRead = file.read(txt_formerly, txt_size);
    Serial.println("File content:");
    while (file.available()) {
      Serial.write(file.read()); // Print the file content
    }
    file.close();

    // Display txt_formerly on the screen
    EPD_ShowPicture(20, 60, 272, 112, txt_formerly, WHITE);
    flag_txt = 1; // Set the flag_txt flag
  }

  // If the pre.bin file exists, read its content
  if (SPIFFS.exists("/pre.bin")) {
    File file = SPIFFS.open("/pre.bin", FILE_READ);
    if (!file) {
      Serial.println("Failed to open file for reading");
      return;
    }
    // Read data from the file into the array
    size_t bytesRead = file.read(price_formerly, pre_size);
    Serial.println("File content:");
    while (file.available()) {
      Serial.write(file.read()); // Print the file content
    }
    file.close();

    // Display price_formerly on the screen
    EPD_ShowPicture(20, 190, 352, 104, price_formerly, WHITE);
    flag_pre = 1; // Set the flag_pre flag
  }

  // Quickly display the image stored in the Image_BW array
  EPD_Display_Part(0, 0, EPD_W, EPD_H, ImageBW);

  // Enter sleep mode
  EPD_Sleep();
}
Image Refresh Process
-
Initialization
EPD_GPIOInit(); // Initialize the EPD (electronic paper display) interface EPD_Clear(); // Clear the EPD screen Paint_NewImage(ImageBW, EPD_W, EPD_H, 0, WHITE); // Create a new image buffer EPD_Full(WHITE); // Clear the canvas EPD_Display_Part(0, 0, EPD_W, EPD_H, ImageBW); // Display a blank image EPD_Init_Fast(Fast_Seconds_1_5s); // Initialize the EPD display speed setting -
Clear screen
-
Select the data to refresh
-
Update the image to the screen
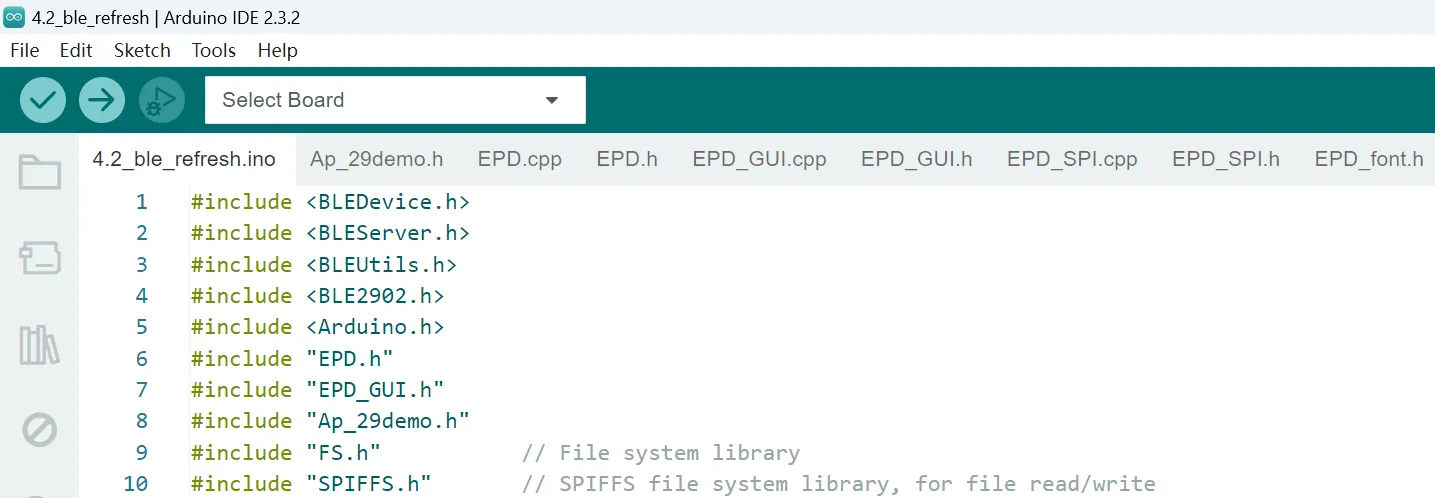
Upload the Code
-
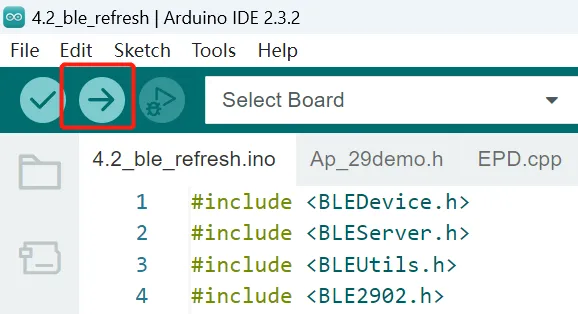
Open the ble_refresh.ino.
-
Click "Tools"->"Board"->"esp32"->"ESP32S3 Dev Module", and the "Partition Scheme" select "Huge APP (3MB No OTA/1MB SPIFFS)", "PSRAM" select "OPI PSRAM".
-
Connect CorwPanel to the computer, click on "Tool" and select the corresponding "port".
-
Click "Upload" to upload the code to the board. There will be an image show on the screen.
Update the images via bluetooth
-
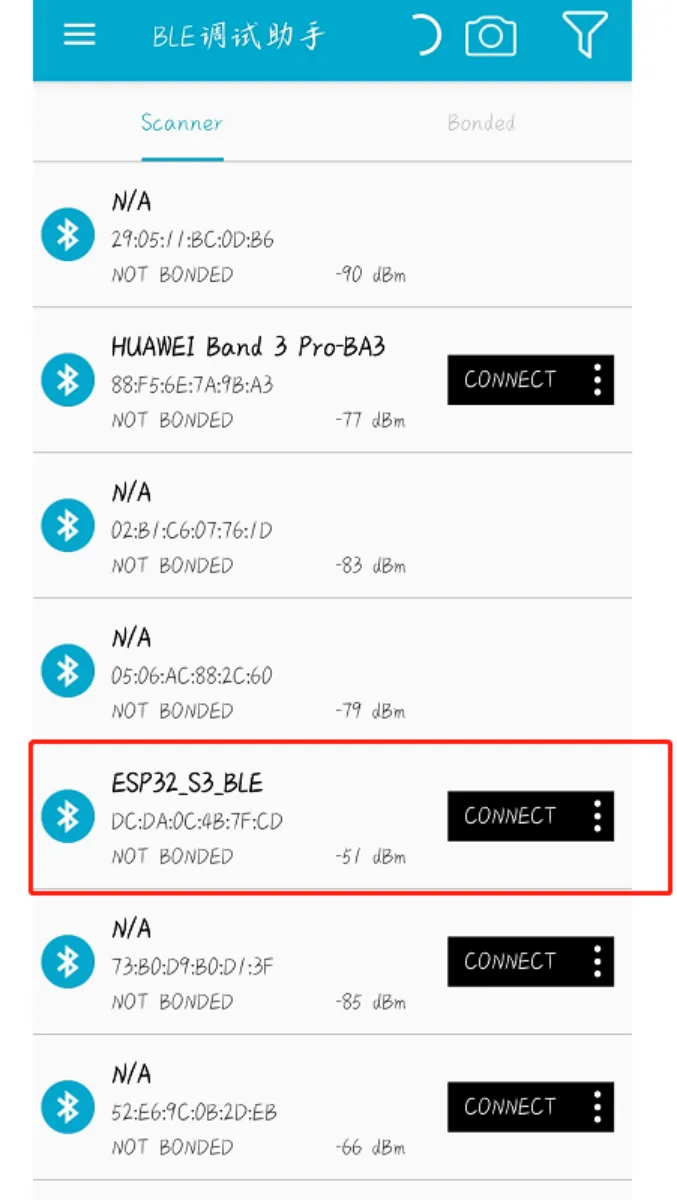
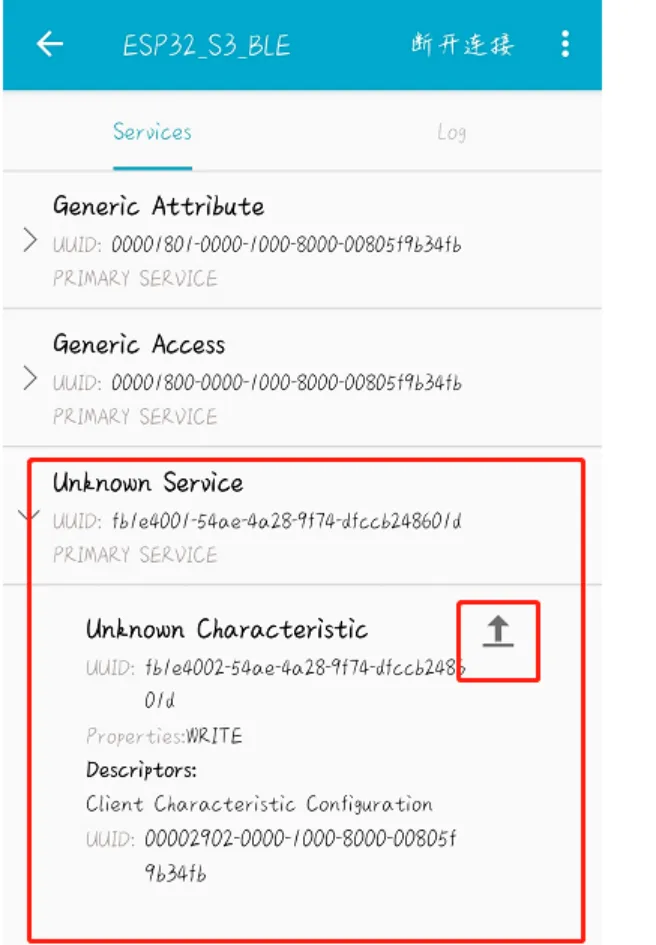
Download a BLE debugging assistant to your phone, and connect it your phone to the screen device BLE.
-
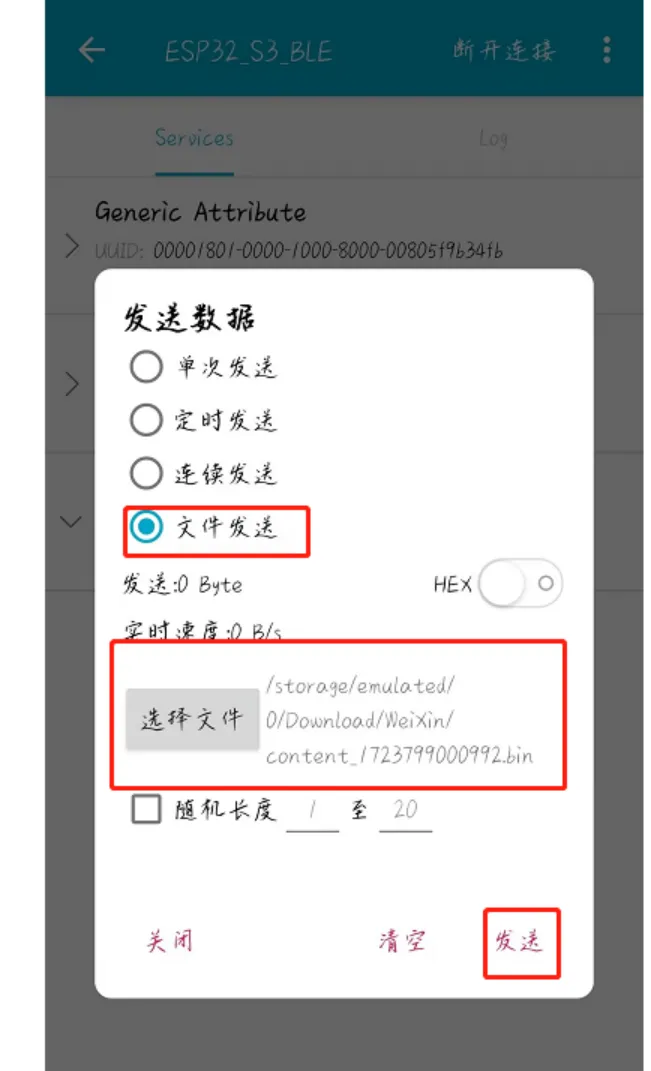
Upload the bin file(Save the bin file to your phone in advance).
Note: The size of the images you transfer must be consistent with the size defined in the code, otherwise it will cause image transfer failure
-
After successful transmission, the price and text will be replaced, and the data will be saved in flash.
Demo 2 Weather Station
Obtain weather information through OpenWeather and display the information on the CrowPanel.
Convert the image format
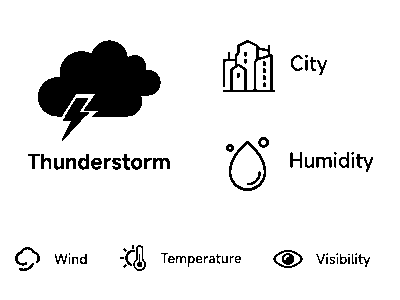
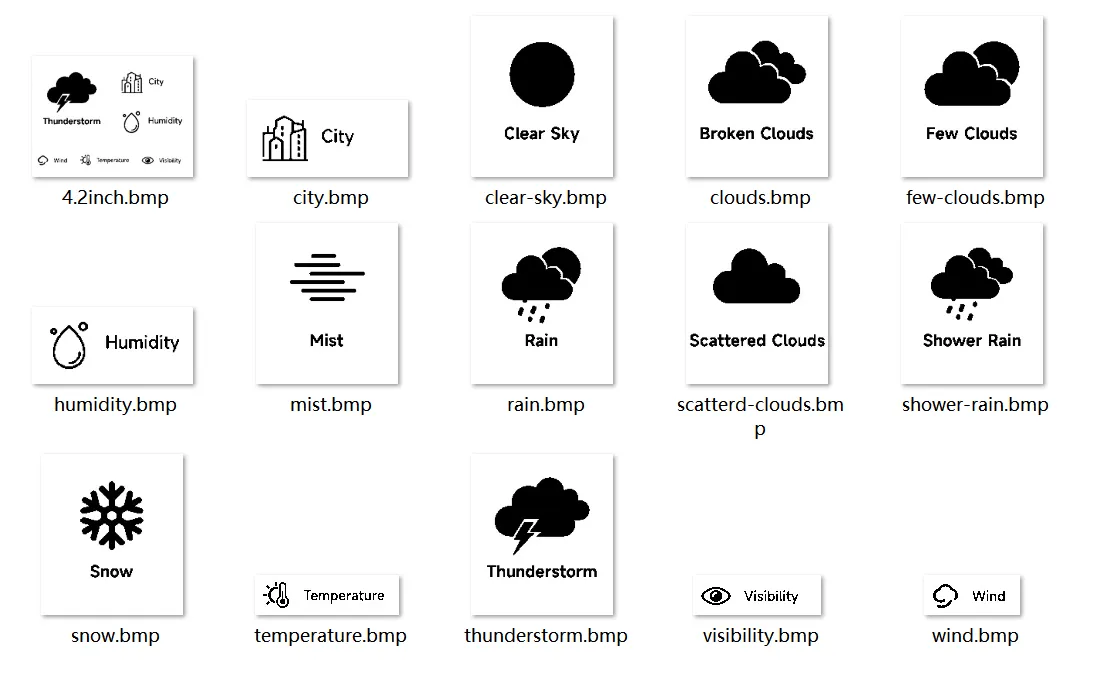
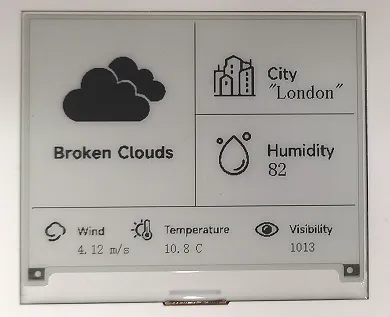
First, let's take a look at the weather information panel we design in this example, which is divided into 6 parts(all are images).
- weather icon
- city
- humidity
- wind
- temperature
-
visibility
-
We need to convert the images of these 6 parts into C arrays and put them in the code, and combine them to form the UI interface above.
-
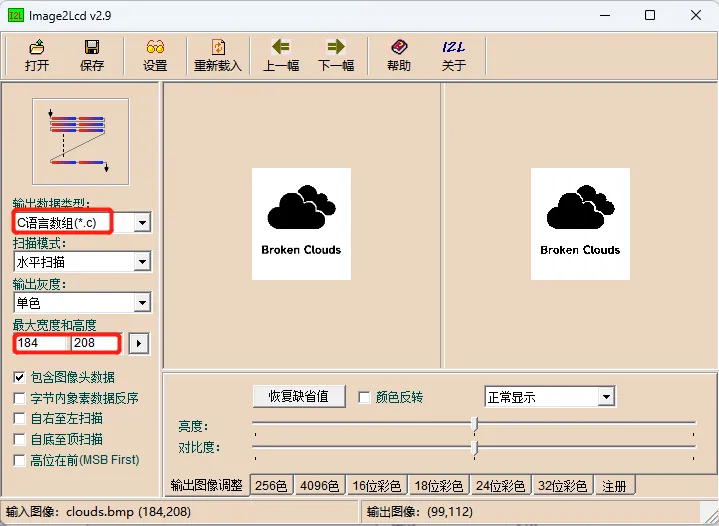
Click open and select the images, convert them to array format.
- Open file
- Output date type: C language array by default
- The biggest width and height: Consistent with the width and height of the image. Note that it must be a multiple of 8, otherwise it cannot be displayed properly
- Save and output
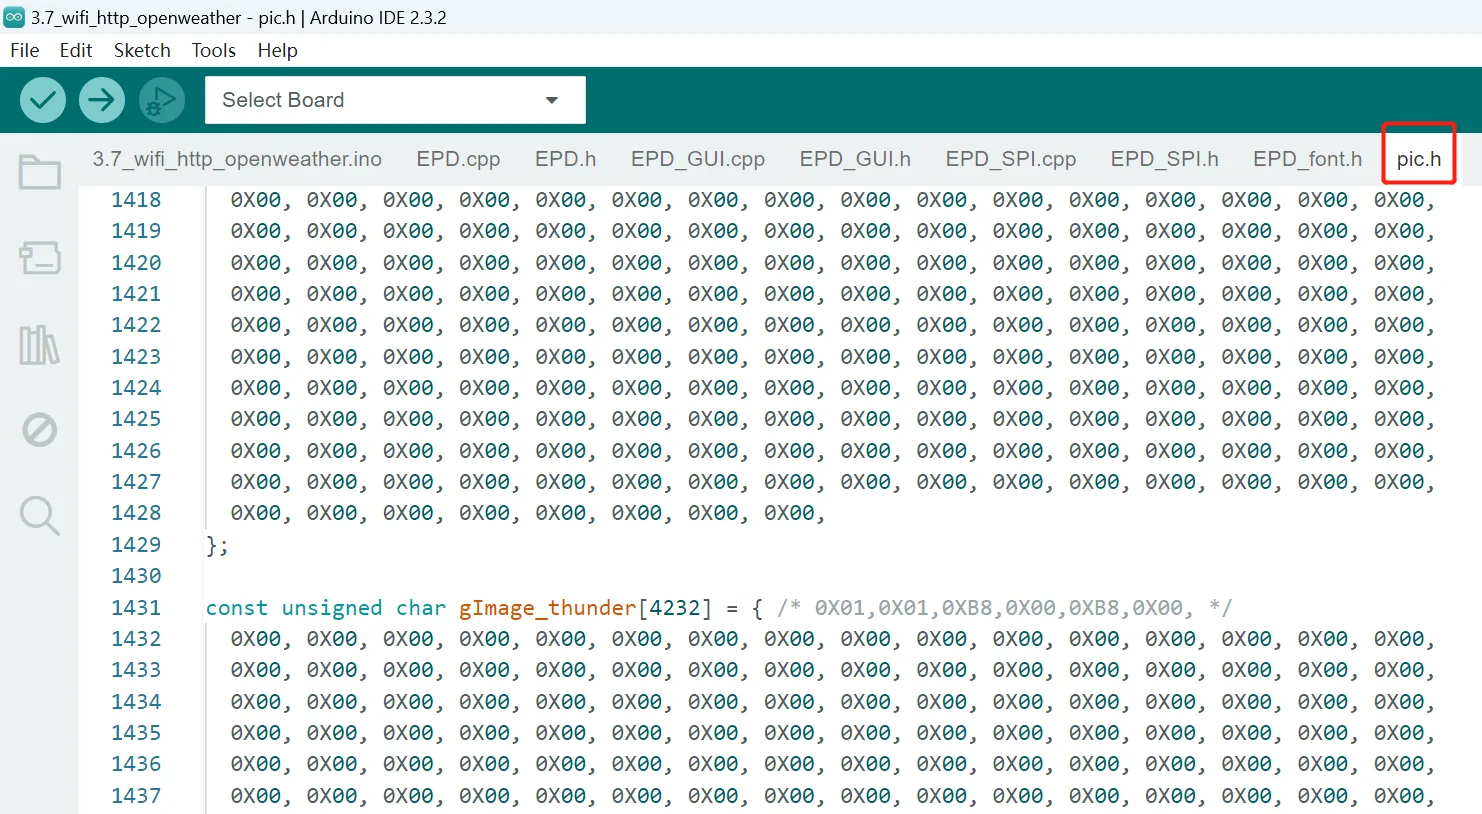
You can put this array in a suitable header file, and I have placed it in pic. h here.
Register an OpenWeather account
-
Enter https://openweathermap.org/ and click "Sing in" to register an OpenWeather account.
-
Log in your account.
-
Click your user name -> "My API Keys" to find your API key.
Code Explanation
Please click  to download the code file wifi_http_openweather.zip for this demo.
Add libraries
#include <WiFi.h>
#include <HTTPClient.h>
#include <Arduino_JSON.h>
#include "EPD.h"  // Include the EPD library for controlling the electronic ink screen (E-Paper Display)
#include "EPD_GUI.h"  // Include the EPD_GUI library for graphical user interface (GUI) operations
#include "pic.h"
Modify your information
const char* ssid = " ";       // Enter your ssid
const char* password = " ";     // Enter your WiFi password

// OpenWeatherMap API key
String openWeatherMapApiKey = "You-API"; //Enter your API key
// For example: String openWeatherMapApiKey = "bd939aa3d23ff33d3c8f5dd1dd435";

// Replace with city and country code you're in
String city = "London";                    // City Name
String countryCode = "2643743";            // Country Code
Country Code
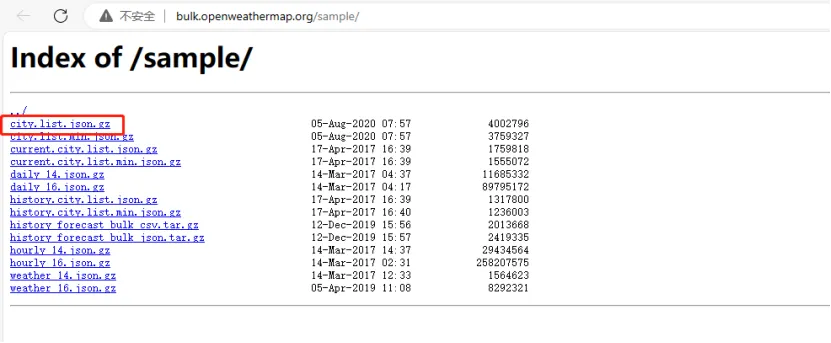
You can find the country code at: http://bulk.openweathermap.org/sample/
Function Explanation
js_analysis
This function is mainly used to parse the received JSON data, process these data separately, and save them in variables.
// Function js_analysis is used to parse weather data and update weather information
void js_analysis()
{
  // Check if WiFi is connected successfully
  if (WiFi.status() == WL_CONNECTED) {
    // Build the OpenWeatherMap API request URL
    String serverPath = "http://api.openweathermap.org/data/2.5/weather?q=" + city + "," + countryCode + "&APPID=" + openWeatherMapApiKey + "&units=metric";

    // Loop until a successful HTTP response code of 200 is received
    while (httpResponseCode != 200)
    {
      // Send an HTTP GET request and get JSON data
      jsonBuffer = httpGETRequest(serverPath.c_str());
      Serial.println(jsonBuffer); // Print the retrieved JSON data
      myObject = JSON.parse(jsonBuffer); // Parse the JSON data

      // Check if the JSON data was parsed successfully
      if (JSON.typeof(myObject) == "undefined") {
        Serial.println("Parsing input failed!"); // If parsing fails, print error message and exit
        return;
      }
      delay(2000); // Wait 2 seconds
    }

    // Extract weather information from the JSON data
    weather = JSON.stringify(myObject["weather"][0]["main"]); // Get the main weather description
    temperature = JSON.stringify(myObject["main"]["temp"]); // Get the temperature
    humidity = JSON.stringify(myObject["main"]["humidity"]); // Get the humidity
    sea_level = JSON.stringify(myObject["main"]["sea_level"]); // Get the sea level pressure
    wind_speed = JSON.stringify(myObject["wind"]["speed"]); // Get the wind speed
    city_js = JSON.stringify(myObject["name"]); // Get the city name

    // Print the extracted weather information
    Serial.print("String weather: ");
    Serial.println(weather);
    Serial.print("String Temperature: ");
    Serial.println(temperature);
    Serial.print("String humidity: ");
    Serial.println(humidity);
    Serial.print("String sea_level: ");
    Serial.println(sea_level);
    Serial.print("String wind_speed: ");
    Serial.println(wind_speed);
    Serial.print("String city_js: ");
    Serial.println(city_js);

    // Set the weather flag based on the weather description
    if (weather.indexOf("clouds") != -1 || weather.indexOf("Clouds") != -1 ) {
      weather_flag = 1; // Cloudy weather
    } else if (weather.indexOf("clear sky") != -1 || weather.indexOf("Clear sky") != -1) {
      weather_flag = 3; // Clear sky
    } else if (weather.indexOf("rain") != -1 || weather.indexOf("Rain") != -1) {
      weather_flag = 5; // Rainy weather
    } else if (weather.indexOf("thunderstorm") != -1 || weather.indexOf("Thunderstorm") != -1) {
      weather_flag = 2; // Thunderstorm weather
    } else if (weather.indexOf("snow") != -1 || weather.indexOf("Snow") != -1) {
      weather_flag = 4; // Snowy weather
    } else if (weather.indexOf("mist") != -1 || weather.indexOf("Mist") != -1) {
      weather_flag = 0; // Mist
    }
  }
  else {
    Serial.println("WiFi Disconnected"); // If WiFi is not connected, print error message
  }
}

// Function httpGETRequest sends an HTTP GET request and returns the response content
String httpGETRequest(const char* serverName) {
  WiFiClient client; // Create a WiFi client object
  HTTPClient http; // Create an HTTP client object

  // Initialize the HTTP request with the specified URL
  http.begin(client, serverName);

  // Send the HTTP GET request
  httpResponseCode = http.GET(); // Get the HTTP response code

  String payload = "{}"; // Default response content is an empty JSON object

  // Check if the HTTP response code is greater than 0 (indicating success)
  if (httpResponseCode > 0) {
    Serial.print("HTTP Response code: ");
    Serial.println(httpResponseCode); // Print the HTTP response code
    payload = http.getString(); // Get the response content
  }
  else {
    Serial.print("Error code: ");
    Serial.println(httpResponseCode); // Print the error code
  }
  // Free the HTTP client resources
  http.end();

  return payload; // Return the response content
}
UI_weather_forecast
Display the processed data saved in the variable on the screen.
// Display weather forecast information
void UI_weather_forecast()
{
  // Create character arrays to store information
  char buffer[40];

  EPD_GPIOInit();  // Initialize the screen GPIO
  EPD_Clear();  // Clear the screen
  Paint_NewImage(ImageBW, EPD_W, EPD_H, 0, WHITE);  // Create a new canvas, set the canvas to white
  EPD_Full(WHITE);  // Clear the canvas, fill with white
  EPD_Display_Part(0, 0, EPD_W, EPD_H, ImageBW);  // Display a blank canvas

  EPD_Init_Fast(Fast_Seconds_1_5s);  // Initialize the screen, set update speed to 1.5 seconds

  // Display weather-related icons and information
  EPD_ShowPicture(7, 10, 184, 208, Weather_Num[weather_flag], WHITE);
  EPD_ShowPicture(205, 22, 184, 88, gImage_city, WHITE);
  EPD_ShowPicture(6, 238, 96, 40, gImage_wind, WHITE);
  EPD_ShowPicture(205, 120, 184, 88, gImage_hum, WHITE);
  EPD_ShowPicture(112, 238, 144, 40, gImage_tem, WHITE);
  EPD_ShowPicture(265, 238, 128, 40, gImage_visi, WHITE);

  // Draw partition lines
  EPD_DrawLine(0, 230, 400, 230, BLACK); // Draw horizontal line
  EPD_DrawLine(200, 0, 200, 230, BLACK); // Draw vertical line
  EPD_DrawLine(200, 115, 400, 115, BLACK); // Draw horizontal line

  // Display city name
  memset(buffer, 0, sizeof(buffer));
  snprintf(buffer, sizeof(buffer), "%s ", city_js); // Format the updated city as a string
  EPD_ShowString(290, 74, buffer, 24, BLACK); // Display city name

  // Display temperature
  memset(buffer, 0, sizeof(buffer));
  snprintf(buffer, sizeof(buffer), "%s C", temperature); // Format the updated temperature as a string
  EPD_ShowString(160, 273, buffer, 16, BLACK); // Display temperature

  // Display humidity
  memset(buffer, 0, sizeof(buffer));
  snprintf(buffer, sizeof(buffer), "%s ", humidity); // Format the humidity as a string
  EPD_ShowString(290, 171, buffer, 16, BLACK); // Display humidity

  // Display wind speed
  memset(buffer, 0, sizeof(buffer));
  snprintf(buffer, sizeof(buffer), "%s m/s", wind_speed); // Format the wind speed as a string
  EPD_ShowString(54, 273, buffer, 16, BLACK); // Display wind speed

  // Display sea level pressure
  memset(buffer, 0, sizeof(buffer));
  snprintf(buffer, sizeof(buffer), "%s ", sea_level); // Format the sea level pressure as a string
  EPD_ShowString(316, 273, buffer, 16, BLACK); // Display sea level pressure

  // Update the e-ink display content
  EPD_Display_Part(0, 0, EPD_W, EPD_H, ImageBW); // Refresh the screen display

  EPD_Sleep(); // Enter sleep mode to save energy
}
Upload the Code
-
Double click the wifi_http_openweather.ino.
-
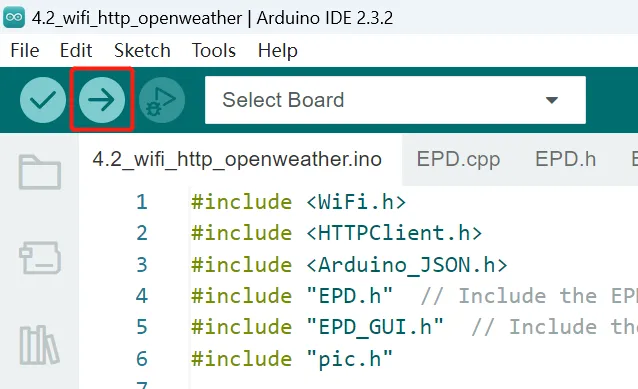
Click "Tools"->"Board"->"esp32"->"ESP32S3 Dev Module", and the "Partition Scheme" select "Huge APP (3MB No OTA/1MB SPIFFS)", "PSRAM" select "OPI PSRAM".
-
Connect CorwPanel to the computer, click on "Tool" and select the corresponding "port".
-
Click "Upload" to upload the code to the board. There will be an image show on the screen.
-
After downloading, the weather information for the city you have selected will be displayed on CrowPanel.
Examples for the CrowPanel Interfaces
Please click  to download the code file for the examples.
Example 1 Control the GPIO
-
Open the GPIO.ino.
-
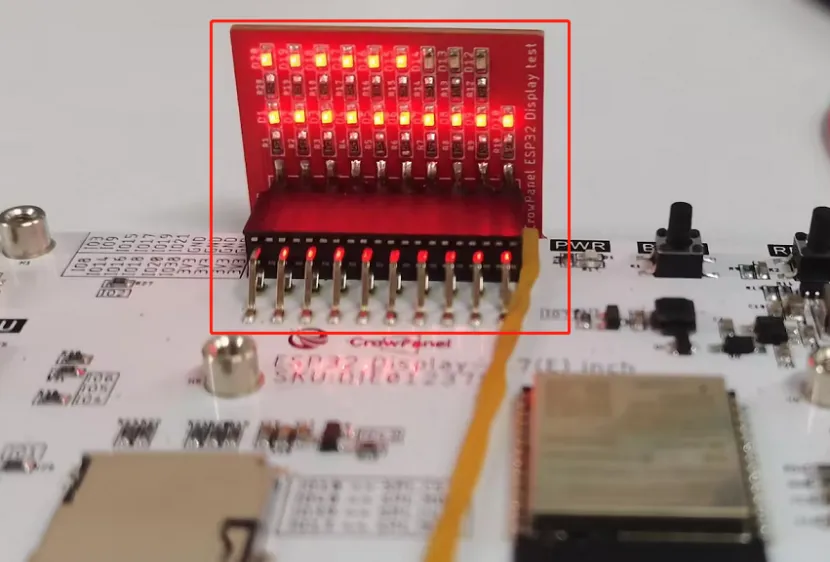
Connect the LED to the GPIO pins.
-
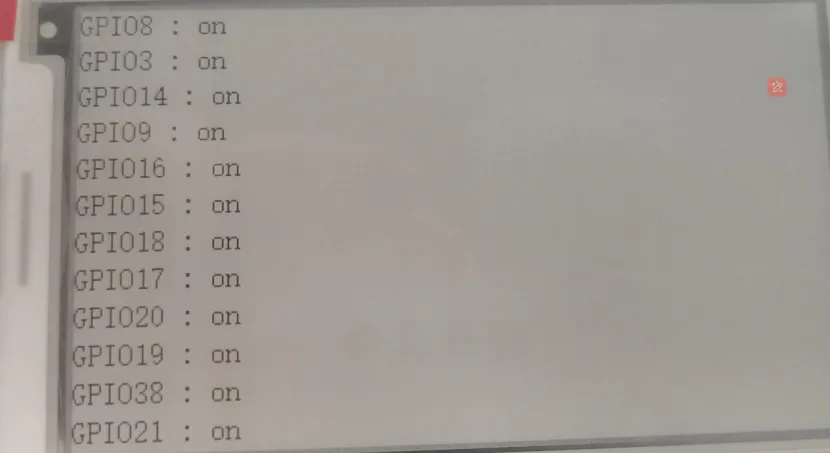
Upload the code to the CrowPanel. The LEDs will turn on, and the status of the GPIO will show on the screen.
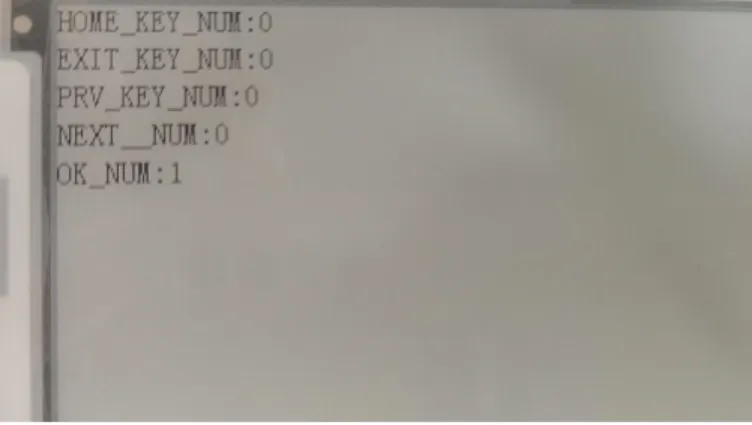
Example 2 Count the times of pressing the keys
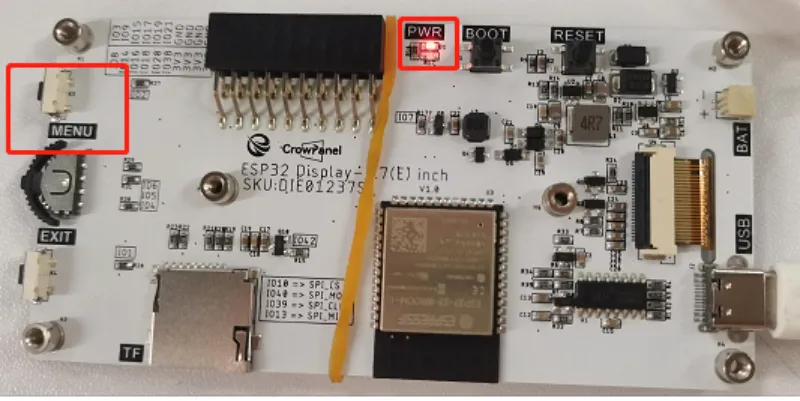
Example 3 Control PWR LED with menu Key
-
Open the PWR.ino
-
Upload the code to the CrowPanel.
-
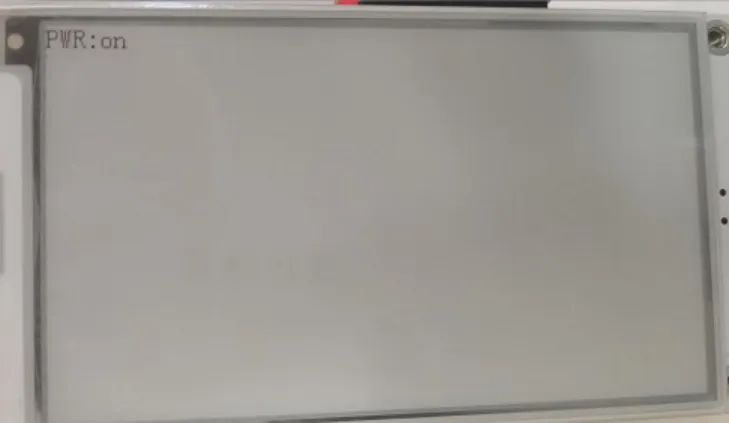
Press the menu key and the PWR LED will turn on/off.
Example 4 Initialize SD card
-
Open TF.ino
-
Insert the TF card to the card slot.
-
Upload the code to the CrowPanel.
-
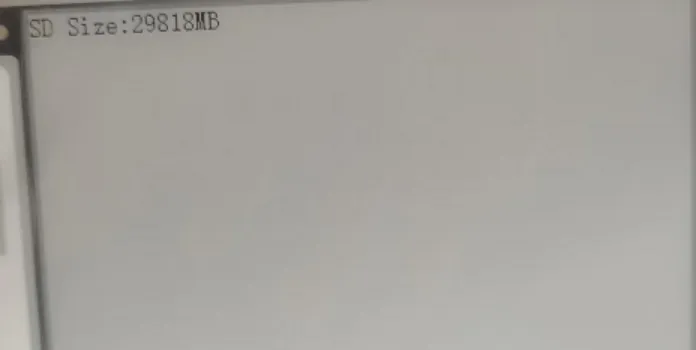
The size of the TF card will show on the screen.
Example 5 Connect Bluetooth
-
Open BLE.ino
-
Upload the code to the CrowPanel.
-
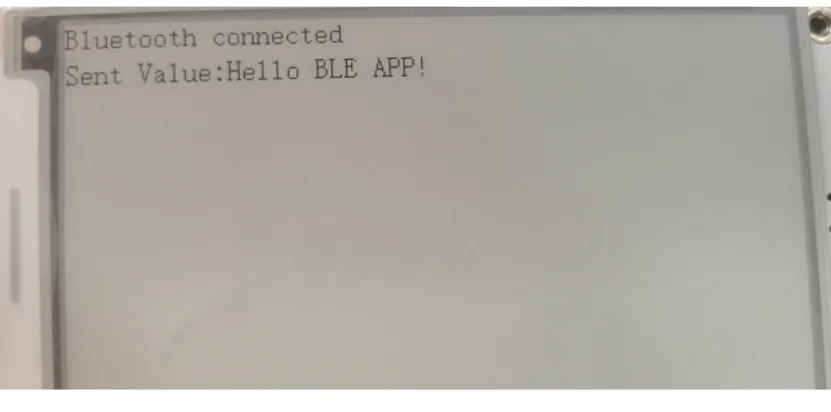
After the blutooth is connected, the screen will show:
Example 6 Connect WiFi
-
Open wifi.ino
-
Modify your ssid and password
-
Upload the code to the CrowPanel.
-
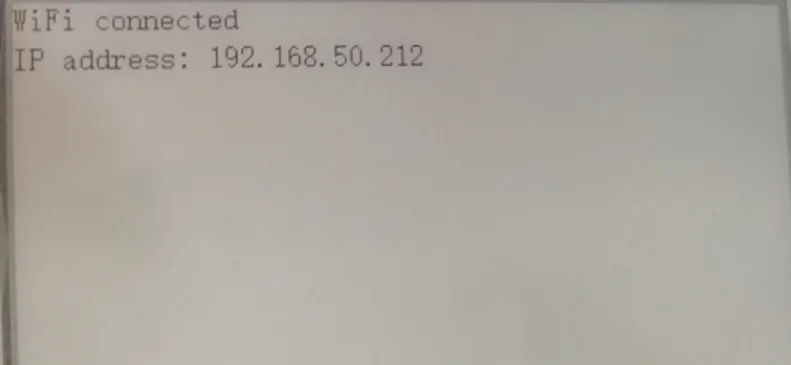
After the WiFi is connected, the screen will show:
Example 7 Refresh image
This example will demonstrate two scenarios: refreshing full screen images and non full screen images.
- Full screen image: The resolution of the image is the same as the screen
- Non full screen image: The image resolution is lower than the screen resolution


